Swift Owner's Handbook - Swift Group
Swift Owner's Handbook - Swift Group
Swift Owner's Handbook - Swift Group
- No tags were found...

You also want an ePaper? Increase the reach of your titles
YUMPU automatically turns print PDFs into web optimized ePapers that Google loves.
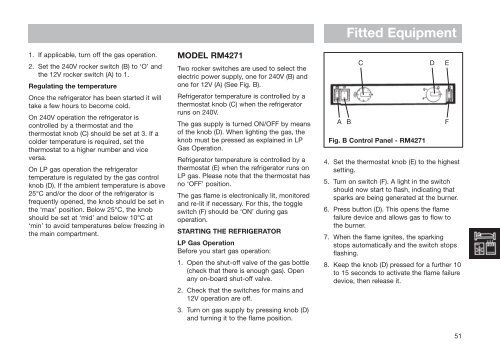
1. If applicable, turn off the gas operation.2. Set the 240V rocker switch (B) to ‘O’ andthe 12V rocker switch (A) to 1.Regulating the temperatureOnce the refrigerator has been started it willtake a few hours to become cold.On 240V operation the refrigerator iscontrolled by a thermostat and thethermostat knob (C) should be set at 3. If acolder temperature is required, set thethermostat to a higher number and viceversa.On LP gas operation the refrigeratortemperature is regulated by the gas controlknob (D). If the ambient temperature is above25°C and/or the door of the refrigerator isfrequently opened, the knob should be set inthe ‘max’ position. Below 25°C, the knobshould be set at ‘mid’ and below 10°C at‘min’ to avoid temperatures below freezing inthe main compartment.MODEL RM4271Two rocker switches are used to select theelectric power supply, one for 240V (B) andone for 12V (A) (See Fig. B).Refrigerator temperature is controlled by athermostat knob (C) when the refrigeratorruns on 240V.The gas supply is turned ON/OFF by meansof the knob (D). When lighting the gas, theknob must be pressed as explained in LPGas Operation.Refrigerator temperature is controlled by athermostat (E) when the refrigerator runs onLP gas. Please note that the thermostat hasno ‘OFF’ position.The gas flame is electronically lit, monitoredand re-lit if necessary. For this, the toggleswitch (F) should be ‘ON’ during gasoperation.STARTING THE REFRIGERATORLP Gas OperationBefore you start gas operation:1. Open the shut-off valve of the gas bottle(check that there is enough gas). Openany on-board shut-off valve.2. Check that the switches for mains and12V operation are off.3. Turn on gas supply by pressing knob (D)and turning it to the flame position.A BFitted EquipmentC D EFig. B Control Panel - RM4271F4. Set the thermostat knob (E) to the highestsetting.5. Turn on switch (F). A light in the switchshould now start to flash, indicating thatsparks are being generated at the burner.6. Press button (D). This opens the flamefailure device and allows gas to flow tothe burner.7. When the flame ignites, the sparkingstops automatically and the switch stopsflashing.8. Keep the knob (D) pressed for a further 10to 15 seconds to activate the flame failuredevice, then release it.51