Swift Owner's Handbook - Swift Group
Swift Owner's Handbook - Swift Group
Swift Owner's Handbook - Swift Group
- No tags were found...

You also want an ePaper? Increase the reach of your titles
YUMPU automatically turns print PDFs into web optimized ePapers that Google loves.
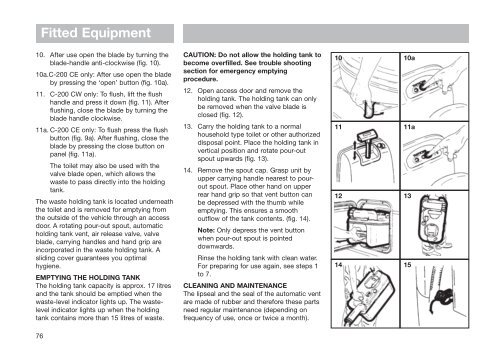
Fitted Equipment10. After use open the blade by turning theblade-handle anti-clockwise (fig. 10).10a.C-200 CE only: After use open the bladeby pressing the ‘open’ button (fig. 10a).11. C-200 CW only: To flush, lift the flushhandle and press it down (fig. 11). Afterflushing, close the blade by turning theblade handle clockwise.11a. C-200 CE only: To flush press the flushbutton (fig. 9a). After flushing, close theblade by pressing the close button onpanel (fig. 11a).The toilet may also be used with thevalve blade open, which allows thewaste to pass directly into the holdingtank.The waste holding tank is located underneaththe toilet and is removed for emptying fromthe outside of the vehicle through an accessdoor. A rotating pour-out spout, automaticholding tank vent, air release valve, valveblade, carrying handles and hand grip areincorporated in the waste holding tank. Asliding cover guarantees you optimalhygiene.EMPTYING THE HOLDING TANKThe holding tank capacity is approx. 17 litresand the tank should be emptied when thewaste-level indicator lights up. The wastelevelindicator lights up when the holdingtank contains more than 15 litres of waste.CAUTION: Do not allow the holding tank tobecome overfilled. See trouble shootingsection for emergency emptyingprocedure.12. Open access door and remove theholding tank. The holding tank can onlybe removed when the valve blade isclosed (fig. 12).13. Carry the holding tank to a normalhousehold type toilet or other authorizeddisposal point. Place the holding tank invertical position and rotate pour-outspout upwards (fig. 13).14. Remove the spout cap. Grasp unit byupper carrying handle nearest to pouroutspout. Place other hand on upperrear hand grip so that vent button canbe depressed with the thumb whileemptying. This ensures a smoothoutflow of the tank contents. (fig. 14).Note: Only depress the vent buttonwhen pour-out spout is pointeddownwards.Rinse the holding tank with clean water.For preparing for use again, see steps 1to 7.CLEANING AND MAINTENANCEThe lipseal and the seal of the automatic ventare made of rubber and therefore these partsneed regular maintenance (depending onfrequency of use, once or twice a month).10 10a11 11a12 1314 1576