Tail Rotor Driveshaft Hanger
Tail Rotor Driveshaft Hanger
Tail Rotor Driveshaft Hanger
- No tags were found...

You also want an ePaper? Increase the reach of your titles
YUMPU automatically turns print PDFs into web optimized ePapers that Google loves.
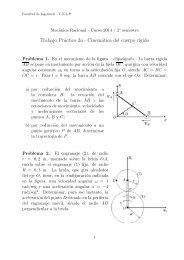
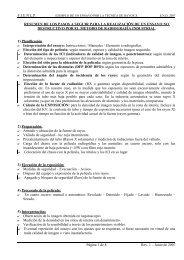
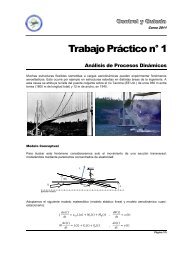
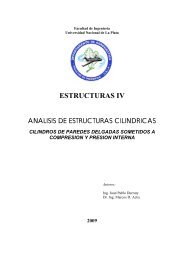
BHT-212-CR&O--{-gym2 CAUTIONIN ORDER TO PREVENTCONTAMINATION OF THE TEMP-PLATES ADHESIVE BACKING,ENSURE THAT WORK AREA ANDHANDS ARE THOROUGHLYCLEANED BEFORE WORKINGWITH TEMP-PLATES.DO NOT PRESS OR RUB THETEMP-PLATES WITH BAREFINGERS DURING INSTALLATIONON THE COUPLING AS THIS WILLCONTAMINATE THE SURFACES.APPLY EPOXY COATING TO THETEMP-PLATES IMMEDIATELYFOLLOWING INSTALLATION OFTHE TEMP-PLATES ONCOUPLING.m0m5. Carefully prebend the temperatureindicator TEMP-PLATES to match the Vcontour of coupling surface. Do not creasethe TEMP-PLATES sharply.NOTEWorking one TEMP-PLATE at atime, repeat steps 6 and 7 until allTEMP-PLATES are installed oncoupling.6. Remove protective backing from theTEMP-PLATE and carefully position onto thesurface prepared in step 2.7. Using a clean cloth or cotton swab, workthe TEMP-PLATE into the contour of thecoupling. A thoroughly cleaned firm rubber(edge of a block type eraser) workaid may beutilized to work TEMP-PLATE into full contactwith the coupling surface. Ensure the TEMP-PLATE is in full contact with the couplingsurface. Do not press or rub the TEMP-PLATE with bare fingers.m(t3-i.-0,NOTEUse of any epoxy adhesive otherthan Devcon 2-Ton is notauthorized.8. Prepare Devcon 2-Ton epoxy adhesiveepoxy adhesive (C-298) as follows:a. Pour equal amounts of epoxy Part Aand Part B into a solvent proof container.b. Vigorously mix Part A and Part B with abrush such as an artist brush.c. A few drops of authorized thinner, suchas MEK (C-309), may be added to the epoxyduring the mixing operation to reduce theviscosity to a level that permits uniform brushapplication of the epoxy mixture. Do not thinthis mixture such that it runs when applied toa vertical surface. The final viscosity of theepoxy should be similar to a heavily bodiedpaint. Too thin a mixture may seep into thetemperature indicator TEMP-PLATE andcause the indicator dots to turn black in whichevent, the TEMP-PLATE must be removedand replaced. Working time for the mixture isapproximately 15 minutes.D-109. Using a soft-bristled brush, uniformlyapply the epoxy coating over the TEMP-PLATES to a thickness of approximately0.002 to 0.004 inch (0.0508 to 0.1016 mm)similar to a coat of paint. The coating shouldbe uniform in appearance, totally cover thesurface of the TEMP-PLATES and extendapproximmately 0.25 inch (6.35 mm) beyondthe edges of the TEMP-PLATES.CAUTION 2DO NOT EXPOSE THE EPOXYCOATING TO OIL, GREASE,CLEANING SOLVENT OR OTHERCHEMICALS DURING CURE.c065-00-00Page 10BRev.3