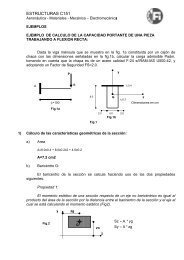
Tail Rotor Driveshaft Hanger
Tail Rotor Driveshaft Hanger
Tail Rotor Driveshaft Hanger
- No tags were found...

Create successful ePaper yourself
Turn your PDF publications into a flip-book with our unique Google optimized e-Paper software.
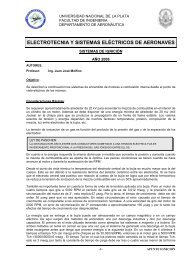
BHT-212-CR&OSPECIAL TOOLS REQUIRED (CONT)NUMBERT101599T101872N30=F33(DENOMENCLATUREPressing toolBacklash arm1. Clean all parts with solvent (C-304) andcoat with gearbox oil. Do not handle drybearings with bare hands.2. Heat gear (3, figure 65-21)with heat lampand position gear on shaft (1) and installbolts (2). Torque bolts 80 to 100 in.lbs. (9.04to 11.30 Nm). Secure bolts with lockwire (C-405).NOTEThe same shim plate (17) which wasremoved from the case shall bereinstalled or a new shim plate ofsame thickness shall be made(paragraph 65-42).0(a0)E0(00)00O0-i.3. Ensure all six washer seats (14) areproperly installed on gearbox case. Positionshim plate (17) on case (9) and secure withthree screws (15).4. Install shim (18) in case (9).5. Heat case (9) and press bearing (30) intocase (9) and install retaining ring (31).NOTEDuplex bearings have matchingserial numbers and must be installedin pairs, face-to-face.6. Press duplex bearing (25), using T103263bearing removal bar, into case.7. Support inner race of bearings (25), withT103263 bearing removal bar, and pressshaft (1) into case (9).8. Position case (9) in T101563 holdingfixture and install nut (26). Use T101305wrench to torque nut 360 to 480 in.lbs.(40.6728 to 54.2304 Nm). Install clip (27).07W9. Install nut (28) and use T101561 wrenchto torque nut 1800 to 2400 in.lbs. (203.364 to271.152 Nm).10. Install clip (29). Remove T101563holding fixture.11. Turn shaft and check bearings rollsmoothly and there is a light drag caused bypreload of bearings.(fin12. Heat sleeve (38), install roller bearing(43), and secure with retaining ring (44).3p)Coax-_sa0)13. Press seal (45) into sleeve with lip ofseal facing inboard (figure 65-22).14. Install new packing (37, figure 65-21).15. Coat packing (37), lip of oil seal (45) andmounting port of case (9) with gearbox oil.16. Heat mounting port of case with a heatlamp. Install sleeve (38) on case and securewith aluminum washers (40) next tomagnesium case and steel washers (41)under nuts (42). Torque nuts 50 to 70 in.lbs.(5.649 to 7.9086 Nm).17. Turn shaft (1) by hand and check forlight drag caused by oil seal and preload induplex bearings.18. Install new packings (32) on input quill(33). Lubricate packing and mating surface ofinput quill with gearbox oil.19. Heat input quill port in case (9) with heatlamp.20. Install quill in gearbox. Exercise care tokeep quill aligned as it is installed so nose ofpinion enters roller bearing and gear teethmesh properly.21. Align quill on studs so flats on gearboxcase and quill sleeve flange are aligned.22. Install spacers (34) and nuts (35).23. Verify gearbox turns smoothly by turninginput pinion by hand. Check backlashbetween input quill pinion and gear in threeplaces 120° apart. Use T101350 backlash65-00-00Page 69(O0