Suite 7.1 Manual - Audio Design Associates
Suite 7.1 Manual - Audio Design Associates
Suite 7.1 Manual - Audio Design Associates

You also want an ePaper? Increase the reach of your titles
YUMPU automatically turns print PDFs into web optimized ePapers that Google loves.
16<br />
<strong>Audio</strong> <strong>Design</strong> <strong>Associates</strong><br />
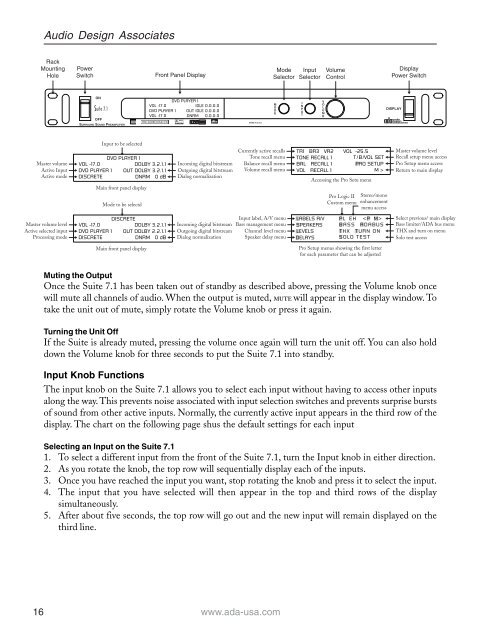
Rack<br />
Mounting<br />
Hole<br />
Master volume<br />
Active Input<br />
Active mode<br />
Master volume level<br />
Active selected input<br />
Processing mode<br />
Power<br />
Switch<br />
ON<br />
OFF<br />
SURROUND SOUND PREAMPLIFIER<br />
VOL -17.0<br />
DVD PLAYER 1<br />
DISCRETE<br />
VOL -17.0<br />
DVD PLAYER 1<br />
DISCRETE<br />
Input to be selected<br />
DVD PLAYER 1<br />
DOLBY 3.2.1.1<br />
OUT DOLBY 3.2.1.1<br />
DNRM 0 dB<br />
Main front panel display<br />
Mode to be selectd<br />
DISCRETE<br />
DOLBY 3.2.1.1<br />
OUT DOLBY 2.2.1.1<br />
DNRM 0 dB<br />
Main front panel display<br />
Front Panel Display<br />
VOL -17.0<br />
DVD PLAYER 1<br />
IDLE 0.0.0.0<br />
DVD PLAYER 1 OUT IDLE 0.0.0.0<br />
VOL -17.0 DNRM 0.0.0.0<br />
Incoming digital bitstream<br />
Outgoing digital bitstream<br />
Dialog normalization<br />
Incoming digital bitstream<br />
Outgoing digital bitstream<br />
Dialog normalization<br />
Currently active recalls<br />
Tone recall menu<br />
Balance recall menu<br />
Volume recall menu<br />
Muting the Output<br />
Once the <strong>Suite</strong> <strong>7.1</strong> has been taken out of standby as described above, pressing the Volume knob once<br />
will mute all channels of audio. When the output is muted, MUTE will appear in the display window. To<br />
take the unit out of mute, simply rotate the Volume knob or press it again.<br />
Turning the Unit Off<br />
If the <strong>Suite</strong> is already muted, pressing the volume once again will turn the unit off. You can also hold<br />
down the Volume knob for three seconds to put the <strong>Suite</strong> <strong>7.1</strong> into standby.<br />
Input Knob Functions<br />
The input knob on the <strong>Suite</strong> <strong>7.1</strong> allows you to select each input without having to access other inputs<br />
along the way. This prevents noise associated with input selection switches and prevents surprise bursts<br />
of sound from other active inputs. Normally, the currently active input appears in the third row of the<br />
display. The chart on the following page shus the default settings for each input<br />
Selecting an Input on the <strong>Suite</strong> <strong>7.1</strong><br />
1. To select a different input from the front of the <strong>Suite</strong> <strong>7.1</strong>, turn the Input knob in either direction.<br />
2. As you rotate the knob, the top row will sequentially display each of the inputs.<br />
3. Once you have reached the input you want, stop rotating the knob and press it to select the input.<br />
4. The input that you have selected will then appear in the top and third rows of the display<br />
simultaneously.<br />
5. After about five seconds, the top row will go out and the new input will remain displayed on the<br />
third line.<br />
MADE IN U.S.A.<br />
Input label, A/V menu<br />
Bass management menu<br />
Channel level menu<br />
Speaker delay menu<br />
www.ada-usa.com<br />
Mode<br />
Selector<br />
M ODE<br />
Input<br />
Selector<br />
I<br />
N<br />
P<br />
U<br />
T<br />
V<br />
O LU<br />
M E<br />
TR1 BR3 VR2 VOL -25.5<br />
TONE RECALL 1 T/B/VOL SET<br />
BAL RECALL 1 PRO SETUP<br />
VOL RECALL 1 M ><br />
LABELS A/V<br />
SPEAKERS<br />
LEVELS<br />
DELAYS<br />
Volume<br />
Control<br />
Accessing the Pro Setu menu<br />
Pro Logic II<br />
Custom menu<br />
Stereo/mono<br />
enhancement<br />
menu access<br />
PL EH <br />
BASS ADABUS<br />
THX TURN ON<br />
SOLO TEST<br />
Pro Setup menus showing the first letter<br />
for each parameter that can be adjusted<br />
Display<br />
Power Switch<br />
DISPLAY<br />
Master volume level<br />
Recall setup menu access<br />
Pro Setup menu access<br />
Return to main display<br />
Select previous/ main display<br />
Bass limiter/ADA bus menu<br />
THX and turn on menu<br />
Solo test access