Suite 7.1 Manual - Audio Design Associates
Suite 7.1 Manual - Audio Design Associates
Suite 7.1 Manual - Audio Design Associates
You also want an ePaper? Increase the reach of your titles
YUMPU automatically turns print PDFs into web optimized ePapers that Google loves.
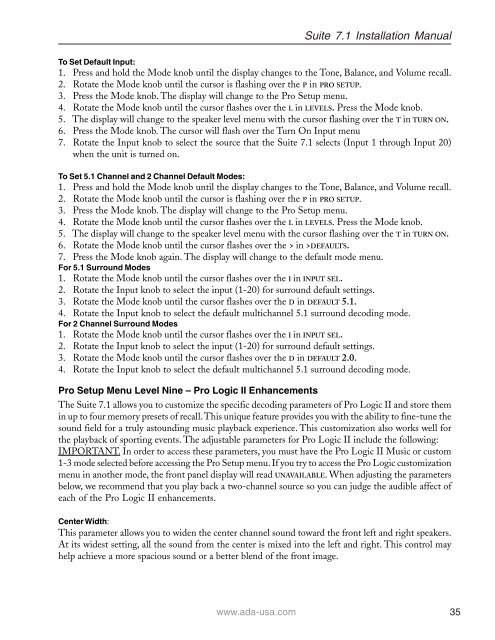
<strong>Suite</strong> <strong>7.1</strong> Installation <strong>Manual</strong><br />
To Set Default Input:<br />
1. Press and hold the Mode knob until the display changes to the Tone, Balance, and Volume recall.<br />
2. Rotate the Mode knob until the cursor is flashing over the P in PRO SETUP.<br />
3. Press the Mode knob. The display will change to the Pro Setup menu.<br />
4. Rotate the Mode knob until the cursor flashes over the L in LEVELS. Press the Mode knob.<br />
5. The display will change to the speaker level menu with the cursor flashing over the T in TURN ON.<br />
6. Press the Mode knob. The cursor will flash over the Turn On Input menu<br />
7. Rotate the Input knob to select the source that the <strong>Suite</strong> <strong>7.1</strong> selects (Input 1 through Input 20)<br />
when the unit is turned on.<br />
To Set 5.1 Channel and 2 Channel Default Modes:<br />
1. Press and hold the Mode knob until the display changes to the Tone, Balance, and Volume recall.<br />
2. Rotate the Mode knob until the cursor is flashing over the P in PRO SETUP.<br />
3. Press the Mode knob. The display will change to the Pro Setup menu.<br />
4. Rotate the Mode knob until the cursor flashes over the L in LEVELS. Press the Mode knob.<br />
5. The display will change to the speaker level menu with the cursor flashing over the T in TURN ON.<br />
6. Rotate the Mode knob until the cursor flashes over the > in >DEFAULTS.<br />
7. Press the Mode knob again. The display will change to the default mode menu.<br />
For 5.1 Surround Modes<br />
1. Rotate the Mode knob until the cursor flashes over the I in INPUT SEL.<br />
2. Rotate the Input knob to select the input (1-20) for surround default settings.<br />
3. Rotate the Mode knob until the cursor flashes over the D in DEFAULT 5.1.<br />
4. Rotate the Input knob to select the default multichannel 5.1 surround decoding mode.<br />
For 2 Channel Surround Modes<br />
1. Rotate the Mode knob until the cursor flashes over the I in INPUT SEL.<br />
2. Rotate the Input knob to select the input (1-20) for surround default settings.<br />
3. Rotate the Mode knob until the cursor flashes over the D in DEFAULT 2.0.<br />
4. Rotate the Input knob to select the default multichannel 5.1 surround decoding mode.<br />
Pro Setup Menu Level Nine – Pro Logic II Enhancements<br />
The <strong>Suite</strong> <strong>7.1</strong> allows you to customize the specific decoding parameters of Pro Logic II and store them<br />
in up to four memory presets of recall. This unique feature provides you with the ability to fine-tune the<br />
sound field for a truly astounding music playback experience. This customization also works well for<br />
the playback of sporting events. The adjustable parameters for Pro Logic II include the following:<br />
IMPORTANT. In order to access these parameters, you must have the Pro Logic II Music or custom<br />
1-3 mode selected before accessing the Pro Setup menu. If you try to access the Pro Logic customization<br />
menu in another mode, the front panel display will read UNAVAILABLE. When adjusting the parameters<br />
below, we recommend that you play back a two-channel source so you can judge the audible affect of<br />
each of the Pro Logic II enhancements.<br />
Center Width:<br />
This parameter allows you to widen the center channel sound toward the front left and right speakers.<br />
At its widest setting, all the sound from the center is mixed into the left and right. This control may<br />
help achieve a more spacious sound or a better blend of the front image.<br />
www.ada-usa.com 35


