CEP Level 3 Manual - Rushmore Hockey Association
CEP Level 3 Manual - Rushmore Hockey Association
CEP Level 3 Manual - Rushmore Hockey Association

You also want an ePaper? Increase the reach of your titles
YUMPU automatically turns print PDFs into web optimized ePapers that Google loves.
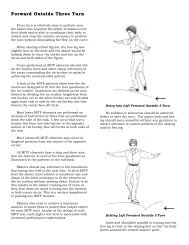
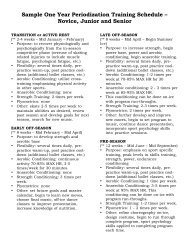
T A B L E O F C O N T E N T SPROTECTING YOURSELF ALONG THE BOARDSPlayers must learn how to protect themselvesaround the boards. When being checked, try todistribute the force of the check over as wide asurface as possible. Get your stick and gloves up tospread out the area of impact (See Figure 11). Yourarms act like shock absorbers. Place the forearmand upper thigh (hip area) against the boards andkeep the feet well apart. Keep knees bent with a lowcenter of gravity (See Figure 12). After impact, recoilby pushing upward and outward with the forearmsand inside leg. Never fully extend your arms towardsthe boards when cushioning a check; serious injurycould occur. Avoid hitting the boards with the pointof your shoulder (See Figure 13), because you couldseparate the shoulder. Lift the shoulder and take theblow on the flat of the biceps and shoulder area.REFERENCESBlase, K; O’Connor, R; Wood, D (1985) the USA <strong>Hockey</strong> CheckingHandbook Colorado Springs, Colorado – USA <strong>Hockey</strong>.Accept checks when playing the puck along theboards. Keep the head up, get a good stableposition, feet apart, knees bent, body in a lowposition, and forearm and hands on the boards forprotection (See Figure 14).When going into the corner for the puck, try touse some deception (fakes) with your body, stickand skates. When you are in a position to pick upthe puck, move the skates quickly so that they areparallel to the boards rather than pointing towardsthe boards where the opponent may ram you headfirst into the barrier. Protect the puck with yourbody, skates and stick and try to move out of thearea quickly and with control of the puck.Players should practice these techniques anduse them in game situations.Figure 12. Maintain a low center of gravityFigure 13. Avoid hitting the boards withthe shoulder.Figure 14. Positioning to avoid injury forcheck along the boards.SUMMARYPracticing checking is a problem because manyyoung players do not like being checked. Propertechnique can be taught by having the puck carrierskate a controlled course (along the blue line orbetween markers) at reduced speed and having thedefensive player make contact without making afinal, forceful thrust. This will allow players to gainconfidence in their ability to check and be checked.Players will tend to speed up the action as theybecome more comfortable. Eventually, you musthave your players check at full speed if they are tosuccessfully master the skills.Before leaving the subject, let us stress theimportance of teaching your players to hit legallyand to take a check safely and never, ever hit frombehind. Insist that officials in your association callcharging, high sticking, and elbowing closely. Theyshould, however, allow good, legal body contact.Figure 11. Getting the stick and gloves upto absorb the force of the check268 | USA <strong>Hockey</strong> Coaching Education Program <strong>Level</strong> 3 <strong>Manual</strong>Defensive Team Tactics | 269