PICAXE Manual Section 1 - TechnoPujades - Free
PICAXE Manual Section 1 - TechnoPujades - Free
PICAXE Manual Section 1 - TechnoPujades - Free
- No tags were found...

You also want an ePaper? Increase the reach of your titles
YUMPU automatically turns print PDFs into web optimized ePapers that Google loves.
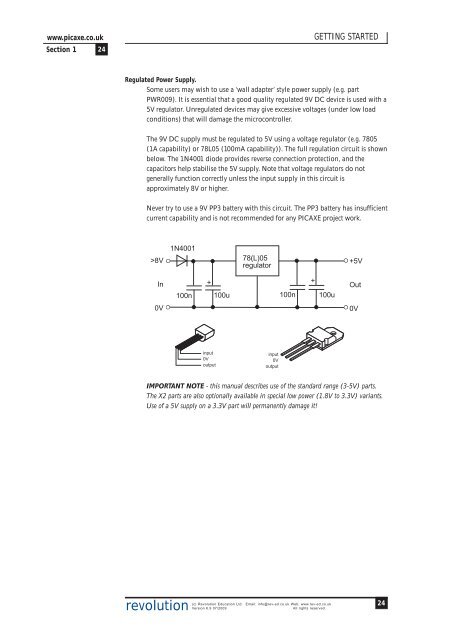
www.picaxe.co.uk<strong>Section</strong> 1 24GETTING STARTEDRegulated Power Supply.Some users may wish to use a ‘wall adapter’ style power supply (e.g. partPWR009). It is essential that a good quality regulated 9V DC device is used with a5V regulator. Unregulated devices may give excessive voltages (under low loadconditions) that will damage the microcontroller.The 9V DC supply must be regulated to 5V using a voltage regulator (e.g. 7805(1A capability) or 78L05 (100mA capability)). The full regulation circuit is shownbelow. The 1N4001 diode provides reverse connection protection, and thecapacitors help stabilise the 5V supply. Note that voltage regulators do notgenerally function correctly unless the input supply in this circuit isapproximately 8V or higher.Never try to use a 9V PP3 battery with this circuit. The PP3 battery has insufficientcurrent capability and is not recommended for any <strong>PICAXE</strong> project work.>8V1N400178(L)05regulator+5VIn100n+100u100n+100uOut0V0Vinput0Voutputinput0VoutputIMPORTANT NOTE - this manual describes use of the standard range (3-5V) parts.The X2 parts are also optionally available in special low power (1.8V to 3.3V) variants.Use of a 5V supply on a 3.3V part will permanently damage it!revolution(c) Revolution Education Ltd. Email: info@rev-ed.co.uk Web: www.rev-ed.co.ukVersion 6.9 07/2009All rights reserved.24