i agree and wish to proceed with download - Roland Systems Group ...
i agree and wish to proceed with download - Roland Systems Group ...
i agree and wish to proceed with download - Roland Systems Group ...

Create successful ePaper yourself
Turn your PDF publications into a flip-book with our unique Google optimized e-Paper software.
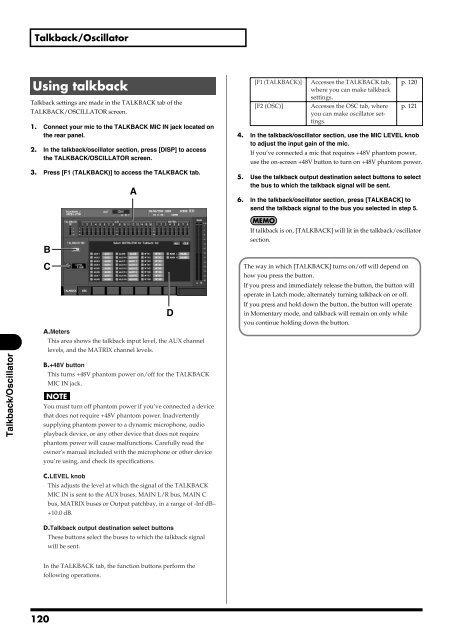
Talkback/Oscilla<strong>to</strong>rUsing talkbackTalkback settings are made in the TALKBACK tab of theTALKBACK/OSCILLATOR screen.1. Connect your mic <strong>to</strong> the TALKBACK MIC IN jack located onthe rear panel.2. In the talkback/oscilla<strong>to</strong>r section, press [DISP] <strong>to</strong> accessthe TALKBACK/OSCILLATOR screen.3. Press [F1 (TALKBACK)] <strong>to</strong> access the TALKBACK tab.ffig.ScrTalkbackGuide.epsA[F1 (TALKBACK)] Accesses the TALKBACK tab,where you can make talkbacksettings.[F2 (OSC)] Accesses the OSC tab, whereyou can make oscilla<strong>to</strong>r settings.p. 120p. 1214. In the talkback/oscilla<strong>to</strong>r section, use the MIC LEVEL knob<strong>to</strong> adjust the input gain of the mic.If you’ve connected a mic that requires +48V phan<strong>to</strong>m power,use the on-screen +48V but<strong>to</strong>n <strong>to</strong> turn on +48V phan<strong>to</strong>m power.5. Use the talkback output destination select but<strong>to</strong>ns <strong>to</strong> selectthe bus <strong>to</strong> which the talkback signal will be sent.6. In the talkback/oscilla<strong>to</strong>r section, press [TALKBACK] <strong>to</strong>send the talkback signal <strong>to</strong> the bus you selected in step 5.BIf talkback is on, [TALKBACK] will lit in the talkback/oscilla<strong>to</strong>rsection.Talkback/Oscilla<strong>to</strong>rCDA.MetersThis area shows the talkback input level, the AUX channellevels, <strong>and</strong> the MATRIX channel levels.B.+48V but<strong>to</strong>nThis turns +48V phan<strong>to</strong>m power on/off for the TALKBACKMIC IN jack.You must turn off phan<strong>to</strong>m power if you’ve connected a devicethat does not require +48V phan<strong>to</strong>m power. Inadvertentlysupplying phan<strong>to</strong>m power <strong>to</strong> a dynamic microphone, audioplayback device, or any other device that does not requirephan<strong>to</strong>m power will cause malfunctions. Carefully read theowner’s manual included <strong>with</strong> the microphone or other deviceyou’re using, <strong>and</strong> check its specifications.The way in which [TALKBACK] turns on/off will depend onhow you press the but<strong>to</strong>n.If you press <strong>and</strong> immediately release the but<strong>to</strong>n, the but<strong>to</strong>n willoperate in Latch mode, alternately turning talkback on or off.If you press <strong>and</strong> hold down the but<strong>to</strong>n, the but<strong>to</strong>n will operatein Momentary mode, <strong>and</strong> talkback will remain on only whileyou continue holding down the but<strong>to</strong>n.C.LEVEL knobThis adjusts the level at which the signal of the TALKBACKMIC IN is sent <strong>to</strong> the AUX buses, MAIN L/R bus, MAIN Cbus, MATRIX buses or Output patchbay, in a range of -Inf dB–+10.0 dB.D.Talkback output destination select but<strong>to</strong>nsThese but<strong>to</strong>ns select the buses <strong>to</strong> which the talkback signalwill be sent.In the TALKBACK tab, the function but<strong>to</strong>ns perform thefollowing operations.120