i agree and wish to proceed with download - Roland Systems Group ...
i agree and wish to proceed with download - Roland Systems Group ...
i agree and wish to proceed with download - Roland Systems Group ...

You also want an ePaper? Increase the reach of your titles
YUMPU automatically turns print PDFs into web optimized ePapers that Google loves.
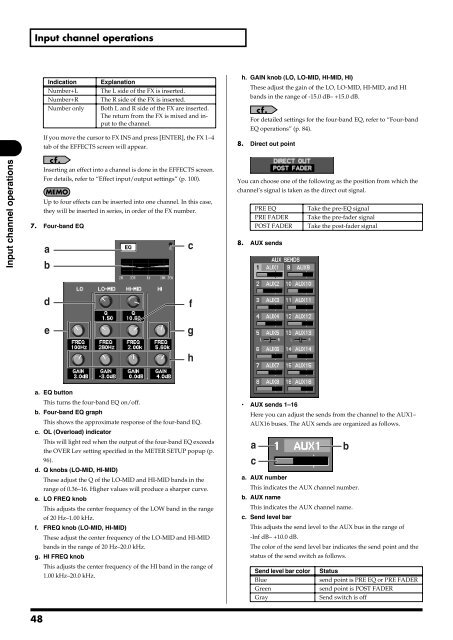
Input channel operationsIndicationNumber+LNumber+RNumber onlyExplanationThe L side of the FX is inserted.The R side of the FX is inserted.Both L <strong>and</strong> R side of the FX are inserted.The return from the FX is mixed <strong>and</strong> input<strong>to</strong> the channel.If you move the cursor <strong>to</strong> FX INS <strong>and</strong> press [ENTER], the FX 1–4tab of the EFFECTS screen will appear.h. GAIN knob (LO, LO-MID, HI-MID, HI)These adjust the gain of the LO, LO-MID, HI-MID, <strong>and</strong> HIb<strong>and</strong>s in the range of -15.0 dB– +15.0 dB.For detailed settings for the four-b<strong>and</strong> EQ, refer <strong>to</strong> “Four-b<strong>and</strong>EQ operations” (p. 84).8. Direct out pointfig.ScrChDirGuide.epsInput channel operationsInserting an effect in<strong>to</strong> a channel is done in the EFFECTS screen.For details, refer <strong>to</strong> “Effect input/output settings” (p. 100).Up <strong>to</strong> four effects can be inserted in<strong>to</strong> one channel. In this case,they will be inserted in series, in order of the FX number.7. Four-b<strong>and</strong> EQfig.ScrChEQ.epsacbYou can choose one of the following as the position from which thechannel’s signal is taken as the direct out signal.PRE EQTake the pre-EQ signalPRE FADER Take the pre-fader signalPOST FADER Take the post-fader signal8. AUX sendsfig.ScrChSends.epsdefgha. EQ but<strong>to</strong>nThis turns the four-b<strong>and</strong> EQ on/off.b. Four-b<strong>and</strong> EQ graphThis shows the approximate response of the four-b<strong>and</strong> EQ.c. OL (Overload) indica<strong>to</strong>rThis will light red when the output of the four-b<strong>and</strong> EQ exceedsthe OVER Lev setting specified in the METER SETUP popup (p.96).d. Q knobs (LO-MID, HI-MID)These adjust the Q of the LO-MID <strong>and</strong> HI-MID b<strong>and</strong>s in therange of 0.36–16. Higher values will produce a sharper curve.e. LO FREQ knobThis adjusts the center frequency of the LOW b<strong>and</strong> in the rangeof 20 Hz–1.00 kHz.f. FREQ knob (LO-MID, HI-MID)These adjust the center frequency of the LO-MID <strong>and</strong> HI-MIDb<strong>and</strong>s in the range of 20 Hz–20.0 kHz.g. HI FREQ knobThis adjusts the center frequency of the HI b<strong>and</strong> in the range of1.00 kHz–20.0 kHz.• AUX sends 1–16Here you can adjust the sends from the channel <strong>to</strong> the AUX1–AUX16 buses. The AUX sends are organized as follows.fig.ScrChSendField.epsabca. AUX numberThis indicates the AUX channel number.b. AUX nameThis indicates the AUX channel name.c. Send level barThis adjusts the send level <strong>to</strong> the AUX bus in the range of-Inf dB– +10.0 dB.The color of the send level bar indicates the send point <strong>and</strong> thestatus of the send switch as follows.Send level bar color StatusBluesend point is PRE EQ or PRE FADERGreensend point is POST FADERGraySend switch is off48