

Untitled - MetosExpo - Free
Untitled - MetosExpo - Free
Untitled - MetosExpo - Free

You also want an ePaper? Increase the reach of your titles
YUMPU automatically turns print PDFs into web optimized ePapers that Google loves.
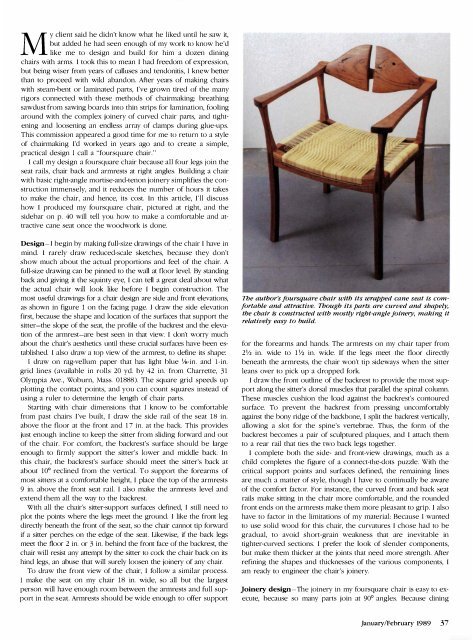
My client said he didn't know what he liked until he saw it,but added he had seen enough of my work to know he'dlike me to design and build for him a dozen diningchairs with arms. I took this to mean I had freedom of expression,but being wiser from years of calluses and tendonitis, I knew benerthan to proceed with wild abandon. After years of making chairswith steam-bent or laminated parts, I've grown tired of the manyrigors connected with these methods of chairmaking: breathingsawdust from sawing boards into thin strips for lamination, foolingaround with the complex joinery of curved chair parts, and tighteningand loosening an endless array of clamps during glue-ups.This commission appeared a good time fo r me to return to a styleof chairmaking I'd worked in years ago and to create a simple,practical design 1 call a "foursquare chair."I call my design a foursquare chair because all four legs join theseat rails, chair back and armrests at right angles. Building a chairwith basic right-angle mortise-and-tenon joinery simplifies the constructionimmensely, and it reduces the number of hours it takesto make the chair, and hence, its cost. In this article, I'll discusshow I produced my foursquare chair, pictured at right, and thesidebar on p. 40 will tell you how to make a comfortable and attractivecane seat once the woodwork is done.Design- I begin by making full-size drawings of the chair I have inmind. 1 rarely draw reduced-scale sketches, because they don'tshow much about the actual proportions and feel of the chair. Afu ll-size drawing can be pinned to the wall at floor level. By standingback and giving it the squinty eye, I can tell a great deal about whattile actual chair will look like before 1 begin consu·uction. Themost useful drawings for a chair design are side and front elevations,as shown in figure 1 on the facing page. I draw tile side elevationfirst, because the shape and location of tile surfaces that support thesitter-tile slope of tile seat, the profile of the backrest and the elevationof tile armrest-are best seen in that view. I don't wOrty muchabout the chair's aesthetics until tilese crucial surfaces have been established.I also draw a top view of tile armrest, to define its shape:I draw on rag-vellum paper that has light blue VB -in. and I-in.grid lines (available in rolls 20 yd. by 42 in. from Chan'ette, 31Olyt1)pia Ave., Woburn, Mass. 01888). The square grid speeds upplotting the contact pOints, and you can count squares instead ofusing a ruler to determine the length of chair parts.Starting witil chair dimensions that 1 know to be comfortablefrom past chairs I've built, I draw the side rail of tile seat 18 in.above the floor at tile front and 17 in. at the back. This providesjust enough incline to keep the sitter from sliding forward and outof the chair. For comfort, the backrest'S surface should be largeenough to fi rmly support the sitter's lower and middle back. Inthis chair, the backrest's surface should meet the sitter'S back atabout 10° reclined from the vertical. To support the fo rearms ofmost sitters at a comfortable height, I place the top of the armrests9 in. above the front seat rail. I also make the armrests level andextend them all the way to the backrest.Witil all the chair's siner-support surfaces defined, 1 still need toplot tile points where tile legs meet the ground. 1 like the front legdirectiy beneatil the front of me seat, so tile chair cannot tip forwardif a siner perches on the edge of the seat. Likewise, if tile back legsmeet the floor 2 in. or 3 in. behind the front face of tile backrest, mechair will resist any anempt by the sitter to cock the chair back on itshind legs, an abuse tilat will surely loosen me joinelY of any chair.To draw the front view of the chair, 1 follow a similar process.1 make the seat on my chair 18 in. wide, so all but the largestperson will have enough room between the armrests and full supportin the seat. Armrests should be wide enough to offer supportThe author's foursquare chair with its wrapped cane seat is comfortableand attractive. Though its parts are curved and shapely,the chair is constructed with mostly right-angle joinery, making itrelatively easy to build.for the fo rearms and hands. The armrests on my chair taper from2 in. wide to 1 V2 in. wide. If the legs meet the floor directlybeneath the armrests, tile chair won't tip sideways when the sitterleans over to pick up a dropped fork.1 draw the front outiine of the backrest to provide the most supportalong the sitter's dorsal muscles tilat parallel tile spinal column.These muscles cushion the load against the backrest's contouredsurface. To prevent tile backrest from pressing uncomfortablyagainst tile bony ridge of tile backbone, 1 split me backrest venically,allowing a slot fo r the spine's vertebrae. Thus, the form of thebackrest becomes a pair of sculptured plaques, and 1 attach themto a rear rail that ties the two back legs together.I complete bOtil the side- and front-view drawings, much as achild completes the figure of a connect-tile-dots puzzle. With thecritical support points and surfaces defined, the remaining linesare much a matter of style, though 1 have to continually be awareof the comfort factor. For instance, the curved front and back seatrails make Sitting in the chair more comfortable, and the roundedfront ends on tile armrests make them more pleasant to grip. 1 alsohave to factor in tile limitations of my material: Because I wantedto use solid wood fo r tilis chair, the curvatures I chose had to begradual, to avoid short-grain weakness that are inevitable intighter-curved sections. 1 prefer the look of slender components,but make tilem thicker at the joints that need more strength. Afterrefining the shapes and thicknesses of the various components, Iam ready to engineer the chair's joinery.Joinery design-The joinery in my foursquare chair is easy to execute,because so many parts join at 90° angles. Because diningJanuary/February 1989 37


