

Untitled - MetosExpo - Free
Untitled - MetosExpo - Free
Untitled - MetosExpo - Free

Create successful ePaper yourself
Turn your PDF publications into a flip-book with our unique Google optimized e-Paper software.
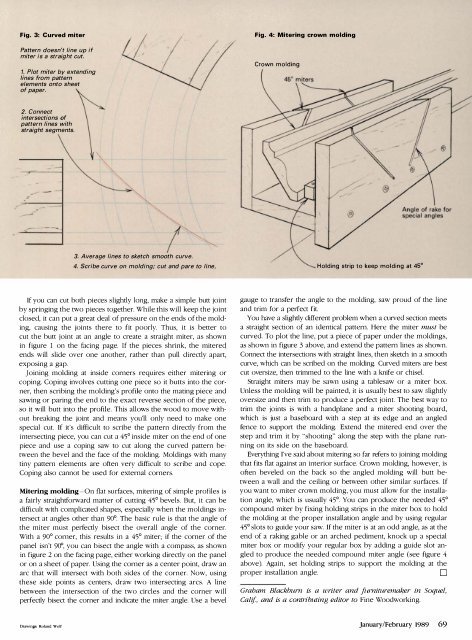
Fig. 3: Curved miterPattern doesn't line up ifmiter is a straight cut.1. Plot miter by extendinglines from patternelements onto sheetof paper./Fig_ 4: Mitering crown moldingCrown molding2. Connectintersections ofpattern lines withstraight segments.- -./' --/3. Average lines to sketch smooth curve.4. Scribe curve on molding; cut and pare to line.Holding strip to keep molding at 45°If you can cut both pieces slightly long, make a simple butt jointby springing the two pieces together. While this will keep the jointclosed, it can put a great deal of pressure on the ends of the molding,causing the joints there to fit poorly. Thus, it is better tocut the butt joint at an angle to create a straight miter, as shownin figure 1 on the facing page. If the pieces shrink, the mitereqends will slide over one another, rather than pull directly apart,exposing a gap.Joining molding at inside corners requires either mitering orcoping. Coping involves cutting one piece so it butts into the corner,then scribing the molding's profile onto the mating piece andsawing or paring the end to the exact reverse section of the piece,so it will butt into the profile. This allows the wood to move withoutbreaking the joint and means you'll only need to make onespecial cut. If it's difficult to scribe the pattern directly from theintersecting piece, you can cut a 45° inside miter on the end of onepiece and use a coping saw to cut along the curved pattern betweenthe bevel and the face of the molding. Moldings with manytiny pattern elements are often very difficult to scribe and cope.Coping also cannot be used for external corners.Mitering molding-On flat surfaces, mitering of simple profiles isa fairly straightforward matter of cutting 45° bevels. But, it can bedifficult with complicated shapes, especially when tl1e moldings intersectat angles other than 90°. The basic rule is that the angle ofthe miter must perfectly bisect the overall angle of the corner.With a 90° corner, this results in a 45° miter; if the corner of thepanel isn't 9(f, you can bisect the angle with a compass, as shownin figure 2 on the facing page, either working directly on the panelor on a sheet of paper. Using the corner as a center pOint, draw anarc that will intersect with both sides of the corner. Now, usingthese side points as centers, draw two intersecting arcs. A linebetween the intersection of the two circles and the corner willperfectly bisect the corner and indicate the miter angle. Use a bevelgauge to transfer the angle to the molding, saw proud of the lineand trim for a perfect fit.You have a slightly different problem when a curved section meetsa straight section of an identical pattern. Here the miter must becurved. To plot the line, put a piece of paper under the moldings,as shown in figure 3 above, and extend the pattern lines as shown.Connect the intersections with straight lines, then sketch in a smoothcurve, which can be scribed on the molding. Curved miters are bestcut oversize, then trimmed to the line with a knife or chisel.Straight miters may be sawn using a tablesaw or a miter box.Unless the molding will be painted, it is usually best to saw lightlyoversize and then trim to produce a perfect joint. The best way totrim the joints is with a handplane and a miter shooting board,which is just a baseboard with a step at its edge and an angledfence to support the molding. Extend the mitered end over thestep and trim it by "shooting" along the step with the plane runningon its side on the baseboard.Everything I've said about mitering so far refers to joining moldingthat fits flat against an interior surface. Crown molding, however, isoften beveled on the back so the angled molding will butt betweena wall and the ceiling or between other similar surfaces. Ifyou want to miter crown molding, you must allow for the installationangle, which is usually 45°. You can produce the needed 45°compound miter by fixing holding strips in the miter box to holdthe molding at the proper installation angle and by using regular45° slots to guide your saw. If the miter is at an odd angle, as at theend of a raking gable or an arched pediment, knock up a specialmiter box or modify your regular box by adding a guide slot angledto produce the needed compound miter angle (see figure 4above). Again, set holding strips to support the molding at theproper installation angle.DGraham Blackburn is a writer and jitrnituremaker in Soquel,Calif, and is a contn"buting editol- to Fine Woodworking.Drawings: Roland WolfJanuary/February 1989 69


