I would assemble the hexagon at this time, gluing and screwingthe ribs in place inside the post and taking care not to put screwswhere the cutouts will be.Mark the outline of the cutouts with a pencil and straightedge.Use a circular saw running against a guide board screwed to theside of the pedestal to make the 60° cuts along the long verticallines. Relocate the guide as you work your way around the pedestal.The angled facets at the top of each cutout are cut with thecircular saw riding on a jig that straddles the corner of the postand is screwed securely to the pedestal's sides. If your circular sawdoesn't have the depth of cut for the top cutouts or where the cutsintersect the ribs, you can finish up with a handsaw. Sawkerfs thatextend too far will be filled and veneered over. Particleboardpieces are custom-fit and glued and screwed into the cutouts andany remaining gaps. After filling all screw holes, sawkerfs andrough spots with auto-body fi ller, I sand all the surfaces smooth.Auto-body fi ller is perfect here because it cures quickly to a hardsandable surface, even when it's used to fill large areas. And, it'srelatively ine>..rpensive when purchased by the gallon. I always wear adust mask when sanding it though, because the dust is an irritant.Next, I make a paper pattern for the six facets of each cutout, cutthe satinwood veneer close to the pattern's size and trim the veneerto fit into the inside corners. The veneer is glued down usingcauls cut to fit over each piece and clamped across to the otherside of the pedestal. After trimming the outside corners with autility knife, I sand the veneer flush. The pedestal's main sides areveneered with padauk, two opposite sides at a time, using plywoodand 2x4s as cauls to distribute the pressure.I borrowed a neighbor'S lathe to turn the purpleheart bun feetand the spheres at the base of this pedestal. The lacquered basesfor my tables are off-d1e-shelf white-pine architectural moldings,mitered and glued to a box made from two pieces of plywoodwith blocking in between (see figure 2 on the previous page).The tabletop is veneered wid1 satinwood wedges radiating fromthe center to a purpleheart border. The purplehean is sandwichedbetween thin strips of satinwood and black imbuya, a Brazilianhardwood. The grain of the satinwood outer rim runs parallel withthe table's edge, as shown in the top photo on the previous page.To cut d1e components for these veneer wedges, 1 clamp pieces ofveneer between a pair of -in. Masonite router templates, onepair for each of the shapes, and trim the veneer pieces to size witha flush-trim bit. Then the components of each wedge are assembledwith veneer tape. Three of the wedges are then taped toged1erand glued down using the triangular jig described earlier. Thetabletop'S underside is also veneered with satinwood, but wid1 thegrain running in one direction.The bullnose edge is basswood wrapped wid1 a cross-band veneerof zebrawood. I shaped four 4-ft.-long bullnose sections witha Yi-in.-dia. roundover router bit. To make d1e mold for veneeringthe bullnose, I resawed a 4x4 in half. I partially hollowed out themating sides, cutting out most of the waste on the tablesaw androunding d1e inside corners wid1 a Yi-in.-dia. cove bit in the router.To test d1e fit, dry-clamp the halves of the mold together and try aveneer-wrapped section of bullnose. Continue making adjustmentsPhoto: Michele Russell SlavinskyThese are a few examples of the veneers available from Alpi Of Modigliana,Italy. The fabric-like patterns, known as AlpiN-iN veneers, logs in such a way that when they are resawn into veneers, theybird's-eye sample is made from veneers that are reconstructed intocome in a wide color range and can even be made to order. The mimic nature's grain patterns.Italian veneers lend an exotic touchVeneers give me a greater variety in grainpatterns, colors and construction techniquestha I can get with solid wood. Inaddition, veneers allow more extensiveuse of rare and costly woods, helping toextend and preserve a dwindling resource.So it was with great excitement that I discoveredAlpilignum veneers made by Alpi,a manufacturer in Modigliana, Italy.These veneers are available in a widerange of patterns that simulate traditionalwood grains, such as quartersawn oak, flatsawnrosewood, bird's-eye maple and severalvarieties of burl. Alpi also offers a line of deSigner veneers, known as AlpiN-iN veneers,in various colors and complex patternsthat suggest woven textile designs. Theseveneers can even be custom ordered toyour own designs.To construct these patterns, sheets ofveneer, sometimes precolored, are arrangedinto the desired patterns with the aid ofcomputers and glued into a new "log."This log is then sliced into %9- in.-thickpatterned veneers. Standard dimensionsare 24% in. by 133 in. and 241/2 in. by98 in. Because of strict quality control, thepatterns and colors are true throughout anentire flitch; there is almost no noticeablevariation from one sheet to the next. Becausethese veneers are made entirely ofwood, they cut, lay up, glue, sand and finishexactly as standard woods and veneers.Alpi also manufactures dimensionedlumber with inlaid vertical lines or geometricpatterns.Alpilignum veneers and other Alpiproducts are marketed in Canada and theUnited States by The Dean Co. Their mainoffice, showroom and factory are locatedat Bee Street and Stafford Drive, Box1239, Princeton, W.Va. 24740. They alsohave offices at Box 426, Gresham, Ore.97030, and at Box 1818, 2006 EnglishRoad, High Point, N.C. 2726 1. -JW66 Fine Woodworking
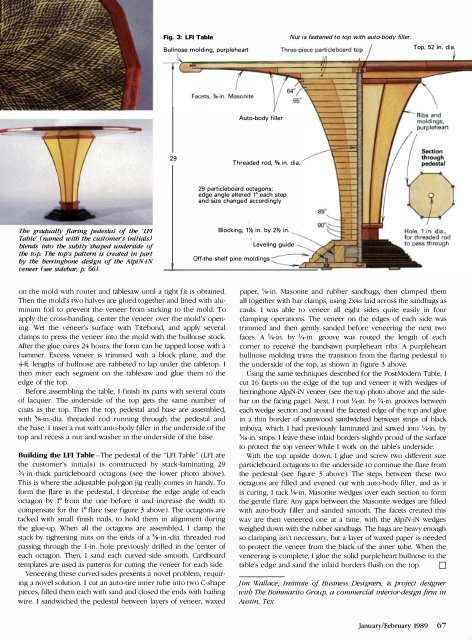
Fig. 3: LFI TableNut is fastened to top with auto-body filler.Bullnose molding, purpleheartTop, 52 in. dia.Auto-body filler29Threaded rod, % in. dia.29 particleboard octagons:edge angle altered 1° each stepand size changed accordinglyThe gradually flaring pedestal of the 'IFfTable' (named with the customer's initials)blends into the subtly shaped underside ofthe top. The top 's pattern is created in partby the herringbone design of the AlpiN-iNveneer (see sidebar, p. 66).Blocking, 1Y2 in. by 2Y2 in.Off-the-shelf pine moldingsLeveling guideon the mold with router and tablesaw until a tight fit is obtained.Then the mold's two halves are glued together and lined with aluminumfoil to prevent the veneer from sticking to the mold. Toapply the cross-banding, center the veneer over the mold's opening.Wet the veneer's surface with Titebond, and apply severalclamps to press the veneer into the mold with the bullnose stock.After the glue cures 24 hours, the form can be tapped loose with a .hammer. Excess veneer is trimmed with a block plane, and the4-ft. lengths of bullnose are rabbeted to lap under the tabletop. Ithen miter each segment on the tablesaw and glue them to theedge of the top.Before assembling the table, I finish its parts with several coatsof lacquer. The underside of the top gets the same number ofcoats as the top. Then the top, pedestal and base are assembled,with %-in.-dia. threaded rod running through the pedestal andthe base. I inset a nut with auto-body filler in the underside of thetop and recess a nut and washer in the underside of the base.Building the LFI Table -The pedestal of the "LFI Table" (LFl arethe customer's initials) is constructed by stack-laminating 29%-in.-thick particleboard octagons (see the lower photo above).This is where the adjustable polygon jig really comes in handy. Toform the flare in the pedestal, I decrease the edge angle of eachoctagon by 1° from the one before it and increase the width tocompensate for the 1° flare (see figure 3 above). The octagons aretacked with small finish nails, to hold them in alignment duringthe glue-up. When all the octagons are assembled, I clamp thestack by tightening nuts on the ends of a %-in.-dia. threaded rodpassing through the I-in. hole previously drilled in the center ofeach octagon. Then, I sand each curved side smooth. Cardboardtemplates are used as patterns for cutting the veneer for each side.Veneering these curved sides presents a novel problem, requiringa novel solution. I cut an auto-tire inner tube into two C-shapepieces, filled them each with sand and closed the ends with bailingwire. I sandwiched the pedestal between layers of veneer, waxedpaper, Ys-in. Masonite and rubber sandbags, then clamped themall together with bar clamps, using 2x4s laid across the sandbags ascauls. I was able to veneer all eight sides quite easily in fourclamping operations. The veneer on the edges of each side wastrimmed and then gently sanded before veneering the next twofaces. A Y4-in. by Y4-in. groove was routed the length of eachcorner to receive the bandsawn purpleheart ribs. A purpleheartbullnose mplding trims the transition from the flaring pedestal tothe underside of the top, as shown in figure 3 above.Using the same tedmiques described for the Post:Modern Table, Icut 16 facets on the edge of the top and veneer it with wedges ofherringbone AlpiN-iN veneer (see the top photo above and the sidebaron the facing page). Next, I rout YI-in. by YI-in. grooves betweeneach wedge section and around the faceted edge of the top and gluein a thin border of satinwood sandwiched between strips of blackimbuya, which I had previously laminated and sawed into YI-in. byYI6-in. su'ips. I leave these inlaid borders slightly proud of the surfaceto protect tl1e top veneer while I work on the table's underside.With the top upside down, I glue and screw two different sizeparticleboard octagons to the underside to continue the flare fromthe pedestal (see figure 3 above). The steps between these twooctagons are filled and evened out with auto-body filler, and as itis curing, I tack Ys-in. Masonite wedges over each section to formthe gentle flare. Any gaps between the Masonite wedges are filledwith auto-body filler and sanded smooth. The facets created thisway are then veneered one at a time, with the AlpiN-iN wedgesweighed down with the rubber sandbags. The bags are heavy enoughso clamping isn't neccessary, but a layer of waxed paper is neededto protect tl1e veneer from tl1e black of the inner tube. When theveneering is complete, I glue the solid purple heart bullnose to thetable's edge and sand tl1e inlaid borders flush on the top. Djim Wallace, Institute of Business Designers, is project designerwith The Bommarito Group, a commercial interior-design fil-m inAustin, Tex.January/February 1989 67
- Page 3 and 4:
FineW> rktng'_' ______ ___ January/
- Page 6 and 7:
Letters (contillued)never hurt hims
- Page 8 and 9:
MetiJods of Wo rkedited and drawn b
- Page 10 and 11:
Methods of Wo rk (contillued)exampl
- Page 12 and 13:
Making a door sandwichI intend to m
- Page 14 and 15:
Q & A (colltillued)of a bad situati
- Page 16 and 17: Pollou'-upby Dick BurrowsMore on to
- Page 18 and 19: Easy toStep by Step DrawingsBuildOn
- Page 20 and 21: (25 years)P-SOO20" PlANERSEATTLE:1
- Page 22 and 23: There areover 4,000money-savingreas
- Page 24 and 25: READY TO ASSEMBLE-SOLID-CHERRYWALNU
- Page 26 and 27: THE BARTLEYBUNDLES!AlJ.500 ·24"Ban
- Page 28 and 29: A GREAT DEA.L IMORE (f)5 HP, 3 Ph3
- Page 30 and 31: --ANTIQUE & USED TOOLSQuality, olde
- Page 32 and 33: PhoneStater--- - -[][]Ur:iTheWoodwo
- Page 34 and 35: """""',' Universal Precision Measu
- Page 36 and 37: FineWorking January/February 1989M
- Page 38 and 39: Once the backrest plaques are joine
- Page 41 and 42: Fig. 4:.1:iim.lf1lmllli.iiiiie?tII
- Page 43 and 44: Secret compartments were so common
- Page 45 and 46: -----.JFig. 4: Hanging tray below t
- Page 47 and 48: Tbree examples of the author's slid
- Page 49 and 50: worked but will maintain a crisp, s
- Page 53 and 54: SCROLL-SA W TESTCompany and model L
- Page 55 and 56: An ordinary woodturning lathe can b
- Page 57 and 58: use a dust collector, and if possib
- Page 59 and 60: I've never been especially fond of
- Page 61 and 62: and it shields your fingers from ex
- Page 63 and 64: The cabinet scraper used by the aut
- Page 65: Fig. 2: Post:Modern Table Top, 52 i
- Page 69 and 70: Fig. 3: Curved miterPattern doesn't
- Page 71 and 72: Selections from the author's sketch
- Page 73 and 74: thor anticipate problems and make f
- Page 75 and 76: Fig. 2: Air flowMoist air exits thr
- Page 77 and 78: lating fan. The idea here is to ins
- Page 79 and 80: Long prized by woodworkers for its
- Page 81 and 82: A Chinese woodworker assembles an e
- Page 83 and 84: Chinese shaping toolsThroughout Chi
- Page 85 and 86: Using a Holtzapffel ornamental lath
- Page 87 and 88: NOW! BUY BRIDGEWOOD IN CANADA . ..
- Page 89: QiUl j!! IIIc:Ul.=:c ...!!
- Page 92 and 93: 111,"11SIOPm'EI.I,lu it ....IS •
- Page 94 and 95: CARBIDE TIPPED ROUTER BITSPRCAL PRO
- Page 96: FS Tool CorporationP.o. Box 510, 21
- Page 99 and 100: ... !Ij*;::""' eMore NTS 14-5614" H
- Page 101 and 102: FI:\ISHI:\G SLPPLIESIf you have bee
- Page 103 and 104: T\UNTONPUBliCATIONS... by fellow en
- Page 105 and 106: PmeWqqQWorkingIndex to issues 66 th
- Page 107 and 108: FowlerFowler, Brian, chair by, 67,1
- Page 109 and 110: ScrewsZimmerScrews:brace driving of
- Page 111 and 112: 34-76 1 10' Uni s-l-l/2 hp ........
- Page 113 and 114: MOISTURE METERFAMOUS "MINI-LiGNO"MA
- Page 115 and 116: Dependable extra hands for all type
- Page 117 and 118:
MIRRORA· THE HAND MIRRORCOMPLEMENT
- Page 119 and 120:
£'Delrl.lnc'e To Manufacture Quali