

Untitled - MetosExpo - Free
Untitled - MetosExpo - Free
Untitled - MetosExpo - Free

You also want an ePaper? Increase the reach of your titles
YUMPU automatically turns print PDFs into web optimized ePapers that Google loves.
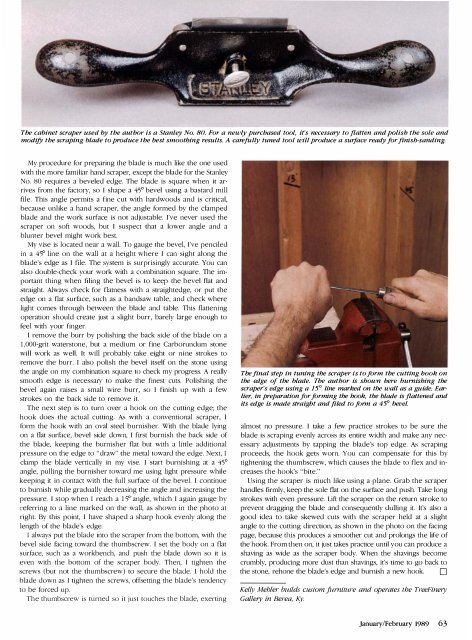
The cabinet scraper used by the author is a Stanley No. 80. For a newly purchased tool, it's necessary to flatten and pOlish the sole andmodify the scraping blade to produce the best smoothing results. A carefu lly tuned tool will produce a surface ready for finish-sanding.My procedure for preparing the blade is much like the one usedwith the more familiar hand scraper, except the blade for the StanleyNo. 80 requires a beveled edge. The blade is square when it arrivesfrom the factOlY, so I shape a 45° bevel using a bastard millfile. This angle permits a fine cut with hardwoods and is critical,because unlike a hand scraper, the angle formed by the clampedblade and the work surface is not adjustable. I've never used thescraper on soft woods, but I suspect that a lower angle and ablunter bevel might work best.My vise is located near a wall. To gauge the bevel, I've penciledin a 45" line on the wall at a height where I can sight along theblade's edge as I file. The system is surprisingly accurate. You canalso double-check your work with a combination square. The importantthing when filing the bevel is to keep the bevel flat andstraight. Always check for flatness with a straightedge, or put theedge on a flat surface, such as a bandsaw table, and check wherelight comes through between the blade and table. This flatteningoperation should create just a slight burr, barely large enough tofeel with your finger.I remove tile burr by polishing the back side of the blade on a1,000-grit waterstone, but a medium or fine Carborundum stoewill work as well. It will probably take eight or nine strokes toremove tile burr. I also polish the bevel itself on the stone usingtile angle on my combination square to check my progress. A reallysmootil edge is necessalY to make tile finest cuts. Polishing thebevel again raises a small wire burr, so I finish up with a fewstrokes on the back side to remove it.The next step is to turn over a hook on the cutting edge; thehook does the actual cutting. As with a conventional scraper, Iform the hook with an oval steel burnisher. With the blade lyingon a flat surface, bevel side down, I first burnish the back side ofthe blade, keeping the burnisher flat but witil a little additionalpressure on tile edge to "draw" the metal toward the edge. Next, Iclamp the blade vertically in my vise. I start burnishing at a 45°angle, pulling the burnisher toward me using light pressure whilekeeping it in contact with the full surface of the bevel. I continueto burnish while gradually decreasing the angle and increasing thepressure. I stop when I reach a 15°'angle, which I again gauge byreferring to a line marked on the wall, as shown in the photo atright. By this pOint, I have shaped a sharp hook evenly along thelength of the blade's edge.I always put the blade into tile scraper from the bottom, with tilebevel side facing toward tile thumbscrew. I set the body on a flatsurface, such as a workbench, and push tile blade down so it iseven with tile bottom of tile scraper body. Then, I tighten thescrews (but not the thumbscrew) to secure tile blade. I hold theblade down as I tighten the screws, offsetting the blade's tendencyto be forced up.The thumbscrew is turned so it just touches the blade, exertingThe final step in tuning the scraper is to form the cutting hook onthe edge of the blade. The author is shown here burnishing thescraper's edge using a 15° line marked on the wall as a guide. Earlier,in preparation for fo rming the hook, the blade is flattened andits edge is made straight and filed to fo rm a 45° bevel.almost no pressure. I take a few practice strokes to be sure theblade is scraping evenly across its entire width and make any necessatyadjustments by tapping the blade's top edge. As scrapingproceeds, the hook gets worn. You can compensate for this bytightening the thumbscrew, which causes the blade to flex and increasesthe hook's "bite."Using the scraper is much like using a plane. Grab the scraperhandles firmly, keep the sole flat on tile surface and push. Take longstrokes with even pressure. Lift the scraper on the return stroke toprevent dragging the blade and consequently dulling it. It's also agood idea to take skewed cuts witil the scraper held at a slightangle to the cutting direction, as shown in the photo on the facingpage, because this produces a smootiler cut and prolongs the life ofthe hook. From tilen on, it just takes practice until you can produce ashaving as wide as the scraper body. When the shavings becomecrumbly, producing more dust til31l shavings, it's time to go back totile stone, rehone the blade's edge and burnish a new hook. 0Kelly Mehler builds custom fu rniture and operates the TreeFineryGallelY in Berea, Ky.January/February 1989 63


