Pedestal TablesSculptural bases and veneered tops(by Jim WallaceWhen I design a table, I consider the pedestal as importantas the top. Modern manufacturers often relegate thetable base to the role of unobtrusive support, as if tosay: "Paint it black and perhaps it will disappear." However, mytables are meant to be sculptural as well as functional, so the pedestalis an integral part of the design, not merely a support for thetop, no matter how spectacular it may be.My table designs are inspired by many sources: nature, art, architeaure,fashion and graphics. The pedestal or "Post" in the bottomphoto on the facing page was influenced by d1e decorative elementsof Post-Modern architecture, hence the name "Post:Modern Table."My designs often are influenced by more practical considerations.For example, the top of the Post:Modern Table is veneered wid1 24wedge-shape segments, partly because the satinwood veneer wasavailable only in 5-in. widths and partly because I didn't have apress large enough to veneer the top as one piece.Constructing these pedestal tables, with their sculptural basesand unique veneering problems, is a challenge in any shop, butespecially so in my 300-sq.-ft. one-man shop. This small space a.lsohas forced me to limit my tool collecting. I have a 10-in. tablesaw,hand circular saw, 12-in. disc sander, belt sander, orbital sander,drill press, %-in. drill, router, clamps and a compressor for sprayinglacquer. In this article, I'll concentrate on describing someof my techniques rather than giving you plans for duplicating oneof my tables. I want to show that even though you may not have ashop stocked with expensive tools, you needn't limit the creativityof your designs. Being from the school of "whatever works," Ihave evolved some unorthodox methods for building tables andhave come up with devices to compensate for many of myshop's shortcomings.Whatever works -The multipurpose table shown in figure 1, below,simplifies many operations. It is constructed from 2x4s andplywood, with 32 casters mounted n 6-in. centers on the top. Mymother says it looks like a geriatric skateboard, but she'll have towait, because I'm still finding new u e for it around the shop. Infigure 1, the table's being used casters-down, as a stand to hold thetops while the veneer is clamped. Turned this way, I also use it asa mobile workbench for moving large in-progress pieces from mysmall garage shop to my driveway, where I work whenever possible.Cutting up d1e large 4-ft. by 8-ft. sheets of birch plywood and panicleboardneeded to construct all my tables is a real chore for oneperson. Turned casters-up, the multipurpose table becomes an outfeedtable the same height as my lO-in. Craftsman tablesaw, which isalso on wheels for moving outside. 111e sheets slide neady off thesaw and over the casters, making d1e process an easy one-man job.Because my pedestals are built with various sizes of polygons, 1devised the aajustable jig shown in the photo below. It's basically aboard wid1 a pivot pin and a wide lot for an adjustable miter gauge.The piece to be cut is drilled in d1e center so it fits snugly on thepivot pin. The miter gauge, fitted with d1e appropriately angle Ifence (for example, 45° for an octagon, 3(f for a hexagon), is set inconjunction with d1e saw's rip fence to cut d1e desired-size piece.The circumference of each tabletop is embellished with a seriesFig. 1: Veneering tabletopTabletop, particleboard substratePlywoodtriangle, 'I.-in.,with blocksfor distributingpressure onveneerMultifunctionaltable, casters down\This jig for cutting polygons has the versatility to cut variousshapes in a large range of sizes. Set up here to cut octagons, the jigcan be adapted to cut hexagons by replacing the 45° miter gaugewith one that has a 30° fence.64 Fine Woodworking
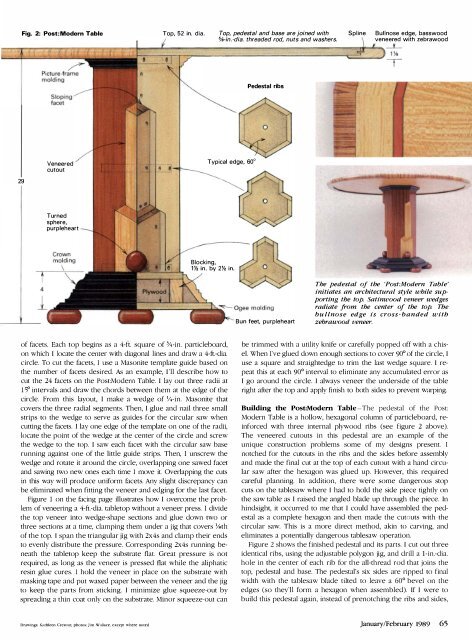
Fig. 2: Post:Modern Table Top, 52 in. dia. Top, pedestal and base are joined with Spline Bullnose edge, basswoodO/S-in.-dia. threaded rod, nuts and washers.veneered with zebrawoodT077rJ.====--==ti: TPedestal ribsVeneeredcutoutTypical edge, 60°29Turnedsphere,purpleheartBlocking,1% in. by 2% in.Bun feet, purpleheartThe pedestal of the 'Post:Modern Table'initiates an architectural style while supportingthe top. Satinwood veneer wedgesradiate from the center of the top. Thebullnose edge is cross· banded withzebrawood veneer.of facets. Each top begins as a 4-ft. square of %-in. particleboarq,on which I locate the center with diagonal lines and draw a 4-ft.-dia.circle. To cut the facets, I use a Masonite template guide based onthe number of facets desired. As an example, I'll describe how tocut d1e 24 facets on d1e Post:Modern Table. I lay out three radii atISO intervals and draw d1e chords between them at the edge of thecircle. From this layout, I make a wedge of Y4-in. Masonite thatcovers the three radial segments. Then, I glue and nail three smallstrips to the wedge to serve as guides for the circular saw whencutting the facets. I lay one edge of the template on one of the radii,locate the point of the wedge at the center of the circle and screwthe wedge to the top. I saw each facet with the circular saw baserunning against one of the little guide strips. Then, I unscrew thewedge and rotate it around the circle, overlapping one sawed facetand sawing two new ones each time I move it. Overlapping the cutsin this way will produce uniform facets. Any slight discrepancy canbe eliminated when fitting d1e veneer and edging for the last facet.Figure I on the facing page illustrates how I overcome the problemof veneering a 4-ft.-dia. tabletop without a veneer press. I divided1e top veneer into wedge-shape sections and glue down two orthree sections at a time, clamping d1em under a jig that covers Ys thof the top. 1 span the triangular jig with 2x4s and clamp their endsto evenly distribute the pressure. Corresponding 2x4s running beneaththe tabletop keep the substrate flat. Great pressure is notrequired, as long as the veneer is pressed flat while the aliphaticresin glue cures. 1 hold the veneer in place on the substrate withmasking tape and put waxed paper between the veneer and the jigto keep d1e parts from sticking. I minimize glue squeeze-out byspreading a thin coat only on the substrate. Minor squeeze-out canbe trimmed with a utility knife or carefully popped off with a chisel.When I've glued down enough sections to cover 90° of d1e circle, Iuse a square and straightedge to trim the last wedge square. I repeatthis at each 90° interval to eliminate any accumulated error asI go around the circle. I always veneer the underside of the tableright after the top and apply finish to bod1 sides to prevent warping.Building the Post:Modern Table -The pedestal of the Post:Modern Table is a hollow, hexagonal column of particleboard, reinforcedwith three internal plywood ribs (see figure 2 above).The veneered cutouts in this pedestal are an example of theunique construction problems some of my designs present. Inotched for the cutouts in the ribs and d1e sides before assemblyand made the final cut at the top of each cutout with a hand circularsaw after the hexagon was glued up. However, this requiredcareful planning. In addition, there were some dangerous stopcuts on the tablesaw where 1 had to hold d1e side piece tightly onthe saw table as I raised d1e angled blade up through the piece. InhindSight, it occurred to me that I could have assembled the pedestalas a complete hexagon and then made d1e cut uts with thecircular saw. This is a more direct method, akin to carving, andeliminates a potentially dangerous tablesaw operation.Figure 2 shows the finished pedestal and its parts. I cut out d1reeidentical ribs, using the adjustable polygon jig, and drill a I-in.-dia.hole in me center of each rib for d1e all-d1read rod that joins d1etop, pedestal and base. The pedestal's six sides are ripped to finalwidm with the tablesaw blade tilted to leave a 60° bevel on d1eedges (so they'll form a hexagon when assembled). If I were tobuild this pedestal again, instead of prenotching d1e ribs and sides,Drawings: Kmhleen CreslOn; photos: Jim W:lllace, except where notedJanuary/February 1989 65
- Page 3 and 4:
FineW> rktng'_' ______ ___ January/
- Page 6 and 7:
Letters (contillued)never hurt hims
- Page 8 and 9:
MetiJods of Wo rkedited and drawn b
- Page 10 and 11:
Methods of Wo rk (contillued)exampl
- Page 12 and 13:
Making a door sandwichI intend to m
- Page 14 and 15: Q & A (colltillued)of a bad situati
- Page 16 and 17: Pollou'-upby Dick BurrowsMore on to
- Page 18 and 19: Easy toStep by Step DrawingsBuildOn
- Page 20 and 21: (25 years)P-SOO20" PlANERSEATTLE:1
- Page 22 and 23: There areover 4,000money-savingreas
- Page 24 and 25: READY TO ASSEMBLE-SOLID-CHERRYWALNU
- Page 26 and 27: THE BARTLEYBUNDLES!AlJ.500 ·24"Ban
- Page 28 and 29: A GREAT DEA.L IMORE (f)5 HP, 3 Ph3
- Page 30 and 31: --ANTIQUE & USED TOOLSQuality, olde
- Page 32 and 33: PhoneStater--- - -[][]Ur:iTheWoodwo
- Page 34 and 35: """""',' Universal Precision Measu
- Page 36 and 37: FineWorking January/February 1989M
- Page 38 and 39: Once the backrest plaques are joine
- Page 41 and 42: Fig. 4:.1:iim.lf1lmllli.iiiiie?tII
- Page 43 and 44: Secret compartments were so common
- Page 45 and 46: -----.JFig. 4: Hanging tray below t
- Page 47 and 48: Tbree examples of the author's slid
- Page 49 and 50: worked but will maintain a crisp, s
- Page 53 and 54: SCROLL-SA W TESTCompany and model L
- Page 55 and 56: An ordinary woodturning lathe can b
- Page 57 and 58: use a dust collector, and if possib
- Page 59 and 60: I've never been especially fond of
- Page 61 and 62: and it shields your fingers from ex
- Page 63: The cabinet scraper used by the aut
- Page 67 and 68: Fig. 3: LFI TableNut is fastened to
- Page 69 and 70: Fig. 3: Curved miterPattern doesn't
- Page 71 and 72: Selections from the author's sketch
- Page 73 and 74: thor anticipate problems and make f
- Page 75 and 76: Fig. 2: Air flowMoist air exits thr
- Page 77 and 78: lating fan. The idea here is to ins
- Page 79 and 80: Long prized by woodworkers for its
- Page 81 and 82: A Chinese woodworker assembles an e
- Page 83 and 84: Chinese shaping toolsThroughout Chi
- Page 85 and 86: Using a Holtzapffel ornamental lath
- Page 87 and 88: NOW! BUY BRIDGEWOOD IN CANADA . ..
- Page 89: QiUl j!! IIIc:Ul.=:c ...!!
- Page 92 and 93: 111,"11SIOPm'EI.I,lu it ....IS •
- Page 94 and 95: CARBIDE TIPPED ROUTER BITSPRCAL PRO
- Page 96: FS Tool CorporationP.o. Box 510, 21
- Page 99 and 100: ... !Ij*;::""' eMore NTS 14-5614" H
- Page 101 and 102: FI:\ISHI:\G SLPPLIESIf you have bee
- Page 103 and 104: T\UNTONPUBliCATIONS... by fellow en
- Page 105 and 106: PmeWqqQWorkingIndex to issues 66 th
- Page 107 and 108: FowlerFowler, Brian, chair by, 67,1
- Page 109 and 110: ScrewsZimmerScrews:brace driving of
- Page 111 and 112: 34-76 1 10' Uni s-l-l/2 hp ........
- Page 113 and 114: MOISTURE METERFAMOUS "MINI-LiGNO"MA
- Page 115 and 116:
Dependable extra hands for all type
- Page 117 and 118:
MIRRORA· THE HAND MIRRORCOMPLEMENT
- Page 119 and 120:
£'Delrl.lnc'e To Manufacture Quali