The author makes raised panels for the wardrobe doors on therouter table. In the first step, shown above, he reduces the thicknessof each panel's edge by running the panel vertically by astraight bit. A fingerboard clamped to a spacer provides the pressureneeded to stabilize the panel as it's fed. This fingerboard alsoprevents the climb-cutting bit from self-feeding the panel.ing on p. 58. The shelf is notched so the edge of the shelf is flushwith the front of the stile.Originally, I'd planned to let the base of my wardrobe rest onthe floor, with a decorative molding at the bottom edge. However,I saw another base treatment I liked in the Ketchum book andadapted this base to fit my wardrobe. With this new base, the carcaseis cut out to make four feet, with gentle convex curves coming upfrom the floor along the insides of the feet-a pleasant visual effect.Drawing in scale, I experimented with various curves until I cameup with one I liked. I scaled up this curve on graph paper to makea full-size plywood template, which I used to mark out the cabinetsides. After roughing out the curve with a sabersaw, I clamped thesame template to the cabinet side and routed the final shapes witha piloted straight bit bearing against the template.Creating tl1e same cUlved feet on the front of the war Irobeinvolved modifying the cabinet's otherwise straightforward faceframe. I used a typical face frame, assembled witl1 mortise-andtenonjOints, on the front of the cabinet and a frame-and-panelback. But the stiles weren't wide enough for the same cLllve I hadcut on the cabinet sides, so I glued 1 Y2-in.-wide ears to tl1e insideedges of the stiles, providing stock for tl1e curved feet. I cut thebottom rail shorter than the top rail and tenoned it to the earpieces instead of the stiles. If I'd made the bottom rail extra wideto accommodate the cutout, I would have created a wood-movementproblem by joining a 6-in.-wide rail cross-grain to the faceframe's stiles.Gluing up a cabinet of this size was quite a task in my smallshop. The cabinet's size stretched every clamp in the shop to itscapacity. The carcase dovetails were tight enough that they didn'tneed clamping, but tl1e pin tenons needed to be pulled into theirmortises witl1 pipe clamps. A 2x4 I had carefully bandsawn into abow shape (convex surface toward the cabinet) was used as a caulto distribute clamping pressure across the sides. After the carcasewas dry, I glued on tl1e already assembled face frame.Though plywood is a suitable and more-often-selected choicefor the back of a large cabinet, I decided to stick to tl1e more traditionalsolid-wood frame-and-panel back. This frame consists ofthree stiles and four rails mortised and tenoned together, dividingthe back into four panels. The panels themselves are flat and only% in. thick, the same thickness as the grooves in the frame. Theentire glued-up back recesses into the rabbet cut in the back of thecarcase earlier.Hagood uses a homemade beading plane to detail the inner edgesof the door frame. The mahogany plane has two nonsymmetricalbead-profile blades, one for cutting in each direction. A piece ofquarter-round molding on the underside of the plane guides italong the frame'S inner edge fo r a straight cut.operations can be time-consuming, but I don't know a faster way tomake pin tenons or an alternative joint that has the same integrity.As with most wardrobes, mine has a high shelf for storing clothingabove the hanging garments. The -in.-thick shelf joins theinside of the carcase by sliding into a simple %-in. by %-in. dadoplowed into the cabinet sides. The dado is the same depth as therabbet cut along the back edges to accept the frame-and-panelback. I cut the dado with a %-in. straight bit in a router, using astraight board clamped across the cabinet side as a fence. Becausethe 4/4 shelf must span the width of the 42-in. cabinet, I supportedthe middle of the shelf with a lap joint on the 1 Y2-in.-wide centerstile. Dovetails at the top and bottom of the stile connect to thefront edges of the carcase top and bottom, as shown in the draw-Building frame-and-panel doors -After measuring the faceframeopening, I made a pair of door frames that fit snugly into tl1eopening. The frames are joined with haunched mortise-and-tenonjoints, and each member has a 6-in.-wide groove, cut with adado blade on the tablesaw, to hold the panel. The bottom doorrails are wider than tl1e top rails, to overcome visual foreshortening,which makes bottom rails look narrower than tl1ey are. I letthe stiles run long to prevent splitting during mortising, thentrimmed them to lengtl1 after the doors were assembled.I raised my panels with a router, homemade router table andtwo different bits. The first operation was to reduce tl1e tl1icknessat tl1e panel's edge with a Y2-in. straight bit. The panel's edges wererouted with tl1e panel on edge and held tight against the fence by afingerboard clamped directly above the bit, as shown in tl1e topphoto on this page. To produce tl1e cleanest cut pOSSible, especiallywhile shaping the panel's endgrain, I climb-cut the panels, feedingthem into the bit counter in t11e same direction it was spinning. Ifyou uy this, make sure to take several shallow passes on each edge,to prevent dangerous self-feeding, which can occur when c1imbcutting.The pressure of the fingerboard also prevents self-feeding,60 Fine Woodworking
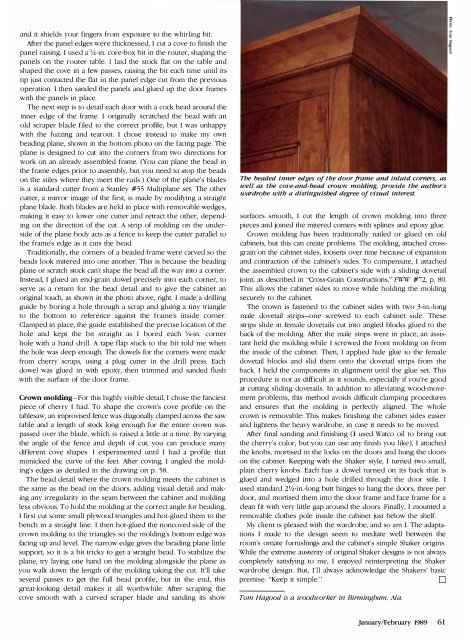
and it shields your fingers from exposure to the whirling bit.After the panel edges were thicknessed, I cut a cove to finish thepanel raising. I used a 112-in. core-box bit in the router, shaping thepanels on the router table. I laid the stock flat on the table andshaped the cove in a few passes, raising the bit each time until itstip just contacted the flat in the panel edge cut from the previousoperation. I then sanded the panels and glued up the door frameswith the panels in place.The next step is to detail each door with a cock bead around theinner edge of the frame. I originally scratched the bead with anold scraper blade filed to the correct profile, but I was unhappywith the fuzzing and tearout. I chose instead to make my ownbeading plane, shown in the bottom photo on the facing page. Theplane is designed to cut into the corners from two directions forwork on an already assembled frame. (You can plane the bead inthe frame edges prior to assembly, but you need to stop the beadson the stiles where they meet the rails.) One of the plane's bladesis a standard cutter from a Stanley #55 Multiplane set. The othercutter, a mirror image of the first, is made by modifying a straightplane blade. Both blades are held in place with removable wedges,making it easy to lower one cutter and retract the other, dependingon the direction of the cut. A strip of molding on the undersideof the plane body acts as a fence to keep the cutter parallel tothe frame's edge as it cuts the bead.Traditionally, the corners of a beaded frame were carved so thebeads look mitered into one another. This is because the beadingplane or scratch stock can't shape the bead all the way into a corner.Instead, I glued an end-grain dowel precisely into each corner, toserve as a return for the bead detail and to give the cabinet anoriginal touch, as shown in the photo above, right. I made a drillingguide by boring a hole through a scrap and gluing a tiny triangleto the bottom to reference against the frame's inside corner.Clamped in place, the guide established the precise location of thehole and kept the bit straight as I bored each Y4-in. cornerhole with a hand drill. A tape flap stuck to the bit told me when .the hole was deep enough. The dowels for the corners were madefrom cherry scraps, using a plug cutter in the drill press. Eachdowel was glued in with epoxy, then trimmed and sanded flushwith the surface of the door frame.Crown molding-For this highly visible detail, I chose the fanciestpiece of cherry I had. To shape the crown's cove profile on thetablesaw, an improvised fence was diagonally clamped across the sawtable and a length of stock long enough for the entire crown waspassed over the blade, which is raised a little at a time. By varyingthe angle of the fence and depth of cut, you can produce manydifferent cove shapes. I experimented until I had a profile thatmimicked the curve of the feet. After coving, I angled the molding'sedges as detailed in the drawing on p. 58.The bead detail where the crown molding meets the cabinet isthe same as the bead on the doors, adding visual detail and makingany irregularity in the seam between the cabinet and moldingless obvious. To hold the molding at the correct angle for beading,I first cut some small plywood triangles and hot-glued them to thebench in a straight line. I then hot-glued the noncoved side of thecrown molding to the triangles so the molding's bottom edge wasfacing up and level. The narrow edge gives the beading plane littlesupport, so it is a bit tricky to get a straight bead. To stabilize theplane, try laying one hand on the molding alongside the plane asyou walk down the length of the molding taking the cut. It'll takeseveral passes to get the full bead profile, but in the end, thisgreat-looking detail makes it all worthwhile. After scraping thecove smooth with a curved scraper blade and sanding its showThe beaded inner edges of the door frame and inlaid corners, aswell as the cove-and-bead crown mOlding, provide the author'swardrobe with a distinguished degree of visual interest.surfaces smooth, I cut the length of crown molding into threepieces and joined the mitered corners with splines and epoxy glue.Crown molding has been traditionally nailed or glued on oldcabinets, but this can create problems. The molding, attached crossgrainon the cabinet sides, loosens over time because of expansionand contraction of the cabinet's sides. To compensate, I attachedthe assembled crown to the cabinet's side with a sliding dovetailjOint, as described in "Cross-Grain Constructions," FWW #72, p. 80.This allows the cabinet sides to move while holding the moldingsecurely to the cabinet.The crown is fastened to the cabinet sides with two 3-in.-longmale dovetail strips-one screwed to each cabinet side. Thesestrips slide in female dovetails cut into angled blocks glued to theback of the molding. After the male strips were in place, an assistantheld 1;he molding while I screwed the front molding on fromthe inside of the cabinet. Then, I applied hide glue to the femaledovetail blocks and slid them onto the dovetail strips from theback. I held the components in alignment until the glue set. Thisprocedure is not as difficult as it sounds, especially if you're goodat cutting sliding dovetails. In addition to alleviating wood-movementproblems, this method avoids difficult clamping proceduresand ensures that the molding is perfectly aligned. The wholecrown is removable: This makes finishing the cabinet sides easierand lightens the heavy wardrobe, in case it needs to be moved.After final sanding and finishing (I used Watco oil to bring outthe cherry's color, but you can use any finish you like), I attachedthe knobs, mortised in the locks on the doors and hung the doorson the cabinet. Keeping with the Shaker style, I turned two small,plain cherry knobs. Each has a dowel turned on its back that isglued and wedged into a hole drilled through the door stile. Iused standard 2Y2-in.-long butt hinges to hang the doors, three perdoor, and mortised them into the door frame and face frame for aclean fit with very little gap around the doors. Finally, I mounted aremovable clothes pole inside the cabinet just below the shelf.My client is pleased with the wardrobe, and so am I. The adaptationsI made to the design seem to mediate well between theroom's ornate furnishings and the cabinet's simple Shaker origins.While the exu-eme austerity of original Shaker designs is not alwayscompletely satisfying to me, I enjoyed reinterpreting the Shakerwardrobe design. But, I'll always acknowledge the Shakers' basicpremise: "Keep it simple."DTom Hagood is a woodworker in Birmingham, Ala.January/February 1989 61
- Page 3 and 4:
FineW> rktng'_' ______ ___ January/
- Page 6 and 7:
Letters (contillued)never hurt hims
- Page 8 and 9:
MetiJods of Wo rkedited and drawn b
- Page 10 and 11: Methods of Wo rk (contillued)exampl
- Page 12 and 13: Making a door sandwichI intend to m
- Page 14 and 15: Q & A (colltillued)of a bad situati
- Page 16 and 17: Pollou'-upby Dick BurrowsMore on to
- Page 18 and 19: Easy toStep by Step DrawingsBuildOn
- Page 20 and 21: (25 years)P-SOO20" PlANERSEATTLE:1
- Page 22 and 23: There areover 4,000money-savingreas
- Page 24 and 25: READY TO ASSEMBLE-SOLID-CHERRYWALNU
- Page 26 and 27: THE BARTLEYBUNDLES!AlJ.500 ·24"Ban
- Page 28 and 29: A GREAT DEA.L IMORE (f)5 HP, 3 Ph3
- Page 30 and 31: --ANTIQUE & USED TOOLSQuality, olde
- Page 32 and 33: PhoneStater--- - -[][]Ur:iTheWoodwo
- Page 34 and 35: """""',' Universal Precision Measu
- Page 36 and 37: FineWorking January/February 1989M
- Page 38 and 39: Once the backrest plaques are joine
- Page 41 and 42: Fig. 4:.1:iim.lf1lmllli.iiiiie?tII
- Page 43 and 44: Secret compartments were so common
- Page 45 and 46: -----.JFig. 4: Hanging tray below t
- Page 47 and 48: Tbree examples of the author's slid
- Page 49 and 50: worked but will maintain a crisp, s
- Page 53 and 54: SCROLL-SA W TESTCompany and model L
- Page 55 and 56: An ordinary woodturning lathe can b
- Page 57 and 58: use a dust collector, and if possib
- Page 59: I've never been especially fond of
- Page 63 and 64: The cabinet scraper used by the aut
- Page 65 and 66: Fig. 2: Post:Modern Table Top, 52 i
- Page 67 and 68: Fig. 3: LFI TableNut is fastened to
- Page 69 and 70: Fig. 3: Curved miterPattern doesn't
- Page 71 and 72: Selections from the author's sketch
- Page 73 and 74: thor anticipate problems and make f
- Page 75 and 76: Fig. 2: Air flowMoist air exits thr
- Page 77 and 78: lating fan. The idea here is to ins
- Page 79 and 80: Long prized by woodworkers for its
- Page 81 and 82: A Chinese woodworker assembles an e
- Page 83 and 84: Chinese shaping toolsThroughout Chi
- Page 85 and 86: Using a Holtzapffel ornamental lath
- Page 87 and 88: NOW! BUY BRIDGEWOOD IN CANADA . ..
- Page 89: QiUl j!! IIIc:Ul.=:c ...!!
- Page 92 and 93: 111,"11SIOPm'EI.I,lu it ....IS •
- Page 94 and 95: CARBIDE TIPPED ROUTER BITSPRCAL PRO
- Page 96: FS Tool CorporationP.o. Box 510, 21
- Page 99 and 100: ... !Ij*;::""' eMore NTS 14-5614" H
- Page 101 and 102: FI:\ISHI:\G SLPPLIESIf you have bee
- Page 103 and 104: T\UNTONPUBliCATIONS... by fellow en
- Page 105 and 106: PmeWqqQWorkingIndex to issues 66 th
- Page 107 and 108: FowlerFowler, Brian, chair by, 67,1
- Page 109 and 110: ScrewsZimmerScrews:brace driving of
- Page 111 and 112:
34-76 1 10' Uni s-l-l/2 hp ........
- Page 113 and 114:
MOISTURE METERFAMOUS "MINI-LiGNO"MA
- Page 115 and 116:
Dependable extra hands for all type
- Page 117 and 118:
MIRRORA· THE HAND MIRRORCOMPLEMENT
- Page 119 and 120:
£'Delrl.lnc'e To Manufacture Quali