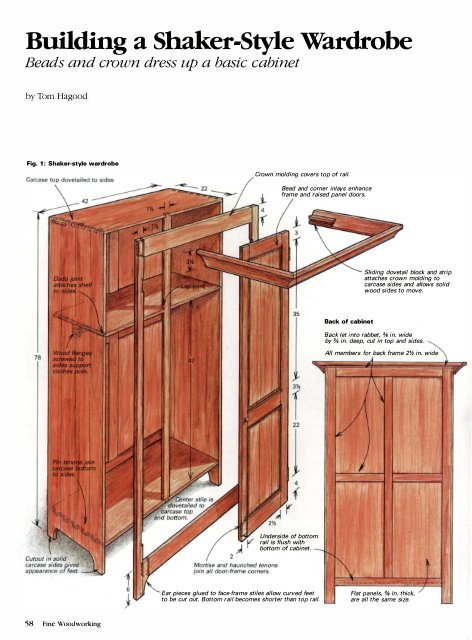
Building a SBeads and crown dress up a basic cabinethaker-Style Wardrobeby Tom HagoodFig. 1: Shaker-style wardrobeCrown molding covers top of rail.Bead and corner inlays enhanceframe and raised panel doors.Sliding dovetail block and stripattaches crown molding tocarcase sides and allows solidwood sides to move.Back of cabinetBack let into rabbet, % in. wideby % in. deep, cut in top and sides.All members for back frame 2% in. wideUnderside of bottomrail is flush withbottom of cabinet.Ear pieces glued to face-frame stiles allow curved feetto be cut out. Bottom rail becomes shorter than top rail.Flat panels, % in. thick,are all the same size.58 Fine Woodworking
I've never been especially fond of period fu rniture; therefore,the commission I received to build a traditionally styled wardrobecabinet was quite a challenge. The client did not specifytile style, but the piece had to fit into an Early American bedroomdominated by a huge antique mahogany bed-a family heirloom.Because all my previous work had been with contemporary designs,I had some reservations about accepting tile commission; a contemporatywardrobe would clearly be out of place in this bedroom.Thus, I set out to find a period style that would be traditional yetallow for some creative interpretation so I could incorporate myown design details. In this article, I'll tell you how I developed mydesign, worked out the details and built the cherry wardrobe cabinetpictured at right.Before I began designing tile wardrobe, I searched through furniturereference books for a period piece to serve as a point ofdeparture. In my search, I discovered a reference book calledChests, Cupboards, Desks and Other Pieces by William C. Ketchum,Jr. (published by Random House, Wesullinster, Md. 21157). Altiloughprimarily a book for furniture collectors, I find it a valuable resourcefor furniture designers: The book includes photographs and drawingsof a dizzying number of styles, from English and French periodpieces to Shaker designs to Wendell Castle stack-laminated work.The book even includes joinelY details and dimensions for manyof the pieces.Ketchum'S book contains a photo of a simple Shaker wardrobethat seemed to fit my needs. The piece is traditional looking yetplain enough to benefit from the addition of some of my decorativedetails. I was already somewhat familiar with Shaker furnitureand crafts, having at one time manufactured Shaker-style steambentoval boxes, and I like the Shakers' straightforward, functionalapproach to fu rnituremaking. There are also modern interpretationsof the style that I like, such as the work of furnituremakerThomas Moser of Maine.It was necessary to adapt the dimensions of tile wardrobe to fittile client's room and accommodate the amount of clothing rh:ecabinet would have to hold. To help visualize how the cabinetwould relate to its surroundings, I made a perspective sketch oftile room, including a view of tile ceiling and other bedroom fu rnishings. I chose to make the wardrobe 78 in. tall and 42 in. wideto fit harmoniously with the client's large bed, and I made thewardrobe 22 in. deep to easily handle bulky winter clothes hungon a clothing pole inside.Pleased with the proportions of the cabinet, I went back to thedrafting table to work out tile small details, such as the cutout basebeading around the door frames, tile profile of the crown moldingand tile joinety to hold the cabinet together. Because solid woodwould be used tilroughout, I had to design the cabinet to allow forexpansion and contraction. In addition to frame-and-panel doors,tilis meant making a frame-and-panel back and a sliding joint forattaching tile crown molding to the top of the carcase. The top,bottom and side of tile carcase would consist of edge-glued boardsjoined with dovetails at the top and pin tenons at tile bottom. A faceframe would be glued to the front of the carcase, and the back framewould be fitted into a rabbet in tile carcase sides. I also shaped door,base and crown molding details to give the cabinet individuality.Carcase construction-I began by building me basic carcase.After edge-gluing several narrow 4/4 boards to make the sides, topand bottom, I cut the dovetails at the top of the case by hand, usinga chisel, mallet and dovetail saw. You could also use a router anddovetail template. Next, I laid out and chopped the mortises at thebottom of tile sides to accept the multiple tenons on the carcasebottom. These mortises were cut witil a straight bit in a routerThe design of the author's cherry wardrobe cabinet, above, isbased on a traditional Shaker piece that he mOdified, adding hisown details to the doors, base and crown molding.By changing the position of the two movable rails that guide therouter, the author works his way across the bottom of the carcaseside, chopping mortises for pin tenons that will join the sides tothe bottom of his wardrobe cabinet.guided by a homemade jig, as shown in the smaller photo above.The jig is a square template made up of two rails and two adjustablefences. A plunge router is set into the square, the bit isplunged and the router is then moved around inside tile fenced area(router base bearing against the fences and rails) until the mortiseis completed. The two adjustable fences, pinned into place withremovable dowels, are repositioned for each of me seven mortisesacross the widtil of tile two carcase sides. The routed mortiseshave rounded corners that must be squared up with a chisel.Next, I cut the multiple tenons on the ends of the carcase bottom.After marking these tenons by transferring lines from tile mortises, Ibandsawed away most of the waste, then pared the tenons for a tightfit into their mortises. As an alternative, you can use a router torough-cut the shoulders, tilen pare them with a chisel. Either of theseDrawing: Mark KaraJanuary/February 1989 59
- Page 3 and 4:
FineW> rktng'_' ______ ___ January/
- Page 6 and 7:
Letters (contillued)never hurt hims
- Page 8 and 9: MetiJods of Wo rkedited and drawn b
- Page 10 and 11: Methods of Wo rk (contillued)exampl
- Page 12 and 13: Making a door sandwichI intend to m
- Page 14 and 15: Q & A (colltillued)of a bad situati
- Page 16 and 17: Pollou'-upby Dick BurrowsMore on to
- Page 18 and 19: Easy toStep by Step DrawingsBuildOn
- Page 20 and 21: (25 years)P-SOO20" PlANERSEATTLE:1
- Page 22 and 23: There areover 4,000money-savingreas
- Page 24 and 25: READY TO ASSEMBLE-SOLID-CHERRYWALNU
- Page 26 and 27: THE BARTLEYBUNDLES!AlJ.500 ·24"Ban
- Page 28 and 29: A GREAT DEA.L IMORE (f)5 HP, 3 Ph3
- Page 30 and 31: --ANTIQUE & USED TOOLSQuality, olde
- Page 32 and 33: PhoneStater--- - -[][]Ur:iTheWoodwo
- Page 34 and 35: """""',' Universal Precision Measu
- Page 36 and 37: FineWorking January/February 1989M
- Page 38 and 39: Once the backrest plaques are joine
- Page 41 and 42: Fig. 4:.1:iim.lf1lmllli.iiiiie?tII
- Page 43 and 44: Secret compartments were so common
- Page 45 and 46: -----.JFig. 4: Hanging tray below t
- Page 47 and 48: Tbree examples of the author's slid
- Page 49 and 50: worked but will maintain a crisp, s
- Page 53 and 54: SCROLL-SA W TESTCompany and model L
- Page 55 and 56: An ordinary woodturning lathe can b
- Page 57: use a dust collector, and if possib
- Page 61 and 62: and it shields your fingers from ex
- Page 63 and 64: The cabinet scraper used by the aut
- Page 65 and 66: Fig. 2: Post:Modern Table Top, 52 i
- Page 67 and 68: Fig. 3: LFI TableNut is fastened to
- Page 69 and 70: Fig. 3: Curved miterPattern doesn't
- Page 71 and 72: Selections from the author's sketch
- Page 73 and 74: thor anticipate problems and make f
- Page 75 and 76: Fig. 2: Air flowMoist air exits thr
- Page 77 and 78: lating fan. The idea here is to ins
- Page 79 and 80: Long prized by woodworkers for its
- Page 81 and 82: A Chinese woodworker assembles an e
- Page 83 and 84: Chinese shaping toolsThroughout Chi
- Page 85 and 86: Using a Holtzapffel ornamental lath
- Page 87 and 88: NOW! BUY BRIDGEWOOD IN CANADA . ..
- Page 89: QiUl j!! IIIc:Ul.=:c ...!!
- Page 92 and 93: 111,"11SIOPm'EI.I,lu it ....IS •
- Page 94 and 95: CARBIDE TIPPED ROUTER BITSPRCAL PRO
- Page 96: FS Tool CorporationP.o. Box 510, 21
- Page 99 and 100: ... !Ij*;::""' eMore NTS 14-5614" H
- Page 101 and 102: FI:\ISHI:\G SLPPLIESIf you have bee
- Page 103 and 104: T\UNTONPUBliCATIONS... by fellow en
- Page 105 and 106: PmeWqqQWorkingIndex to issues 66 th
- Page 107 and 108: FowlerFowler, Brian, chair by, 67,1
- Page 109 and 110:
ScrewsZimmerScrews:brace driving of
- Page 111 and 112:
34-76 1 10' Uni s-l-l/2 hp ........
- Page 113 and 114:
MOISTURE METERFAMOUS "MINI-LiGNO"MA
- Page 115 and 116:
Dependable extra hands for all type
- Page 117 and 118:
MIRRORA· THE HAND MIRRORCOMPLEMENT
- Page 119 and 120:
£'Delrl.lnc'e To Manufacture Quali