Once the backrest plaques are joined to the back rail and clampedto the bench, they are roughed to shape with a small motorizedblock plane. The author then uses spokeshaves and scrapers to refineand smooth the forms.With a lh-in. spiral-fluted straight bit in a plunge router, the authorcuts through mortises in the chair's armrests and legs. Thechair parts are clamped inside a plywood jig, which guides therouter base as it cuts the mortises. Two adjustable stops clamped tothe top of the jig's sides act as stops to determine mortise length.chairs are among the most brutalized fu rniture in the home, I useinterlocking dowel and tenon joinery to help the chairs survive thestress of being sat on, of being dragged and of being balanced ontheir rear legs. Further, interlocking joints help prevent parts thatare joined cross-grain from separating due to differential woodmovement caused by humidity changes.The side seat rails join the four legs with through mortises andtenons. I make the legs thick enough at the joints to prevent rackingforces from breaking through the mortises. Also, I wedge theends of the side-rail through tenons to prevent them from pullingout. Because there isn't enough room to also mortise and tenonthe front and back rails to the leg, these rails are joined by angleddowels. The dowels are driven through holes drilled in the side ofthe legs, penetrating deeply into the ends of the front and backrails. The angle creates a dovetail-like effect that makes the jointinseparable once assembled, and because the dowels pass throughthe edges of the side-rail tenons, they also lock those joints.The armrests join the tops of both front and back legs withthrough tenons rising from the legs. Although the chair doesn'thave stretchers bracing the legs below the seat, the armrests reinforcethe front-leg to side-rail joint and keep the chair from rack-ing. The chair's connecting back rail is joined to the armrests witha bridle joint. The tenon is cut on the armrest, leaving more woodon the back rail, which needs the extra stock for strength. Thearmrests also have shoulders on their inside faces, which buttressagainst the back rail and keep it from racking. The backrest joinsthe back rail in a glued long-grain to long-grain jOint-the strongestjoint possible.Construction-I start construction by making up a cutting list forthe chair parts, specifying the dimensions of the final parts, asdrawn on the plans. Next, I make patterns for the parts that will beshaped so I can quickly make identical parts for all 12 chairs. I useYs-in.-thick white Marlite (a Masonite-like product used in bathenclosures, which is available from local hardware stores) fo r thepatterns, but its white surface is very slick, so I scrub it lightly withsandpaper to provide some tOOtl1 for the pencil lines. I transfer tl1elines for a part from the full-size plans using carbon paper betweenthe plans and Marlite. The patterns are then bandsawn out,and the edges are smootl1ed with a rasp and spokeshave.I decided to use cherry for my chairs to harmonize witl1 theinterior of the client's home. First, I jOint, thickness-plane and cutall the parts to rough dimensions. At this stage, I make the parts atleast Y4 in. oversize in width and thickness and allow 1 in. extra inlength. For maximum efficiency in making a whole set of chairs, Iperform each of the operations described in the following paragraphson all chair parts before moving on to the next step.I start with the backrests, and following the Marlite pattern, Imark and bandsaw out the shape. Because some of the edges ofthe backrests are difficult to sand after being glued to tl1e back rail,I spokeshave and sand all edges of the plaques. Next, I dress theback rail to final dimensions and cut the bridle-joint slot on eachend with a tablesaw. I then cut a 10° bevel on the rail's front faceand glue the backrest plaques in position on the rail. A Y' 6-in.deep rabbet jointed on the back sides of the plaques keeps themfrom slipping when clamped.After the glue dries, I'm ready to shape the faces of the backrestplaques. I rough out the shapes with a Porter-Cable motorizedblock plane (see top photo this page), then use a spokeshave andcabinet scraper to refine the form-a rigorous job, but I've alwaysenjoyed the satisfaction of shaping wood to final fo rm by the judgmentof eye and hand. After the plaques are done, I spokeshave,rasp and sand the back rail to final shape.As with all the other shaped parts, the joints of the armrestsshould be cut while the armrests are still square pieces, becauseit's easier to reference a square part to the saw fence. The tenonthat joins the back-rail bridle joint is cut on the tablesaw, holdingeach armrest vertically in a sliding-tenon jig to cut the cheeks, tl1encrosscutting the shoulders using the miter gauge. I also cut theangled shoulder on the inside edge of each armrest on the tablesaw.The direction this 10° shoulder slants to meet the angled faceof the back rail determines whether an armrest will be a right orleft arm. One of the chairmaker neuroses I've developed over theyears is the "right-left top-bottom paranoia." To avoid confusionand mistakes, I separate my armrests and other right-left parts intodifferent piles and mark them accordingly.Next, I cut the mortises that join the armrests with the legs. Forthis, I use a plunge router fitted with a Y2-in. straight bit and amortising fi xture (see bottom photo this page), similar to the oneTage Frid wrote about in FWW #30, pp. 90-92. The armrest clampsin the fixture, while the top rails of the box-like fixture guide therouter base. Two adjustable stops limit router travel to determinethe length of each mortise. I cut two mortises in each armrest, onefor each leg. This same jig does tl1e mortises in the legs for the38 Fine Woodworking
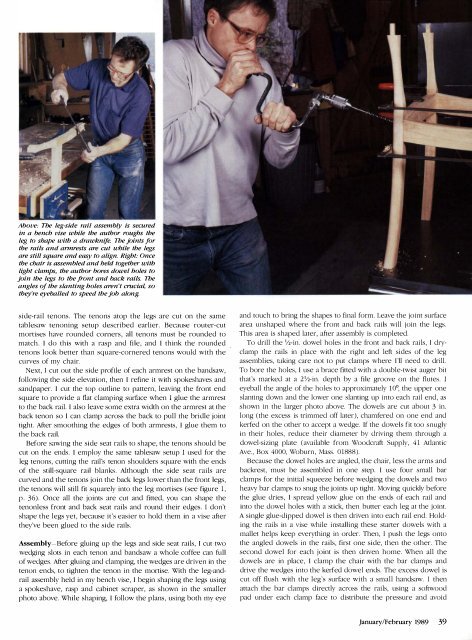
Above: The leg-side rail assembly is securedin a bench vise while the author roughs theleg to shape with a drawknife. The joints forthe rails and armrests are cut while the legsare still square and easy to align. Right: Oncethe chair is assembled and held together withlight clamps, the author bores dowel holes tojoin the legs to the front and back rails. Theangles of the slanting holes aren't crucia4 sothey're eyeballed to speed the job along.side-rail tenons. The tenons atop the legs are cut on the sametablesaw tenoning setup described earlier. Because router-cutmortises have rounded corners, all tenons must be rounded tomatch. I do this with a rasp and fi le, and I think the roundedtenons look better than square-cornered tenons would with thecurves of my chair.Next, I cut out the side profile of each armrest on the bandsaw,following the side elevation, then I refine it with spokeshaves andsandpaper. I cut the top outline to pattern, leaving the front endsquare to provide a flat clamping surface when I glue the armrestto the back rail. I also leave some extra width on the armrest at theback tenon so I can clamp across the back to pull the bridle jointtight. After smoothing the edges of both armrests, I glue them tothe back rail.Before sawing the side seat rails to shape, the tenons should becut on the ends. I employ the same tablesaw setup I used for theleg tenons, cutting the rail's tenon shoulders square with the endsof the still-square rail blanks. Although the side seat rails arecurved and the tenons join the back legs lower than the front legs,the tenons will still fit squarely into the leg mortises (see figure 1,p. 36). Once all the joints are cut and fitted, you can shape thetenonless front and back seat rails and round their edges. I don'tshape the legs yet, because it's easier to hold them in a vise afterthey've been glued to the side rails.Assembly-Before gluing up the legs and side seat rails, I cut twowedging slots in each tenon and bandsaw a whole coffee can fullof wedges. After gluing and clamping, the wedges are driven in thetenon ends, to tighten the tenon in the mortise. With d1e leg-andrailassembly held in my bench vise, I begin shaping d1e legs usinga spokeshave, rasp and cabinet scraper, as shown in the smallerphoto above. While shaping, I follow d1e plans, using bod1 my eyeand touch to bring d1e shapes to final form. Leave the joint surfacearea unshaped where the front and back rails will join the legs.This area is shaped later, after assembly is completed.To drill the Y2-in. dowel holes in the front and back rails, I dryclampthe rails in place with the right and left sides of the legassemblies, taking care not to put clamps where I'll need to drill.To bore d1e holes, I use a brace fitted with a double-twist auger bitthat's marked at a 2 Y2 -in. depth by a file groove on the flutes. Ieyeball the angle of the holes to approximately 10°, the upper oneslanting down and d1e lower one slanting up into each rail end, asshown in the larger photo above. The dowels are cut about 3 in.long (d1e excess is trimmed off later), chamfered on one end andkerfed on d1e od1er to accept a wedge. If the dowels fit too snuglyin their holes, reduce d1eir diameter by driving them d1rough adowel-sizing plate (available from Woodcraft Supply, 41 AtlanticAve., Box 4000, Woburn, Mass. 01888).Because d1e dowel holes are angled, the chair, less the arms andbackrest, must be assembled in one step. I use four small barclamps for the initial squeeze before wedging d1e dowels and twoheavy bar clamps to snug d1e joints up tight. Moving quickly beforethe glue dries, I spread yellow glue on the ends of each rail andinto the dowel holes with a stick, then butter each leg at d1e joint.A single glue-dipped dowel is then driven into each rail end. Holdingthe rails in a vise while installing these starter dowels with amallet helps keep everything in order. Then, I push the legs ontothe angled dowels in d1e rails, first one side, d1en d1e other. Thesecond dowel for each joint is then driven home. When all d1edowels are in place, I clamp the chair with the bar clamps anddrive the wedges into the kerfed dowel ends. The excess dowel iscut off flush with the leg's surface with a small handsaw. I thenattach the bar clamps directly across the rails, using a softwoodpad under each clamp face to distribute tl1e pressure and avoidJanuary/February 1989 39
- Page 3 and 4: FineW> rktng'_' ______ ___ January/
- Page 6 and 7: Letters (contillued)never hurt hims
- Page 8 and 9: MetiJods of Wo rkedited and drawn b
- Page 10 and 11: Methods of Wo rk (contillued)exampl
- Page 12 and 13: Making a door sandwichI intend to m
- Page 14 and 15: Q & A (colltillued)of a bad situati
- Page 16 and 17: Pollou'-upby Dick BurrowsMore on to
- Page 18 and 19: Easy toStep by Step DrawingsBuildOn
- Page 20 and 21: (25 years)P-SOO20" PlANERSEATTLE:1
- Page 22 and 23: There areover 4,000money-savingreas
- Page 24 and 25: READY TO ASSEMBLE-SOLID-CHERRYWALNU
- Page 26 and 27: THE BARTLEYBUNDLES!AlJ.500 ·24"Ban
- Page 28 and 29: A GREAT DEA.L IMORE (f)5 HP, 3 Ph3
- Page 30 and 31: --ANTIQUE & USED TOOLSQuality, olde
- Page 32 and 33: PhoneStater--- - -[][]Ur:iTheWoodwo
- Page 34 and 35: """""',' Universal Precision Measu
- Page 36 and 37: FineWorking January/February 1989M
- Page 41 and 42: Fig. 4:.1:iim.lf1lmllli.iiiiie?tII
- Page 43 and 44: Secret compartments were so common
- Page 45 and 46: -----.JFig. 4: Hanging tray below t
- Page 47 and 48: Tbree examples of the author's slid
- Page 49 and 50: worked but will maintain a crisp, s
- Page 53 and 54: SCROLL-SA W TESTCompany and model L
- Page 55 and 56: An ordinary woodturning lathe can b
- Page 57 and 58: use a dust collector, and if possib
- Page 59 and 60: I've never been especially fond of
- Page 61 and 62: and it shields your fingers from ex
- Page 63 and 64: The cabinet scraper used by the aut
- Page 65 and 66: Fig. 2: Post:Modern Table Top, 52 i
- Page 67 and 68: Fig. 3: LFI TableNut is fastened to
- Page 69 and 70: Fig. 3: Curved miterPattern doesn't
- Page 71 and 72: Selections from the author's sketch
- Page 73 and 74: thor anticipate problems and make f
- Page 75 and 76: Fig. 2: Air flowMoist air exits thr
- Page 77 and 78: lating fan. The idea here is to ins
- Page 79 and 80: Long prized by woodworkers for its
- Page 81 and 82: A Chinese woodworker assembles an e
- Page 83 and 84: Chinese shaping toolsThroughout Chi
- Page 85 and 86: Using a Holtzapffel ornamental lath
- Page 87 and 88: NOW! BUY BRIDGEWOOD IN CANADA . ..
- Page 89:
QiUl j!! IIIc:Ul.=:c ...!!
- Page 92 and 93:
111,"11SIOPm'EI.I,lu it ....IS •
- Page 94 and 95:
CARBIDE TIPPED ROUTER BITSPRCAL PRO
- Page 96:
FS Tool CorporationP.o. Box 510, 21
- Page 99 and 100:
... !Ij*;::""' eMore NTS 14-5614" H
- Page 101 and 102:
FI:\ISHI:\G SLPPLIESIf you have bee
- Page 103 and 104:
T\UNTONPUBliCATIONS... by fellow en
- Page 105 and 106:
PmeWqqQWorkingIndex to issues 66 th
- Page 107 and 108:
FowlerFowler, Brian, chair by, 67,1
- Page 109 and 110:
ScrewsZimmerScrews:brace driving of
- Page 111 and 112:
34-76 1 10' Uni s-l-l/2 hp ........
- Page 113 and 114:
MOISTURE METERFAMOUS "MINI-LiGNO"MA
- Page 115 and 116:
Dependable extra hands for all type
- Page 117 and 118:
MIRRORA· THE HAND MIRRORCOMPLEMENT
- Page 119 and 120:
£'Delrl.lnc'e To Manufacture Quali