Untitled - MetosExpo - Free
Untitled - MetosExpo - Free
Untitled - MetosExpo - Free
You also want an ePaper? Increase the reach of your titles
YUMPU automatically turns print PDFs into web optimized ePapers that Google loves.
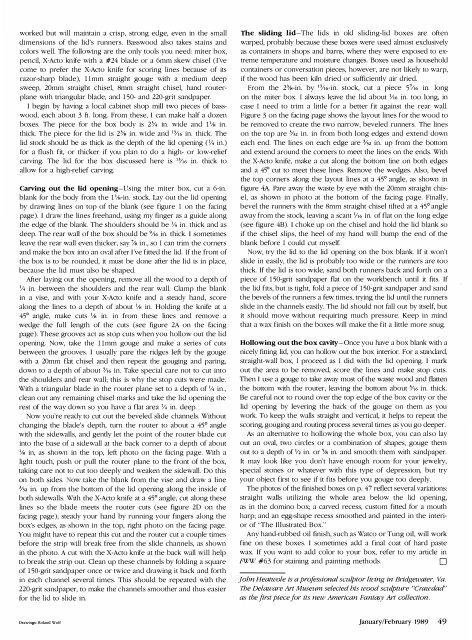
worked but will maintain a crisp, strong edge, even in the smalldimensions of the lid's runners. Basswood also takes stains andcolors well. The fo llowing are the only tools you need: miter box,pencil, X-Acto knife with a #24 blade or a 6mm skew chisel (I'vecome to prefer the X-Acto knife for scoring lines because of itsrazor-sharp blade), llmm straight gouge with a medium deepsweep, 20mm straight chisel, 8mm straight chisel, hand routerplanewith triangular blade, and ISO- and 220-grit sandpaper.I begin by having a local cabinet shop mill two pieces of basswood,each about 3 ft. long. From these, I can make half a dozenboxes. The piece for the box body is 2% in. wide and IVs in.thick. The piece fo r the lid is 2% in. wide and 13;16 in. thick. Thelid stock should be as thick as the depth of the lid opening (Y4 in.)for a flush fit, or thicker if you plan to do a high- or low-reliefcarving. The lid for the box discussed here is 13;16 in. thick toallow fo r a high-relief carving.Carving out the lid opening-Using the miter box, cut a 6-in.blank for the body from the IVs-in. stock. Lay out the lid openingby drawing lines on top of the blank (see figure 1 on the facingpage). I draw the lines freehand, using my finger as a guide alongthe edge of the blank. The shoulders should be Y4 in. thick and asdeep. The rear wall of the box should be 9/16 in. thick. I sometimesleave the rear wall even thicker, say 7/S in., so I can trim the cornersand make the box into an oval after I've fined the lid. If the front ofthe box is to be rounded, it must be done after the lid is in place,becau e the lid must also be shaped.After laying out the opening, remove all the wood to a depth of1,14 in. between the shoulders and the rear wall. Clamp the blankin a vise, and with your X-ACto knife and a steady hand, scorealong the lines to a depth of about Vs in. Holding the knife at a4So angle, make cuts Vs in. in from these lines and remove awedge the fu ll length of the cuts (see figure 2A on the facingpage). These grooves act as stop cuts when you hollow out the lidopening. Now, take the llmm gouge and make a series of cutsbetween the grooves. I usually pare the ridges left by the gougewith a 20mm flat chisel and then repeat the gouging and paring,down to a depth of about Y1 6 in. Take special care not to cut intothe shoulders and rear wall; this is why the stop cuts were made.With a triangular blade in the router plane set to a depth of Y4 in.,clean out any remaining chisel marks and take the lid opening therest of the way down so you have a flat area Y4 in. deep.Now you're ready to cut out the beveled slide channels. Withoutchanging the blade's depth, turn the router to about a 4So anglewith the Sidewalls, and gently let the point of the router blade cutinto the base of a sidewall at the back corner to a depth of aboutVB in, as shown in the top, left photo on the facing page. With alight touch, push or pull the router plane to the front of the box,taking care not to cut too deeply and weaken the sidewall. Do thison both sides. ow take the blank from the vise and draw a line%2 in. up from the bottom of the lid opening along the inside ofboth sidewalls. With the X-Acto knife at a 4So angle, cut along theselines so the blade meets the router cuts (see figure 2D on thefacing page); steady your hand by running your fingers along thebox's edges, as shown in the top, right photo on the facing page.You might have to repeat this cut and the router cut a couple timesbefore the strip will break free from the slide channels, as shownin the photo. A cut with the X-Acto knife at the back wall will helpto break the strip out. Clean up these channels by folding a squareof ISO-grit sandpaper once or twice and drawing it back and forthin each channel several times. This should be repeated with the220-grit sandpaper, to make the channels smoother and thus easierfo r the lid to slide in.The sliding lid-The lids in old sliding-lid boxes are oftenwarped, probably because these boxes were used almost exclusivelyas containers in shops and barns, where they were exposed to extremetemperature and moisture changes. Boxes used as householdcontainers or conversation pieces, however, are not likely to warp,if the wood has been kiln dried or sufficiently air dried.From the 2%-in. by 1 3/16-in. stock, cut a piece S7/1 6 in. longon the miter box. I always leave the lid about 1/1 6 in. too long, incase I need to trim a little for a better fit against the rear wall.Figure 3 on the facing page shows the layout lines for the wood tobe removed to create the two narrow, beveled runners. The lineson the top are %2 in. in from both long edges and extend downeach end. The lines on each edge are %2 in. up from the bottomand extend around the corners to meet the lines on the ends. Witl1the X-Acto knife, make a cut along the bottom line on both edgesand a 45" cut to meet these lines. Remove the wedges. Also, bevelthe top corners along the layout lines at a 4So angle, as shown infigure 4A. Pare away the waste by eye with the 20mm straight chisel,as shown in photo at the bottom of the facing page. Finally,bevel the runners with the 8mm straight chisel tilted at a 4So angleaway from the stock, leaving a scant 1,116 in. of flat on the long edge(see figure 4B). I choke up on the chisel and hold the lid blank soif the chisel slips, the heel of my hand will bump the end of theblank before I could cut myself.Now, try the lid to the lid opening on the box blank. If it won'tslide in easily, the lid is probably too wide or the runners are toothick. If the lid is too wide, sand both runners back and forth on apiece of ISO-grit sandpaper flat on the workbench until it fits. Ifthe lid fits, but is tight, fold a piece of ISO-grit sandpaper and sandthe bevels of the runners a few times, trying the lid until the runnersslide in the channels easily. The lid should not fall out by itself, butit should move without requiring much pressure. Keep in mindthat a wax finish on the boxes will make the fit a little more snug.Hollowing out the box cavity-Once you have a box blank with anicely fining lid, you can hollow out the box interior. For a standard,straight-wall box, I proceed as I did with the lid opening. I markout the area to be removed, score the lines and make stop cuts.Then I use a gouge to take away most of the waste wood and flattenthe bottom with the router, leaving the bottom about Y1 6 in. thick.Be careful not to round over the top edge of the box cavity or thelid opening by levering the back of the gouge on them as youwork. To keep the walls straight and vertical, it helps to repeat thescoring, gouging and routing process several times as you go deeper.As an alternative to hollowing the whole box, you can also layout an oval, two circles or a combination of shapes, gouge themout to a depth of 1,12 in. or % in. and smooth them with sandpaper.It may look like you don't have enough room for your jewelry,special stones or whatever with this type of depression, but tryyour object first to see if it fits before you gouge too deeply.The photos of the fm ished boxes on p. 47 reflect several variations:straight walls utilizing the whole area below the lid opening,as in the domino box; a carved recess, custom fitted for a mouthharp; and an egg-shape recess smoothed and painted in the interiorof "The Illustrated Box."Any hand-rubbed oil finish, such as Watco or Tung oil, will workfine on these boxes. I sometimes add a final coat of hard pastewax. If you want to add color to your box, refer to my article inFWW #63 for staining and painting methods. 0John Heatwole is a professional sculptor living in Bridgewater, Va.The Delaware Art Museum selected his wood sculpture "Crawdad"as the first piece for its new American Fantasy Art collection.Drawings: Roland WolfJanuary/February 1989 49


