Panasonic Air Conditioner
Panasonic Air Conditioner
Panasonic Air Conditioner

Create successful ePaper yourself
Turn your PDF publications into a flip-book with our unique Google optimized e-Paper software.
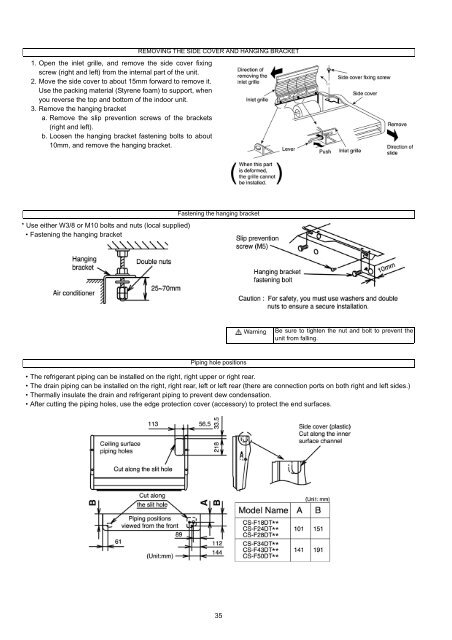
1. Open the inlet grille, and remove the side cover fixing<br />
screw (right and left) from the internal part of the unit.<br />
2. Move the side cover to about 15mm forward to remove it.<br />
Use the packing material (Styrene foam) to support, when<br />
you reverse the top and bottom of the indoor unit.<br />
3. Remove the hanging bracket<br />
a. Remove the slip prevention screws of the brackets<br />
(right and left).<br />
b. Loosen the hanging bracket fastening bolts to about<br />
10mm, and remove the hanging bracket.<br />
* Use either W3/8 or M10 bolts and nuts (local supplied)<br />
• Fastening the hanging bracket<br />
REMOVING THE SIDE COVER AND HANGING BRACKET<br />
Fastening the hanging bracket<br />
Piping hole positions<br />
• The refrigerant piping can be installed on the right, right upper or right rear.<br />
• The drain piping can be installed on the right, right rear, left or left rear (there are connection ports on both right and left sides.)<br />
• Thermally insulate the drain and refrigerant piping to prevent dew condensation.<br />
• After cutting the piping holes, use the edge protection cover (accessory) to protect the end surfaces.<br />
35<br />
Warning Be sure to tighten the nut and bolt to prevent the<br />
unit from falling.