
Create successful ePaper yourself
Turn your PDF publications into a flip-book with our unique Google optimized e-Paper software.
CAMERA RAW EXPLAINED<br />
Get to grips with <strong>Photoshop</strong>’s powerful plug-in and learn how<br />
to make quick adjustments that can help your images jump<br />
off the page or screen<br />
1<br />
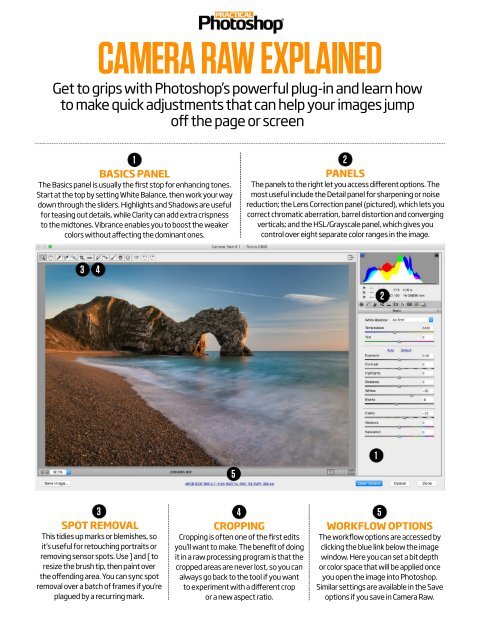
BASICS PANEL<br />
The Basics panel is usually the first stop for enhancing tones.<br />
Start at the top by setting White Balance, then work your way<br />
down through the sliders. Highlights and Shadows are useful<br />
for teasing out details, while Clarity can add extra crispness<br />
to the midtones. Vibrance enables you to boost the weaker<br />
colors without affecting the dominant ones.<br />
2<br />
PANELS<br />
The panels to the right let you access different options. The<br />
most useful include the Detail panel for sharpening or noise<br />
reduction; the Lens Correction panel (pictured), which lets you<br />
correct chromatic aberration, barrel distortion and converging<br />
verticals; and the HSL/Grayscale panel, which gives you<br />
control over eight separate color ranges in the image.<br />
3 4<br />
2<br />
5<br />
1<br />
3<br />
SPOT REMOVAL<br />
This tidies up marks or blemishes, so<br />
it’s useful for retouching portraits or<br />
removing sensor spots. Use ] and [ to<br />
resize the brush tip, then paint over<br />
the offending area. You can sync spot<br />
removal over a batch of frames if you’re<br />
plagued by a recurring mark.<br />
4<br />
CROPPING<br />
Cropping is often one of the first edits<br />
you’ll want to make. The benefit of doing<br />
it in a raw processing program is that the<br />
cropped areas are never lost, so you can<br />
always go back to the tool if you want<br />
to experiment with a different crop<br />
or a new aspect ratio.<br />
5<br />
WORKFLOW OPTIONS<br />
The workflow options are accessed by<br />
clicking the blue link below the image<br />
window. Here you can set a bit depth<br />
or color space that will be applied once<br />
you open the image into <strong>Photoshop</strong>.<br />
Similar settings are available in the Save<br />
options if you save in Camera Raw.