
You also want an ePaper? Increase the reach of your titles
YUMPU automatically turns print PDFs into web optimized ePapers that Google loves.
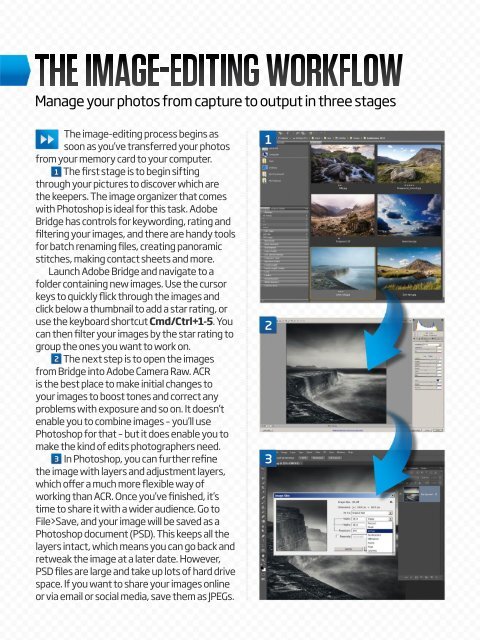
Manage your photos from capture to output in three stages<br />
The image-editing process begins as<br />
soon as you’ve transferred your photos<br />
from your memory card to your computer.<br />
1 The first stage is to begin sifting<br />
through your pictures to discover which are<br />
the keepers. The image organizer that comes<br />
with <strong>Photoshop</strong> is ideal for this task. Adobe<br />
Bridge has controls for keywording, rating and<br />
filtering your images, and there are handy tools<br />
for batch renaming files, creating panoramic<br />
stitches, making contact sheets and more.<br />
Launch Adobe Bridge and navigate to a<br />
folder containing new images. Use the cursor<br />
keys to quickly flick through the images and<br />
click below a thumbnail to add a star rating, or<br />
use the keyboard shortcut Cmd/Ctrl+1-5. You<br />
can then filter your images by the star rating to<br />
group the ones you want to work on.<br />
2 The next step is to open the images<br />
from Bridge into Adobe Camera Raw. ACR<br />
is the best place to make initial changes to<br />
your images to boost tones and correct any<br />
problems with exposure and so on. It doesn’t<br />
enable you to combine images – you’ll use<br />
<strong>Photoshop</strong> for that – but it does enable you to<br />
make the kind of edits photographers need.<br />
3 In <strong>Photoshop</strong>, you can further refine<br />
the image with layers and adjustment layers,<br />
which offer a much more flexible way of<br />
working than ACR. Once you’ve finished, it’s<br />
time to share it with a wider audience. Go to<br />
File>Save, and your image will be saved as a<br />
<strong>Photoshop</strong> document (PSD). This keeps all the<br />
layers intact, which means you can go back and<br />
retweak the image at a later date. However,<br />
PSD files are large and take up lots of hard drive<br />
space. If you want to share your images online<br />
or via email or social media, save them as JPEGs.<br />
1<br />
2<br />
3