RTHD and RTAC - Trane
RTHD and RTAC - Trane
RTHD and RTAC - Trane
You also want an ePaper? Increase the reach of your titles
YUMPU automatically turns print PDFs into web optimized ePapers that Google loves.
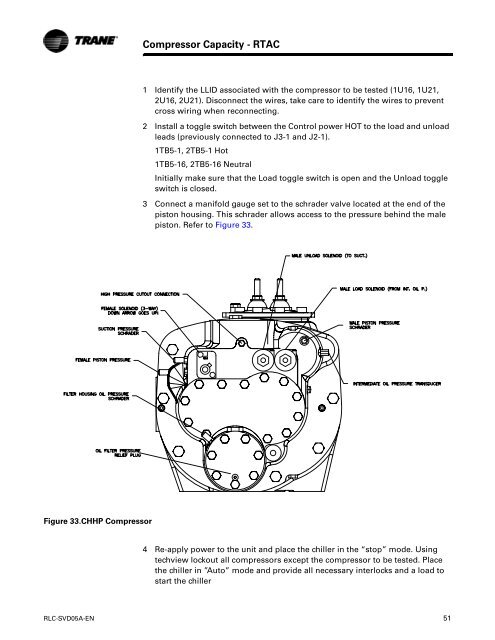
Figure 33.CHHP Compressor<br />
Compressor Capacity - <strong>RTAC</strong><br />
1 Identify the LLID associated with the compressor to be tested (1U16, 1U21,<br />
2U16, 2U21). Disconnect the wires, take care to identify the wires to prevent<br />
cross wiring when reconnecting.<br />
2 Install a toggle switch between the Control power HOT to the load <strong>and</strong> unload<br />
leads (previously connected to J3-1 <strong>and</strong> J2-1).<br />
1TB5-1, 2TB5-1 Hot<br />
1TB5-16, 2TB5-16 Neutral<br />
Initially make sure that the Load toggle switch is open <strong>and</strong> the Unload toggle<br />
switch is closed.<br />
3 Connect a manifold gauge set to the schrader valve located at the end of the<br />
piston housing. This schrader allows access to the pressure behind the male<br />
piston. Refer to Figure 33.<br />
4 Re-apply power to the unit <strong>and</strong> place the chiller in the “stop” mode. Using<br />
techview lockout all compressors except the compressor to be tested. Place<br />
the chiller in ”Auto” mode <strong>and</strong> provide all necessary interlocks <strong>and</strong> a load to<br />
start the chiller<br />
RLC-SVD05A-EN 51


