RTHD and RTAC - Trane
RTHD and RTAC - Trane
RTHD and RTAC - Trane

You also want an ePaper? Increase the reach of your titles
YUMPU automatically turns print PDFs into web optimized ePapers that Google loves.
Is the EXV<br />
functioning<br />
properly?<br />
Electronic Expansion Valve<br />
the old connector <strong>and</strong> splice in a new section of cable <strong>and</strong> a new connector. See<br />
Section 2-IPC Overview for instruction on installing a new cap.<br />
If the EXV is bound, try to turn the LED on with a magnet. If the light will not turn<br />
on, there could be a problem with the EXV. Try to turn the light on in Binding<br />
View. With the light on, hold the magnet to the LED. The LED should get brighter.<br />
If it doesn’t get brighter, this may indicate a problem with the EXV or the<br />
connector. Take a close look at the connector to make sure that all four wires are<br />
securely in place. It may be necessary to remove the cap to check for broken or<br />
misplaced wires.<br />
If there is no problem found with the connector <strong>and</strong> the EXV will not bind, then<br />
replace the EXV.<br />
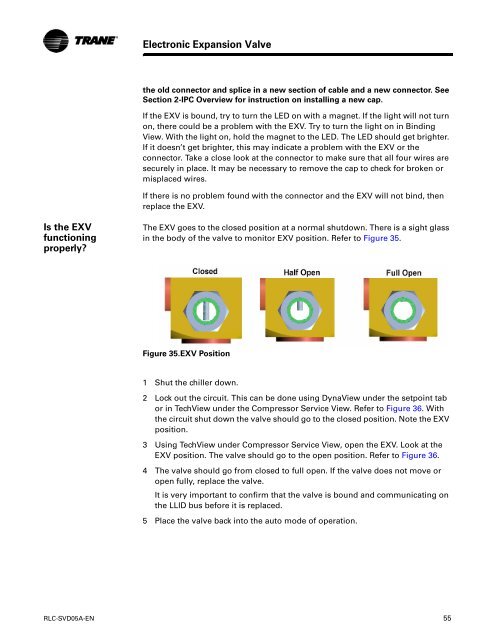
The EXV goes to the closed position at a normal shutdown. There is a sight glass<br />
in the body of the valve to monitor EXV position. Refer to Figure 35.<br />
Figure 35.EXV Position<br />
1 Shut the chiller down.<br />
2 Lock out the circuit. This can be done using DynaView under the setpoint tab<br />
or in TechView under the Compressor Service View. Refer to Figure 36. With<br />
the circuit shut down the valve should go to the closed position. Note the EXV<br />
position.<br />
3 Using TechView under Compressor Service View, open the EXV. Look at the<br />
EXV position. The valve should go to the open position. Refer to Figure 36.<br />
4 The valve should go from closed to full open. If the valve does not move or<br />
open fully, replace the valve.<br />
It is very important to confirm that the valve is bound <strong>and</strong> communicating on<br />
the LLID bus before it is replaced.<br />
5 Place the valve back into the auto mode of operation.<br />
RLC-SVD05A-EN 55