11-12 GA-1120 Color Management - Toshiba
11-12 GA-1120 Color Management - Toshiba
11-12 GA-1120 Color Management - Toshiba

You also want an ePaper? Increase the reach of your titles
YUMPU automatically turns print PDFs into web optimized ePapers that Google loves.
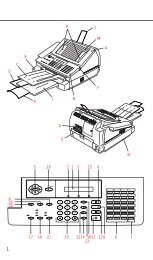
Place grayscale strip face down<br />
2-25 Using AutoCal and <strong>Color</strong>Cal<br />
8. Choose Yes in the Measure Page screen.<br />
9. When prompted on the Control Panel, place the Kodak Gray Scale strip face-down on<br />
the copier glass.<br />
Place the strip along the top edge of the copier so that it is centered between the paper<br />
width marks on the copier.<br />
10. Place the color measurement page face-down over the grayscale strip.<br />
Make sure the patches on the grayscale strip do not overlap the color patches.<br />
Close the platen glass cover, being careful not to move the grayscale strip and color<br />
measurement page.<br />
<strong>11</strong>. On the Control Panel, choose OK.<br />
Status messages display the progress of scanning and calculating measurements.<br />
<strong>12</strong>. When prompted to Print Comparison Page (Expert Mode only), choose Yes to print a<br />
preview of the selected calibration.<br />
Choose from a list of output profiles that use the same calibration set and press OK.<br />
This option appears only in Expert Mode calibration.<br />
13. When prompted to apply or overwrite the calibration, choose Yes.<br />
Place color measurement page face<br />
down over grayscale strip<br />
14. Choose Yes to confirm.<br />
Status messages display progress information. When calibration is complete, the<br />
Control Panel display returns to the Functions menu.