2 - Cash Registers
2 - Cash Registers
2 - Cash Registers

You also want an ePaper? Increase the reach of your titles
YUMPU automatically turns print PDFs into web optimized ePapers that Google loves.
70<br />
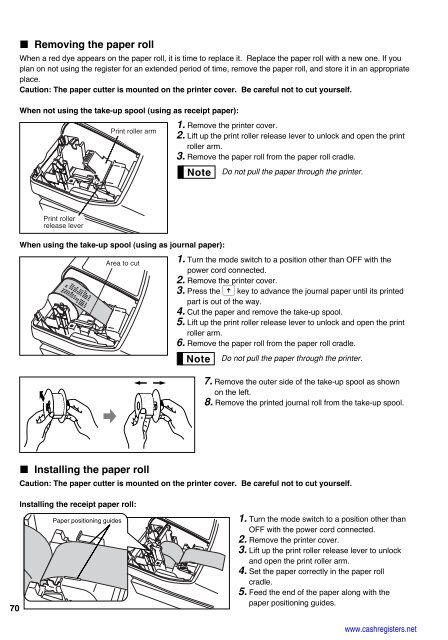
Removing the paper roll<br />
When a red dye appears on the paper roll, it is time to replace it. Replace the paper roll with a new one. If you<br />
plan on not using the register for an extended period of time, remove the paper roll, and store it in an appropriate<br />
place.<br />
Caution: The paper cutter is mounted on the printer cover. Be careful not to cut yourself.<br />
When not using the take-up spool (using as receipt paper):<br />
Print roller<br />
release lever<br />
When using the take-up spool (using as journal paper):<br />
Area to cut<br />
Installing the paper roll<br />
1. Remove the printer cover.<br />
2. Lift up the print roller release lever to unlock and open the print<br />
roller arm.<br />
3. Remove the paper roll from the paper roll cradle.<br />
Do not pull the paper through the printer.<br />
1. Turn the mode switch to a position other than OFF with the<br />
power cord connected.<br />
2. Remove the printer cover.<br />
3. Press the F key to advance the journal paper until its printed<br />
part is out of the way.<br />
4. Cut the paper and remove the take-up spool.<br />
5. Lift up the print roller release lever to unlock and open the print<br />
roller arm.<br />
6. Remove the paper roll from the paper roll cradle.<br />
Do not pull the paper through the printer.<br />
7. Remove the outer side of the take-up spool as shown<br />
on the left.<br />
8. Remove the printed journal roll from the take-up spool.<br />
Caution: The paper cutter is mounted on the printer cover. Be careful not to cut yourself.<br />
Installing the receipt paper roll:<br />
Paper positioning guides<br />
Print roller arm<br />
1. Turn the mode switch to a position other than<br />
OFF with the power cord connected.<br />
2. Remove the printer cover.<br />
3. Lift up the print roller release lever to unlock<br />
and open the print roller arm.<br />
4. Set the paper correctly in the paper roll<br />
cradle.<br />
5. Feed the end of the paper along with the<br />
paper positioning guides.<br />
www.cashregisters.net