- Page 1 and 2: Contact SAMSUNG WORLDWIDE If you ha
- Page 3 and 4: Contents Setting up Your TV ■ Lis
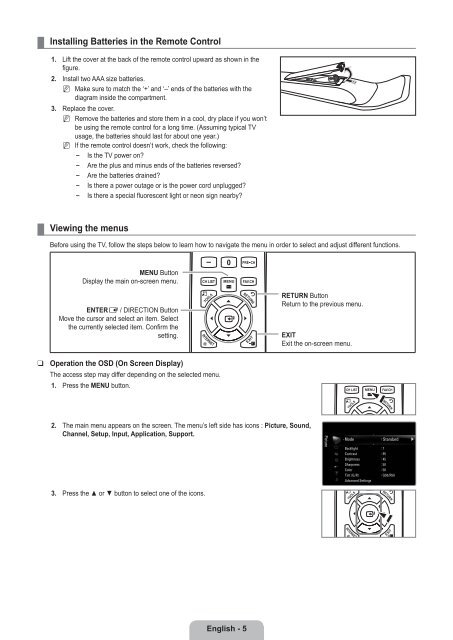
- Page 5: 8 ¦ Viewing the Control Panel N N
- Page 9 and 10: ¦ Plug & Play Feature When the TV
- Page 11 and 12: ¦ Connecting Cable TV To connect t
- Page 13 and 14: 6 7 4 R W R B G or R W Y 5 4 KENSIN
- Page 15 and 16: CHANNEL You can configure various s
- Page 17 and 18: ■ ■ ■ ■ ■ Add to Favorite
- Page 19 and 20: ■ ■ ■ ■ ■ ■ ■ Dynamic
- Page 21 and 22: ■ ■ ■ ■ ■ ❑ Digital NR
- Page 23 and 24: ¦ Using Your TV as a Computer (PC)
- Page 25 and 26: SOUND You can configure the sound m
- Page 27 and 28: SETUP You can set up additional fun
- Page 29 and 30: ■ Downloadable U.S. Rating Parent
- Page 31 and 32: ■ Time Zone Select your time zone
- Page 33 and 34: ■ LAN Connection for Static IP En
- Page 35 and 36: ¦ Setting the Network ❑ ■ ■
- Page 37 and 38: Ad-hoc: You can connect to a mobile
- Page 39 and 40: Using the Remote Control Buttons in
- Page 41 and 42: Media Play (USB & DLNA) ¦ Connecti
- Page 43 and 44: Removing a USB Memory Device Safely
- Page 45 and 46: ¦ Photo List Option Menu 1. Press
- Page 47 and 48: To perform a Slide Show with only t
- Page 49 and 50: ¦ Sorting the Music List You can s
- Page 51 and 52: ¦ Playing Music Playing a music fi
- Page 53 and 54: ¦ Movie List Option Menu 1. Press
- Page 55 and 56: N Video Play Control Buttons Button
- Page 57 and 58:
¦ Using the Setup Menu Setup displ
- Page 59 and 60:
¦ Installing the DLNA Application
- Page 61 and 62:
❑ ■ Share Sharing a Folder You
- Page 63 and 64:
ANYNET+ ¦ Connecting Anynet+ Devic
- Page 65 and 66:
TV Remote Control Buttons Available
- Page 67 and 68:
CONTENT LIBRARY ¦ Using the Conten
- Page 69 and 70:
¦ ❑ ■ ■ ■ ■ Using the Co
- Page 71 and 72:
6. Accepting the Yahoo!® TV Widget
- Page 73 and 74:
¦ Editing Snippets in the Dock 1.
- Page 75 and 76:
¦ Using the Yahoo!® Widget Galler
- Page 77 and 78:
¦ Using the Yahoo!® Flickr Widget
- Page 79 and 80:
Home Network Center The Home Networ
- Page 81 and 82:
¦ Using the Message Function Using
- Page 83 and 84:
RECOMMENDATIONS ¦ Troubleshooting
- Page 85 and 86:
¦ Assembling the Cables Enclose th
- Page 87 and 88:
¦ Securing the TV to a Wall or Cab
- Page 89 and 90:
Model Name Screen Size (Diagonal) P
- Page 91 and 92:
LN46B750 TOP VIEW JACK PANEL DETAIL
- Page 93 and 94:
● ● ● This product uses parts
- Page 95 and 96:
- c) You must license the entire wo
- Page 97 and 98:
Each contributor grants you a non-e
- Page 99 and 100:
¦ GNU Lesser General Public Licens
- Page 101 and 102:
A compilation of a covered work wit
- Page 103 and 104:
If you convey a covered work, knowi
- Page 105 and 106:
¦ LICENSE ISSUES The OpenSSL toolk
- Page 107 and 108:
Contenido Configuración del televi
- Page 109 and 110:
8 ¦ Aspecto general del panel de c
- Page 111 and 112:
¦ Instalación de las pilas en el
- Page 113 and 114:
¦ Función Plug & Play Cuando el t
- Page 115 and 116:
¦ Conexión de TV por cable Para c
- Page 117 and 118:
6 7 4 R W R B G o R W Y 5 4 BLOQUEO
- Page 119 and 120:
CANAL Puede configurar diversas opc
- Page 121 and 122:
■ ■ ■ ■ ■ Agregar a Favor
- Page 123 and 124:
■ ■ ■ ■ ■ ■ ■ Contras
- Page 125 and 126:
■ ■ ■ ■ ■ ❑ Digital NR
- Page 127 and 128:
¦ Uso del televisor como una panta
- Page 129 and 130:
SONIDO Puede configurar el modo de
- Page 131 and 132:
CONFIGURACIÓN Puede ajustar las fu
- Page 133 and 134:
■ Clasificación U.S. Descargable
- Page 135 and 136:
■ ■ ❑ ❑ ■ ■ ■ Zona Ti
- Page 137 and 138:
■ Conexión LAN para un entorno I
- Page 139 and 140:
¦ Configuración de la red ❑ ■
- Page 141 and 142:
Ad-hoc: No puede conectarse a un di
- Page 143 and 144:
Uso de los botones del mando a dist
- Page 145 and 146:
Media Play (USB & DLNA) ¦ Conexió
- Page 147 and 148:
Extracción segura del dispositivo
- Page 149 and 150:
¦ Menú de opciones de la lista de
- Page 151 and 152:
Para ver una presentación sólo co
- Page 153 and 154:
¦ Clasificación de la lista de m
- Page 155 and 156:
¦ Reproducción de música Reprodu
- Page 157 and 158:
¦ Menú de opciones de la lista de
- Page 159 and 160:
N Botones de control de la reproduc
- Page 161 and 162:
¦ ■ ■ ■ ■ ■ ■ ■ Uso
- Page 163 and 164:
¦ Instalación de la aplicación D
- Page 165 and 166:
❑ ■ Compartición Compartición
- Page 167 and 168:
ACERCA DE ANYNET+ ¦ Conexión de d
- Page 169 and 170:
Botones del mando a distancia del t
- Page 171 and 172:
CONTENT LIBRARY ¦ Uso de la biblio
- Page 173 and 174:
¦ ❑ ■ ■ ■ ■ Uso del gest
- Page 175 and 176:
5. La elección de la ubicación pe
- Page 177 and 178:
¦ Edición del extracto en el acop
- Page 179 and 180:
¦ Uso de la galería de widgets de
- Page 181 and 182:
¦ Uso del servicio Flickr de Yahoo
- Page 183 and 184:
Centro de red doméstica El Centro
- Page 185 and 186:
¦ Uso de la función de mensajerí
- Page 187 and 188:
RECOMENDACIONES ¦ Identificación
- Page 189 and 190:
¦ Montaje de los cables Sujete los
- Page 191 and 192:
¦ Fijación del televisor a una pa
- Page 193 and 194:
Nombre del Modelo Tamaño de pantal
- Page 195 and 196:
LN46B750 VISTA SUPERIOR DETALLE DEL
- Page 197 and 198:
Esta página se ha dejado intencion
- Page 199 and 200:
❑ Remarques importantes sur la ga
- Page 201 and 202:
Configuration de votre téléviseur
- Page 203 and 204:
¦ Affichage de la télécommande N
- Page 205 and 206:
4. Ensuite, appuyez sur ENTERE pour
- Page 207 and 208:
Connexions ¦ Connexion d'antennes
- Page 209 and 210:
¦ Affichage du panneau de branchem
- Page 211 and 212:
W Y 8 0 9 8 EX-LINK Connecteur util
- Page 213 and 214:
¦ ■ ■ ■ ■ Gestion des cana
- Page 215 and 216:
IMAGE Vous pouvez configurer divers
- Page 217 and 218:
❑ ■ ■ Options d'image N En mo
- Page 219 and 220:
¦ Visionnement Image sur Image Il
- Page 221 and 222:
¦ Configuration du téléviseur av
- Page 223 and 224:
❑ ❑ Volume auto → Off / On Ch
- Page 225 and 226:
■ ■ ■ ■ ■ Blocage V-Chip
- Page 227 and 228:
● ● N N N N N Opacité arrière
- Page 229 and 230:
¦ Connexion au réseau Vous pouvez
- Page 231 and 232:
❑ Connexion au réseau - Sans fil
- Page 233 and 234:
N ● Impossible de se connecter à
- Page 235 and 236:
ENTRÉE / SUPPORT TECHNIQUE ¦ Menu
- Page 237 and 238:
❑ ■ Mise à jour du logiciel Sa
- Page 239 and 240:
Utilisation des touches de la tél
- Page 241 and 242:
¦ Classement de la liste des photo
- Page 243 and 244:
¦ Lecture d’une photo ou d’un
- Page 245 and 246:
❑ ❑ ■ ■ ■ ■ ❑ ❑ ❑
- Page 247 and 248:
¦ Options du menu Liste de fichier
- Page 249 and 250:
¦ Options du menu Lecture de la mu
- Page 251 and 252:
N Formats de sous-titre pris en cha
- Page 253 and 254:
¦ Options du menu Lecture de film
- Page 255 and 256:
Media Play-DLNA ¦ Configuration du
- Page 257 and 258:
¦ Utilisation de l’application D
- Page 259 and 260:
■ ❑ ■ ■ ■ ❑ ■ ¦ Conf
- Page 261 and 262:
¦ Configuration de la fonction Any
- Page 263 and 264:
¦ Dépannage de la fonction Anynet
- Page 265 and 266:
¦ Utilisation du contenu intégré
- Page 267 and 268:
Internet@TV Grâce à la simplicit
- Page 269 and 270:
■ Mode volet (Sidebar) 1 Placez u
- Page 271 and 272:
Le menu Paremètres du système vou
- Page 273 and 274:
¦ Utilisation de l’objet fenêtr
- Page 275 and 276:
¦ Utilisation de l’objet fenêtr
- Page 277 and 278:
¦ Programmation du Centre réseau
- Page 279 and 280:
¦ Utilisation de la fonction Media
- Page 281 and 282:
Problème L’écran est noir et le
- Page 283 and 284:
¦ Utilisation du verrou antivol Ke
- Page 285 and 286:
¦ Spécifications Modèle Taille d
- Page 287 and 288:
¦ Dimensions LN40B750 VUE DE DESSU
- Page 289 and 290:
LN52B750 VUE DE DESSUS DÉTAILS DU