LCD TV - Specs and reviews at HDTV Review
LCD TV - Specs and reviews at HDTV Review
LCD TV - Specs and reviews at HDTV Review

You also want an ePaper? Increase the reach of your titles
YUMPU automatically turns print PDFs into web optimized ePapers that Google loves.
¦<br />
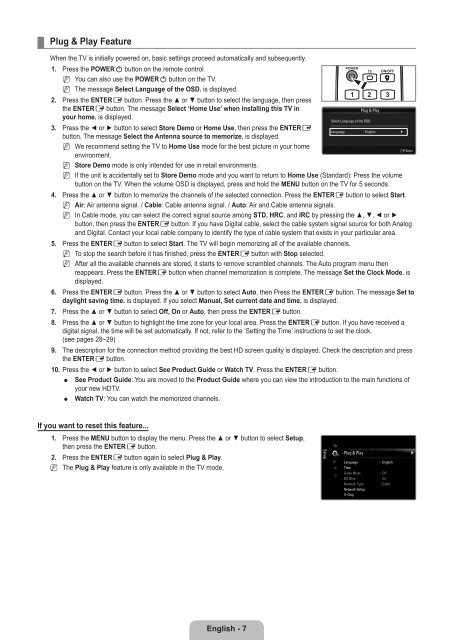
Plug & Play Fe<strong>at</strong>ure<br />
When the <strong>TV</strong> is initially powered on, basic settings proceed autom<strong>at</strong>ically <strong>and</strong> subsequently.<br />
1. Press the POWERP button on the remote control.<br />
N<br />
N<br />
You can also use the POWERP button on the <strong>TV</strong>.<br />
The message Select Language of the OSD. is displayed.<br />
2. Press the ENTERE button. Press the ▲ or ▼ button to select the language, then press<br />
the ENTERE button. The message Select ‘Home Use’ when installing this <strong>TV</strong> in<br />
your home. is displayed.<br />
3. Press the ◄ or ► button to select Store Demo or Home Use, then press the ENTERE<br />
button. The message Select the Antenna source to memorize. is displayed.<br />
N<br />
N<br />
N<br />
We recommend setting the <strong>TV</strong> to Home Use mode for the best picture in your home<br />
environment.<br />
Store Demo mode is only intended for use in retail environments.<br />
If the unit is accidentally set to Store Demo mode <strong>and</strong> you want to return to Home Use (St<strong>and</strong>ard): Press the volume<br />
button on the <strong>TV</strong>. When the volume OSD is displayed, press <strong>and</strong> hold the MENU button on the <strong>TV</strong> for 5 seconds.<br />
4. Press the ▲ or ▼ button to memorize the channels of the selected connection. Press the ENTERE button to select Start.<br />
N<br />
N<br />
Air: Air antenna signal. / Cable: Cable antenna signal. / Auto: Air <strong>and</strong> Cable antenna signals.<br />
In Cable mode, you can select the correct signal source among STD, HRC, <strong>and</strong> IRC by pressing the ▲, ▼, ◄ or ►<br />
button, then press the ENTERE button. If you have Digital cable, select the cable system signal source for both Analog<br />
<strong>and</strong> Digital. Contact your local cable company to identify the type of cable system th<strong>at</strong> exists in your particular area.<br />
5. Press the ENTERE button to select Start. The <strong>TV</strong> will begin memorizing all of the available channels.<br />
N<br />
N<br />
To stop the search before it has finished, press the ENTERE button with Stop selected.<br />
After all the available channels are stored, it starts to remove scrambled channels. The Auto program menu then<br />
reappears. Press the ENTERE button when channel memoriz<strong>at</strong>ion is complete. The message Set the Clock Mode. is<br />
displayed.<br />
6. Press the ENTERE button. Press the ▲ or ▼ button to select Auto, then Press the ENTERE button. The message Set to<br />
daylight saving time. is displayed. If you select Manual, Set current d<strong>at</strong>e <strong>and</strong> time. is displayed.<br />
7. Press the ▲ or ▼ button to select Off, On or Auto, then press the ENTERE button.<br />
Plug & Play<br />
Select Language of the OSD.<br />
Language : English ▶<br />
8. Press the ▲ or ▼ button to highlight the time zone for your local area. Press the ENTERE button. If you have received a<br />
digital signal, the time will be set autom<strong>at</strong>ically. If not, refer to the ‘Setting the Time’ instructions to set the clock.<br />
(see pages 28~29)<br />
9. The description for the connection method providing the best HD screen quality is displayed. Check the description <strong>and</strong> press<br />
the ENTERE button.<br />
10. Press the ◄ or ► button to select See Product Guide or W<strong>at</strong>ch <strong>TV</strong>. Press the ENTERE button.<br />
See Product Guide: You are moved to the Product Guide where you can view the introduction to the main functions of<br />
your new HD<strong>TV</strong>.<br />
W<strong>at</strong>ch <strong>TV</strong>: You can w<strong>at</strong>ch the memorized channels.<br />
E Enter<br />
If you want to reset this fe<strong>at</strong>ure...<br />
1. Press the MENU button to display the menu. Press the ▲ or ▼ button to select Setup,<br />
then press the ENTERE button.<br />
2. Press the ENTERE button again to select Plug & Play.<br />
N The Plug & Play fe<strong>at</strong>ure is only available in the <strong>TV</strong> mode.<br />
Setup<br />
Plug & Play<br />
Language<br />
Time<br />
Game Mode<br />
BD Wise<br />
Network Type<br />
Network Setup<br />
V-Chip<br />
: English<br />
: Off<br />
: On<br />
: Cable<br />
▶<br />
English -