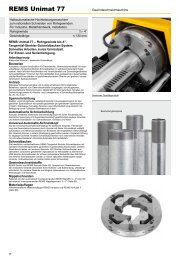
REMS Picus S1 REMS Picus S3 REMS Picus S2 / 3,5 REMS Picus ...
REMS Picus S1 REMS Picus S3 REMS Picus S2 / 3,5 REMS Picus ...
REMS Picus S1 REMS Picus S3 REMS Picus S2 / 3,5 REMS Picus ...

You also want an ePaper? Increase the reach of your titles
YUMPU automatically turns print PDFs into web optimized ePapers that Google loves.
deu eng<br />
7. Hersteller-Garantie<br />
Die Garantiezeit beträgt 12 Monate nach Übergabe des Neuproduktes an den<br />
Erstverwender. Der Zeitpunkt der Übergabe ist durch die Einsendung der<br />
Original-Kaufunterlagen nachzuweisen, welche die Angaben des Kaufdatums<br />
und der Produktbezeichnung enthalten müssen. Alle innerhalb der Garantiezeit<br />
auftretenden Funktionsfehler, die nachweisbar auf Fertigungs- oder Materialfehler<br />
zurückzuführen sind, werden kostenlos beseitigt. Durch die Mängelbeseitigung<br />
wird die Garantiezeit für das Produkt weder verlängert noch erneuert.<br />
Schäden, die auf natürliche Abnutzung, unsachgemäße Behandlung oder<br />
Missbrauch, Missachtung von Betriebsvorschriften, ungeeignete Betriebsmittel,<br />
übermäßige Beanspruchung, zweckfremde Verwendung, eigene oder fremde<br />
Eingriffe oder andere Gründe, die <strong>REMS</strong> nicht zu vertreten hat, zurückzuführen<br />
sind, sind von der Garantie ausgeschlossen.<br />
Garantieleistungen dürfen nur von einer autorisierten <strong>REMS</strong> Vertrags-Kundendienstwerkstatt<br />
erbracht werden. Beanstandungen werden nur anerkannt, wenn<br />
das Produkt ohne vorherige Eingriffe in unzerlegtem Zustand einer autorisierten<br />
<strong>REMS</strong> Vertrags-Kundendienstwerkstatt eingereicht wird. Ersetzte Produkte<br />
und Teile gehen in das Eigentum von <strong>REMS</strong> über.<br />
Die Kosten für die Hin- und Rückfracht trägt der Verwender.<br />
Die gesetzlichen Rechte des Verwenders, insbesondere seine Gewährleistungsansprüche<br />
bei Mängeln gegenüber dem Verkäufer, werden durch diese<br />
Garantie nicht eingeschränkt. Diese Hersteller-Garantie gilt nur für Neuprodukte,<br />
welche in der Europäischen Union, in Norwegen oder in der Schweiz gekauft<br />
und dort verwendet werden.<br />
Für diese Garantie gilt deutsches Recht unter Ausschluss des Übereinkommens<br />
der Vereinten Nationen über Verträge über den internationalen Warenkauf<br />
(CISG).<br />
8. <strong>REMS</strong> Vertrags-Kundendienstwerkstätten<br />
Firmeneigene Fachwerkstatt für Reparaturen:<br />
SERVICE-CENTER<br />
Neue Rommelshauser Straße 4<br />
D-71332 Waiblingen<br />
Telefon (07151) 56808-60<br />
Telefax (07151) 56808-64<br />
Wir holen Ihre Maschinen und Werkzeuge bei Ihnen ab!<br />
Nutzen Sie in der Bundesrepublik Deutschland unseren Abholservice.<br />
Einfach anrufen unter Telefon (07151) 56808-60, oder Download des Abholauftrages<br />
unter www.rems.de → Kontakt → Kundendienstwerkstätten →<br />
Abholauftrag.<br />
Oder wenden Sie sich an eine andere autorisierte <strong>REMS</strong> Vertrags-Kundendienstwerkstatt<br />
in Ihrer Nähe.<br />
9. Teileverzeichnisse<br />
Teileverzeichnisse siehe www.rems.de → Downloads → Teileverzeichnisse.<br />
Translation of the Original Instruction Manual<br />
Fig. 1 <strong>REMS</strong> <strong>Picus</strong> <strong>S1</strong><br />
Fig. 2 <strong>REMS</strong> <strong>Picus</strong> <strong>S3</strong><br />
Fig. 3 <strong>REMS</strong> <strong>Picus</strong> <strong>S2</strong>/3,5<br />
Fig. 4 Manually controlled dry boring with tapping tool<br />
Fig. 5 Securing of drill upright with plugs in concrete, with knock-in anchor<br />
Fig. 6 Securing of drill upright with plugs in masonry, with expansion anchor<br />
(anchor sleeve)<br />
Fig. 7 Machine rating plate, <strong>REMS</strong> <strong>Picus</strong> <strong>S3</strong><br />
Fig. 8 Machine rating plate, <strong>REMS</strong> <strong>Picus</strong> <strong>S2</strong>/3,5<br />
Fig. 9 1) Speed regulation for <strong>REMS</strong> <strong>Picus</strong> SR<br />
2) Concrete Ø mm<br />
3) Masonry Ø mm<br />
4) Rotation n ¹/min<br />
5) Gear step<br />
6) Electronic speed regulation<br />
Fig. 1 – 12<br />
1 Boring trestle<br />
2 Feed slider<br />
4 Feed lever<br />
5 Adjustment screws<br />
6 Base plate<br />
7 Slot<br />
8 Fillister head screw<br />
10 Clamping angle<br />
11 Drive spindle<br />
12 Holder-up (insulated grip)<br />
13 Drill collar<br />
14 Cover<br />
15 Water supply system<br />
16 Safety switch, PRCD indicator light<br />
17 Safety switch, PRCD RESET button<br />
18 Safety switch, PRCD TEST button<br />
19 Fault-current safety switch, PRCD<br />
20 Motor handle (insulated grip)<br />
21 Switch<br />
22 Adapter<br />
23 Knock-in anchor<br />
24 Flattener<br />
25 Knurled threaded rod<br />
26 Washer<br />
27 Fast-tightening nut<br />
28 Expansion anchor<br />
29 Grip head<br />
30 Locknut<br />
31 Screws<br />
32 Wing nut<br />
33 Threaded spindle<br />
34 Fillister head screw<br />
37 Screws<br />
38 Spacer set<br />
General Power Tool Safety Warnings<br />
39 Handle grip<br />
40 Struts<br />
41 Hose connection<br />
42 Cover plate<br />
43 Sealing ring<br />
44 Water extractor unit<br />
45 Rubber gasket<br />
46 Suction rotor<br />
47 Annular core bit connector,<br />
UNC 1¼ and G ½<br />
48 Diamond core drilling crowns<br />
49 Tapping tool<br />
50 Annular core bit extension<br />
51 Water pressure tank<br />
52 Screws<br />
53 Guide<br />
54 Quick-release ring<br />
55 Whetstone<br />
56 Levelling block<br />
57 Dial<br />
58 Laser drilling centre pointer<br />
59 Locking screw for earthing cable<br />
60 Tapped hole<br />
61 Clip<br />
62 Quick clamp set 160<br />
63 Quick clamp set 500<br />
64 Drilling template <strong>REMS</strong> Titan<br />
65 Carbide masonry drill Ø 15 mm<br />
SDS-plus<br />
66 Carbide masonry drill Ø 20 mm<br />
SDS-plus<br />
67 Vacuum pump<br />
68 Tile drill<br />
69 Tapping tool with vacuum fastening<br />
WARNING<br />
To reduce the risk of injury, the user must read and understand the instruction<br />
manual.<br />
Read all instructions. Failure to follow all instructions listed below may result in<br />
electric shock, fire and/or serious injury. The term „power tool“ in all of the warnings<br />
listed below refers to your mains operated (corded) power tool or battery operated<br />
(cordless) power tool, also machines and electric units. Only use the power tool for<br />
the purpose for which it was intended, with the due attention to the general safety<br />
and accident prevention regulations.<br />
SAVE THESE INSTRUCTIONS.<br />
A) Work area<br />
a) Keep work area clean and well lit. Cluttered and dark areas invite accidents.<br />
b) Do not operate power tools in explosive atmospheres, such as in the<br />
presence of flammable liquids, gases or dust. Power tools create sparks<br />
which may ignite the dust or fumes.<br />
c) Keep children and bystanders away while operating a power tool. Distractions<br />
can cause you to lose control.<br />
B) Electrical safety<br />
a) Power tool plugs must match the outlet. Never modify the plug in any way.<br />
Do not use any adapter plugs with earthed (grounded) power tools. Unmodified<br />
plugs and matching outlets will reduce risk of electric shock. If the power<br />
tool comes with an earthed wire, the plug may only be connected to an earthed<br />
receptacle. At work sites, in damp surroundings, in the open or in the case of<br />
comparable types of use, only operate the power tool off the mains using a 30<br />
mA fault current protected switch (FI breaker).<br />
b) Avoid body contact with earthed or grounded surfaces such as pipes,<br />
radiators, ranges and refrigerators. There is an increased risk of electric shock<br />
if your body is earthed or grounded.<br />
c) Do not expose power tools to rain or wet conditions. Water entering a power<br />
tool will increase the risk of electric shock.