

Download the Plane Maker Manual - X-Plane
Download the Plane Maker Manual - X-Plane
Download the Plane Maker Manual - X-Plane

You also want an ePaper? Increase the reach of your titles
YUMPU automatically turns print PDFs into web optimized ePapers that Google loves.
3.2. SHAPING THE FUSELAGE 17<br />
Now, how do <strong>the</strong>se three views (top, side, and bottom) fit toge<strong>the</strong>r? It all starts with <strong>the</strong> side<br />
view—<strong>the</strong> left side view, in particular. The points that make up <strong>the</strong> left side are mirrored on <strong>the</strong><br />
right, similar to <strong>the</strong> way <strong>the</strong> half-slices of <strong>the</strong> Section tab’s cross-section view are mirrored to form<br />
a complete slice. The middle, roughly horizontal line in <strong>the</strong> side view corresponds to <strong>the</strong> top- and<br />
bottommost lines in <strong>the</strong> top and bottom views.<br />
The top and bottom views are mirrored in <strong>the</strong>ir upper and lower halves; dragging a point in<br />
<strong>the</strong> upper half of <strong>the</strong> top view will drag its corresponding point in <strong>the</strong> lower half of that view (in<br />
addition to dragging <strong>the</strong> same point in <strong>the</strong> side view). They are mirrored like this because <strong>the</strong> left<br />
side view itself is mirrored on <strong>the</strong> right; thus, <strong>the</strong> top view, for instance, shows <strong>the</strong> top half of both<br />
<strong>the</strong> left and right sides.<br />
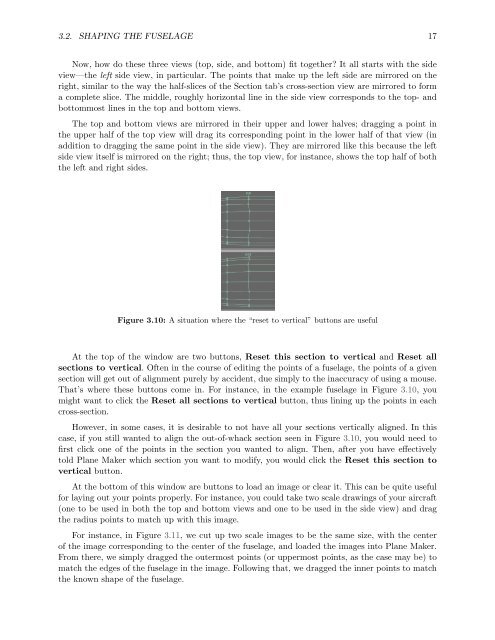
Figure 3.10: A situation where <strong>the</strong> “reset to vertical” buttons are useful<br />
At <strong>the</strong> top of <strong>the</strong> window are two buttons, Reset this section to vertical and Reset all<br />
sections to vertical. Often in <strong>the</strong> course of editing <strong>the</strong> points of a fuselage, <strong>the</strong> points of a given<br />
section will get out of alignment purely by accident, due simply to <strong>the</strong> inaccuracy of using a mouse.<br />
That’s where <strong>the</strong>se buttons come in. For instance, in <strong>the</strong> example fuselage in Figure 3.10, you<br />
might want to click <strong>the</strong> Reset all sections to vertical button, thus lining up <strong>the</strong> points in each<br />
cross-section.<br />
However, in some cases, it is desirable to not have all your sections vertically aligned. In this<br />
case, if you still wanted to align <strong>the</strong> out-of-whack section seen in Figure 3.10, you would need to<br />
first click one of <strong>the</strong> points in <strong>the</strong> section you wanted to align. Then, after you have effectively<br />
told <strong>Plane</strong> <strong>Maker</strong> which section you want to modify, you would click <strong>the</strong> Reset this section to<br />
vertical button.<br />
At <strong>the</strong> bottom of this window are buttons to load an image or clear it. This can be quite useful<br />
for laying out your points properly. For instance, you could take two scale drawings of your aircraft<br />
(one to be used in both <strong>the</strong> top and bottom views and one to be used in <strong>the</strong> side view) and drag<br />
<strong>the</strong> radius points to match up with this image.<br />
For instance, in Figure 3.11, we cut up two scale images to be <strong>the</strong> same size, with <strong>the</strong> center<br />
of <strong>the</strong> image corresponding to <strong>the</strong> center of <strong>the</strong> fuselage, and loaded <strong>the</strong> images into <strong>Plane</strong> <strong>Maker</strong>.<br />
From <strong>the</strong>re, we simply dragged <strong>the</strong> outermost points (or uppermost points, as <strong>the</strong> case may be) to<br />
match <strong>the</strong> edges of <strong>the</strong> fuselage in <strong>the</strong> image. Following that, we dragged <strong>the</strong> inner points to match<br />
<strong>the</strong> known shape of <strong>the</strong> fuselage.


