

Download the Plane Maker Manual - X-Plane
Download the Plane Maker Manual - X-Plane
Download the Plane Maker Manual - X-Plane

Create successful ePaper yourself
Turn your PDF publications into a flip-book with our unique Google optimized e-Paper software.
3.5. SHAPING THE LANDING GEAR 37<br />
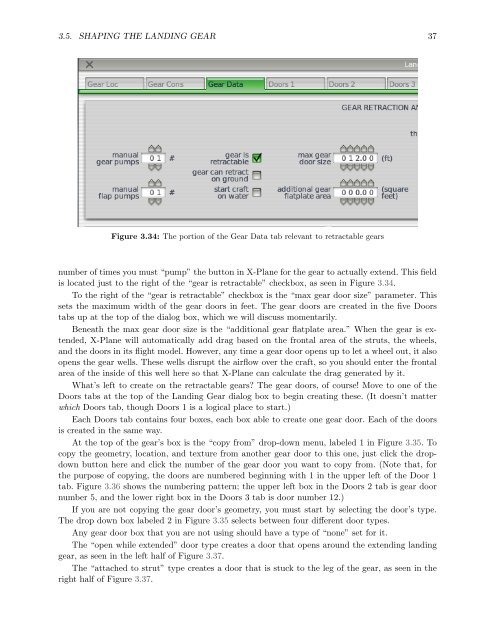
Figure 3.34: The portion of <strong>the</strong> Gear Data tab relevant to retractable gears<br />
number of times you must “pump” <strong>the</strong> button in X-<strong>Plane</strong> for <strong>the</strong> gear to actually extend. This field<br />
is located just to <strong>the</strong> right of <strong>the</strong> “gear is retractable” checkbox, as seen in Figure 3.34.<br />
To <strong>the</strong> right of <strong>the</strong> “gear is retractable” checkbox is <strong>the</strong> “max gear door size” parameter. This<br />
sets <strong>the</strong> maximum width of <strong>the</strong> gear doors in feet. The gear doors are created in <strong>the</strong> five Doors<br />
tabs up at <strong>the</strong> top of <strong>the</strong> dialog box, which we will discuss momentarily.<br />
Beneath <strong>the</strong> max gear door size is <strong>the</strong> “additional gear flatplate area.” When <strong>the</strong> gear is extended,<br />
X-<strong>Plane</strong> will automatically add drag based on <strong>the</strong> frontal area of <strong>the</strong> struts, <strong>the</strong> wheels,<br />
and <strong>the</strong> doors in its flight model. However, any time a gear door opens up to let a wheel out, it also<br />
opens <strong>the</strong> gear wells. These wells disrupt <strong>the</strong> airflow over <strong>the</strong> craft, so you should enter <strong>the</strong> frontal<br />
area of <strong>the</strong> inside of this well here so that X-<strong>Plane</strong> can calculate <strong>the</strong> drag generated by it.<br />
What’s left to create on <strong>the</strong> retractable gears? The gear doors, of course! Move to one of <strong>the</strong><br />
Doors tabs at <strong>the</strong> top of <strong>the</strong> Landing Gear dialog box to begin creating <strong>the</strong>se. (It doesn’t matter<br />
which Doors tab, though Doors 1 is a logical place to start.)<br />
Each Doors tab contains four boxes, each box able to create one gear door. Each of <strong>the</strong> doors<br />
is created in <strong>the</strong> same way.<br />
At <strong>the</strong> top of <strong>the</strong> gear’s box is <strong>the</strong> “copy from” drop-down menu, labeled 1 in Figure 3.35. To<br />
copy <strong>the</strong> geometry, location, and texture from ano<strong>the</strong>r gear door to this one, just click <strong>the</strong> dropdown<br />
button here and click <strong>the</strong> number of <strong>the</strong> gear door you want to copy from. (Note that, for<br />
<strong>the</strong> purpose of copying, <strong>the</strong> doors are numbered beginning with 1 in <strong>the</strong> upper left of <strong>the</strong> Door 1<br />
tab. Figure 3.36 shows <strong>the</strong> numbering pattern; <strong>the</strong> upper left box in <strong>the</strong> Doors 2 tab is gear door<br />
number 5, and <strong>the</strong> lower right box in <strong>the</strong> Doors 3 tab is door number 12.)<br />
If you are not copying <strong>the</strong> gear door’s geometry, you must start by selecting <strong>the</strong> door’s type.<br />
The drop down box labeled 2 in Figure 3.35 selects between four different door types.<br />
Any gear door box that you are not using should have a type of “none” set for it.<br />
The “open while extended” door type creates a door that opens around <strong>the</strong> extending landing<br />
gear, as seen in <strong>the</strong> left half of Figure 3.37.<br />
The “attached to strut” type creates a door that is stuck to <strong>the</strong> leg of <strong>the</strong> gear, as seen in <strong>the</strong><br />
right half of Figure 3.37.


