

Download the Plane Maker Manual - X-Plane
Download the Plane Maker Manual - X-Plane
Download the Plane Maker Manual - X-Plane

You also want an ePaper? Increase the reach of your titles
YUMPU automatically turns print PDFs into web optimized ePapers that Google loves.
3.2. SHAPING THE FUSELAGE 19<br />
Simply click a point and drag it to change <strong>the</strong> fuselage shape <strong>the</strong>re. You can also double click a<br />
point to prevent it from being changed in a future smoothing operation (described in <strong>the</strong> section<br />
“Smoothing <strong>the</strong> Fuselage” below).<br />
The buttons Reset this section to vertical and Reset all sections to vertical are available<br />
in this tab as <strong>the</strong>y are in <strong>the</strong> Top/Bottom tab. However, it may be wise to confine your use of <strong>the</strong>m<br />
to <strong>the</strong> Top/Bottom tab, as you will not be able to see its effect in this view—<strong>the</strong> view is essentially<br />
without perspective, so a point that is far away looks <strong>the</strong> same as a much closer point with <strong>the</strong><br />
same up/down and left/right position.<br />
Smoothing <strong>the</strong> Fuselage<br />
The most basic smoothing operation that can be performed on <strong>the</strong> fuselage is <strong>the</strong> smoothing of<br />
individual cross-sections to an elliptical shape. This is done using <strong>the</strong> Ellipse button in <strong>the</strong> Section<br />
tab of <strong>the</strong> Fuselage dialog, as described in <strong>the</strong> section “The Cross-Sections Box” above.<br />
A much far<strong>the</strong>r-reaching version of this smoothing operation can also be performed. Using <strong>the</strong><br />
“Ellipse-Smooth Fuselage” option, located in <strong>the</strong> Special menu, will nudge all cross-sections of <strong>the</strong><br />
fuselage toward <strong>the</strong> elliptical shape that would be obtained using <strong>the</strong> Ellipse button. Repeatedly<br />
using <strong>the</strong> “Ellipse-Smooth Fuselage” will have an effect identical to clicking <strong>the</strong> Ellipse button on<br />
all stations in <strong>the</strong> fuselage.<br />
Adding O<strong>the</strong>r Bodies to <strong>the</strong> Fuselage<br />
Some aircraft have odd protrusions (such as a large fuel tank poking out from under <strong>the</strong> fuselage)<br />
or even special physical objects attached to <strong>the</strong>m. In this case, it may be best to model <strong>the</strong> fuselage<br />
itself as not having <strong>the</strong>se things. Instead, you might model <strong>the</strong>se things as separate “bodies”<br />
(physical objects) which intersect <strong>the</strong> fuselage. X-<strong>Plane</strong> doesn’t care whe<strong>the</strong>r <strong>the</strong> large protrusion<br />
on <strong>the</strong> underside of <strong>the</strong> aircraft is actually part of <strong>the</strong> fuselage or just ano<strong>the</strong>r object touching <strong>the</strong><br />
fuselage; it will model <strong>the</strong> aerodynamics <strong>the</strong> same way.<br />
In this case, you would model <strong>the</strong> o<strong>the</strong>r things using <strong>the</strong> Miscellaneous Bodies dialog box, found<br />
in <strong>the</strong> Standard menu.<br />
Each body created in this window is modeled almost identically to <strong>the</strong> fuselage; <strong>the</strong>re is a<br />
Section, Top/Bottom, and Front/Back tab for each body, just as <strong>the</strong>re is for <strong>the</strong> fuselage. To add<br />
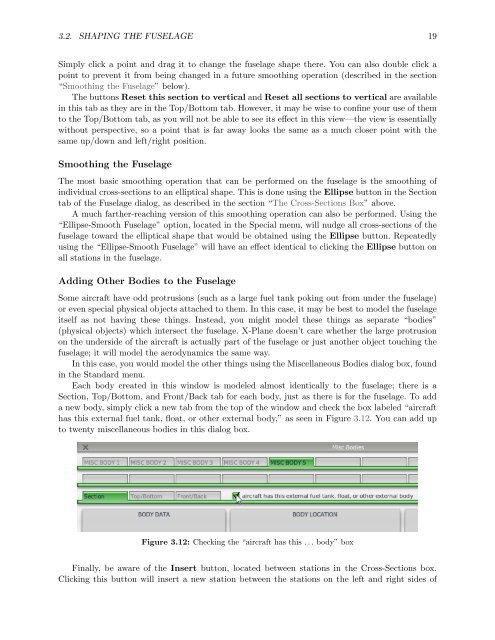
a new body, simply click a new tab from <strong>the</strong> top of <strong>the</strong> window and check <strong>the</strong> box labeled “aircraft<br />
has this external fuel tank, float, or o<strong>the</strong>r external body,” as seen in Figure 3.12. You can add up<br />
to twenty miscellaneous bodies in this dialog box.<br />
Figure 3.12: Checking <strong>the</strong> “aircraft has this . . . body” box<br />
Finally, be aware of <strong>the</strong> Insert button, located between stations in <strong>the</strong> Cross-Sections box.<br />
Clicking this button will insert a new station between <strong>the</strong> stations on <strong>the</strong> left and right sides of


