
You also want an ePaper? Increase the reach of your titles
YUMPU automatically turns print PDFs into web optimized ePapers that Google loves.
4 - The PatchMix DSP Mixer<br />
Mixer Strip Creation<br />
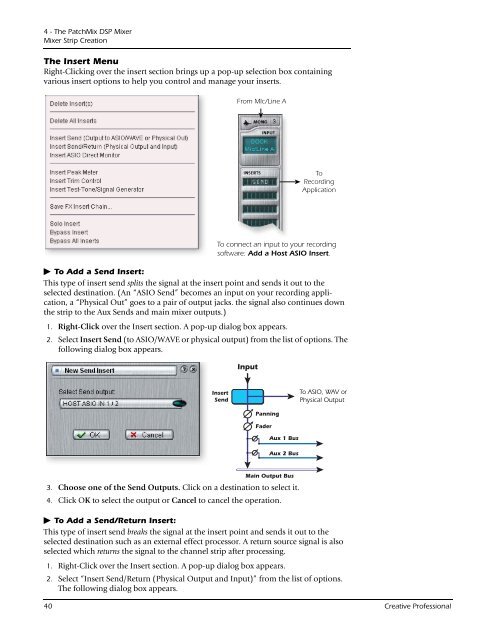
The Insert Menu<br />
Right-Clicking over the insert section brings up a pop-up selection box containing<br />
various insert options to help you control and manage your inserts.<br />
From MIc/Line A<br />
To<br />
Recording<br />
Application<br />
To connect an input to your recording<br />
software: Add a Host ASIO Insert.<br />
To Add a Send Insert:<br />
This type of insert send splits the signal at the insert point and sends it out to the<br />
selected destination. (An “ASIO Send” becomes an input on your recording application,<br />
a “Physical Out” goes to a pair of output jacks. the signal also continues down<br />
the strip to the Aux Sends and main mixer outputs.)<br />
1. Right-Click over the Insert section. A pop-up dialog box appears.<br />
2. Select Insert Send (to ASIO/WAVE or physical output) from the list of options. The<br />
following dialog box appears.<br />
Insert<br />
Send<br />
<strong>Input</strong><br />
Panning<br />
40 <strong>Creative</strong> Professional<br />
Fader<br />
Aux 1 Bus<br />
Aux 2 Bus<br />
Main Output Bus<br />
3. Choose one of the Send Outputs. Click on a destination to select it.<br />
4. Click OK to select the output or Cancel to cancel the operation.<br />
To ASIO, WAV or<br />
Physical Output<br />
To Add a Send/Return Insert:<br />
This type of insert send breaks the signal at the insert point and sends it out to the<br />
selected destination such as an external effect processor. A return source signal is also<br />
selected which returns the signal to the channel strip after processing.<br />
1. Right-Click over the Insert section. A pop-up dialog box appears.<br />
2. Select “Insert Send/Return (Physical Output and <strong>Input</strong>)” from the list of options.<br />
The following dialog box appears.