- Page 1 and 2:
Getting Started with LibreOffice 3.
- Page 3 and 4:
Contents Copyright.................
- Page 5 and 6:
Formatting spreadsheets using theme
- Page 7 and 8:
Chapter 13 Getting Started with Mac
- Page 9 and 10:
Chapter 1 Introducing LibreOffice
- Page 11 and 12:
standalone tool. You can save formu
- Page 13 and 14:
Free LibreOffice support FAQs Docum
- Page 15 and 16:
Parts of the main window The main w
- Page 17 and 18:
Docking/floating windows and toolba
- Page 19 and 20:
What are all these things called? T
- Page 21 and 22:
You can also open an existing docum
- Page 23 and 24:
Figure 12: The LibreOffice Save as
- Page 25 and 26:
Figure 14: Navigation toolbar • T
- Page 27 and 28:
Chapter 2 Setting up LibreOffice Ch
- Page 29 and 30:
Figure 19: Filling in user data Gen
- Page 31 and 32:
Memory options In the Options dialo
- Page 33 and 34:
Graphics output - Use anti-aliasing
- Page 35 and 36:
Tip Color options You can use the e
- Page 37 and 38:
On the LibreOffice - Fonts page: 1)
- Page 39 and 40:
Figure 31: Showing or hiding text,
- Page 41 and 42: General Load/Save options Most of t
- Page 43 and 44: • If you are importing a Microsof
- Page 45 and 46: Export - Display warning When the L
- Page 47 and 48: • Check special regions includes
- Page 49 and 50: Figure 45: The AutoCorrect dialog i
- Page 51 and 52: What is a template? A template is a
- Page 53 and 54: Figure 46: The Styles and Formattin
- Page 55 and 56: Caution Make sure that there are un
- Page 57 and 58: Using the Template Management dialo
- Page 59 and 60: Caution Deleting styles If your doc
- Page 61 and 62: Figure 54: Saving a new template An
- Page 63 and 64: Caution Note If you choose Keep Old
- Page 65 and 66: Resetting the default template To r
- Page 67 and 68: 3) Click the Commands button and ch
- Page 69 and 70: Compiling an automatic table of con
- Page 71 and 72: What is Writer? Writer is the word
- Page 73 and 74: Section or object information When
- Page 75 and 76: Working with documents Chapter 1, I
- Page 77 and 78: Selecting a vertical block of text
- Page 79 and 80: Tip If you click Find All, LibreOff
- Page 81 and 82: Checking spelling and grammar Figur
- Page 83 and 84: You can customize word completion f
- Page 85 and 86: Tip Autoformatting To remove manual
- Page 87 and 88: Note Turning on hyphenation for the
- Page 89 and 90: For a document with terms and trans
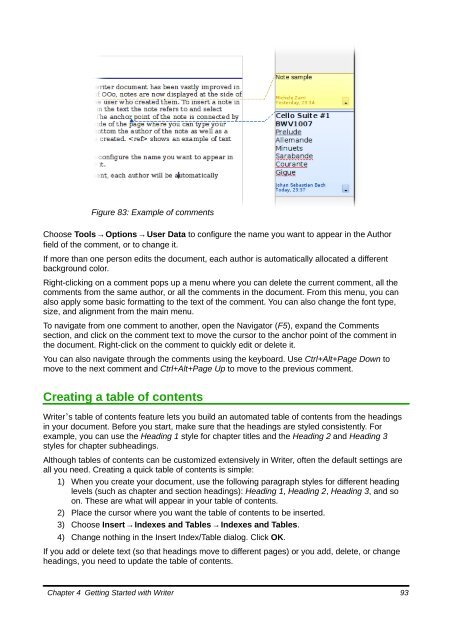
- Page 91: Changing page margins You can chang
- Page 95 and 96: • To hyperlink to an object such
- Page 97 and 98: Figure 86: Inserting a bookmark Usi
- Page 99 and 100: What is Calc? Calc is the spreadshe
- Page 101 and 102: Figure 89. Formula Bar In a spreads
- Page 103 and 104: Figure 92: Text Import dialog, with
- Page 105 and 106: Moving from cell to cell Figure 94:
- Page 107 and 108: If you have a lot of sheets, then s
- Page 109 and 110: Selecting sheets You can select eit
- Page 111 and 112: Figure 100. Insert Sheet dialog Del
- Page 113 and 114: Unfreezing To unfreeze rows or colu
- Page 115 and 116: Entering data using the keyboard Mo
- Page 117 and 118: Caution Choices that are not availa
- Page 119 and 120: Figure 111: Defining a new fill ser
- Page 121 and 122: Replacing all the data in a cell To
- Page 123 and 124: Shrinking text to fit the cell The
- Page 125 and 126: Autoformatting cells and sheets You
- Page 127 and 128: Figure 120: Hiding or showing cells
- Page 129 and 130: Custom sort order Select the box, t
- Page 131 and 132: Details You can specify which detai
- Page 133 and 134: Deleting a page break To remove a p
- Page 135 and 136: Setting the contents of the header
- Page 137 and 138: What is Impress? Impress is LibreOf
- Page 139 and 140: It is also possible to perform the
- Page 141 and 142: Workspace views Each of the workspa
- Page 143 and 144:
Figure 135: Dialog to set the page
- Page 145 and 146:
Renaming slides Right-click on a th
- Page 147 and 148:
5) Click Next. The Presentation Wiz
- Page 149 and 150:
Tip If you do not know the names fo
- Page 151 and 152:
There are two types of text boxes t
- Page 153 and 154:
In text boxes created automatically
- Page 155 and 156:
Adding tables For displaying tabula
- Page 157 and 158:
Styles All of the characteristics o
- Page 159 and 160:
Figure 146: Loading slide masters f
- Page 161 and 162:
Figure 147: Configuring the slide f
- Page 163 and 164:
To hide a slide, right-click on the
- Page 165 and 166:
What is Draw? Draw is a vector grap
- Page 167 and 168:
Status bar The Status bar is locate
- Page 169 and 170:
Figure 155. Changing the color pale
- Page 171 and 172:
Changing the color of the grid poin
- Page 173 and 174:
Choosing line endings Several types
- Page 175 and 176:
line will look. Every mouse click s
- Page 177 and 178:
Drawing geometric shapes Geometric
- Page 179 and 180:
Selections for rotating objects are
- Page 181 and 182:
Dynamic size modification of object
- Page 183 and 184:
You can change some properties from
- Page 185 and 186:
Mirror copies Move the axis of symm
- Page 187 and 188:
Combining multiple objects Using Dr
- Page 189 and 190:
Type or paste your comment into the
- Page 191 and 192:
Introduction A data source, or data
- Page 193 and 194:
On the first page of the Database W
- Page 195 and 196:
Figure 176: Selecting fields for th
- Page 197 and 198:
forms, and reports. Notice that a t
- Page 199 and 200:
Figure 179: Changing field properti
- Page 201 and 202:
Adding data to the list table List
- Page 203 and 204:
Figure 185: Update options and Dele
- Page 205 and 206:
Step 4: Get joined fields. Figure 1
- Page 207 and 208:
Figure 191: A selected control •
- Page 209 and 210:
Caution Do not use Control+click wh
- Page 211 and 212:
Note Figure 199: Type of list conte
- Page 213 and 214:
To widen the Date column, move the
- Page 215 and 216:
Tip b) Right-click the Heading 2 st
- Page 217 and 218:
Accessing a spreadsheet as a data s
- Page 219 and 220:
Writer documents To insert a field
- Page 221 and 222:
• To select multiple rows, hold d
- Page 223 and 224:
To create a new record while in ano
- Page 225 and 226:
Figure 219: Sorting order page 1) C
- Page 227 and 228:
Figure 222: Query table Step 4: Set
- Page 229 and 230:
Figure 228: Typing in calculation o
- Page 231 and 232:
Note Creating reports To fully use
- Page 233 and 234:
Step 5: Choose layout Use default s
- Page 235 and 236:
Figure 240: Adding an additional fi
- Page 237 and 238:
Figure 243: Realigned columns in a
- Page 239 and 240:
Chapter 9 Getting Started with Math
- Page 241 and 242:
You can enter a formula in three wa
- Page 243 and 244:
Figure 250. Result of entering 5 an
- Page 245 and 246:
Figure 252. Symbols catalog—used
- Page 247 and 248:
How can I make a formula bigger? Th
- Page 249 and 250:
Markup Result int from Re f ∫ ℜ
- Page 251 and 252:
The fn is replaced by a numbered fo
- Page 253 and 254:
Introduction This chapter provides
- Page 255 and 256:
Figure 265: General print options P
- Page 257 and 258:
Figure 267: Printing a selection of
- Page 259 and 260:
a) In the Ranges and copies section
- Page 261 and 262:
2) Click Properties to open the Pro
- Page 263 and 264:
Figure 271: General page of PDF Opt
- Page 265 and 266:
Figure 272: Initial View page of PD
- Page 267 and 268:
Security page of PDF Options dialog
- Page 269 and 270:
If you choose E-mail as Microsoft [
- Page 271 and 272:
Figure 281: Sending a document as a
- Page 273 and 274:
Chapter 11 Graphics, the Gallery, a
- Page 275 and 276:
Figure 282. Insert picture dialog L
- Page 277 and 278:
Inserting an image using a scanner
- Page 279 and 280:
By default, the Gallery is docked a
- Page 281 and 282:
5) When done, click the Save icon t
- Page 283 and 284:
The selected drawing function remai
- Page 285 and 286:
Figure 290. The Fontwork Gallery 2)
- Page 287 and 288:
Using the Formatting toolbar Now le
- Page 289 and 290:
Figure 295: 3D-Settings toolbar Mov
- Page 291 and 292:
Introduction This chapter describes
- Page 293 and 294:
You can also use the Navigator to i
- Page 295 and 296:
To erase the link text or button fr
- Page 297 and 298:
2) Choose or browse to the document
- Page 299 and 300:
7) Chose where to save the file and
- Page 301 and 302:
• WebCast: generates an ASP or Pe
- Page 303 and 304:
9) Click Create to generate the HTM
- Page 305 and 306:
Your first macros A macro is a save
- Page 307 and 308:
4) Be certain to open the library c
- Page 309 and 310:
There are advanced topics that are
- Page 311 and 312:
4) Press Tab to add the tab without
- Page 313 and 314:
Cursor movements are used for all o
- Page 315 and 316:
A computer scientist would use Figu
- Page 317 and 318:
Importing macros The LibreOffice Ma
- Page 319 and 320:
2) Select the library and module in
- Page 321 and 322:
Figure 311: Assign macro to an appl
- Page 323 and 324:
Writing macros without the recorder
- Page 325 and 326:
Chapter 14 Customizing LibreOffice
- Page 327 and 328:
3) In the Save In drop-down list, c
- Page 329 and 330:
Figure 316: Adding a command to a m
- Page 331 and 332:
2) The Add Commands dialog is the s
- Page 333 and 334:
Assigning shortcut keys In addition
- Page 335 and 336:
4) Click Save. A confirmation dialo
- Page 337 and 338:
Presenter Console Provides extra co
- Page 339 and 340:
Introduction You can use LibreOffic
- Page 341 and 342:
Managing documents Shortcut Keys Re
- Page 343 and 344:
Appendix B Open Source, Open Standa
- Page 345 and 346:
How is LibreOffice licensed? LibreO
- Page 347 and 348:
Why do I need Java to run LibreOffi
- Page 349 and 350:
File formats LibreOffice can save t
- Page 351 and 352:
Index 3 3D objects 189 A accepting
- Page 353 and 354:
positioning 188 properties 287 Draw
- Page 355 and 356:
LibreOffice Basic Macros dialog 311
- Page 357 and 358:
enabling 31 quotation marks 117 R r
- Page 359:
user interface options 31 user inte