S O N"_ 2-66t-360-11/1) - ManageMyLife
S O N"_ 2-66t-360-11/1) - ManageMyLife
S O N"_ 2-66t-360-11/1) - ManageMyLife

Create successful ePaper yourself
Turn your PDF publications into a flip-book with our unique Google optimized e-Paper software.
138<br />
Naistssasss ass presa_[tisss (ssstisss_<br />
• How to prevent moisture condensation<br />
When you bring your camcorder lbom a cold<br />
place into a warm place, pitt your camcorder<br />
in a plastic bag and seal it tightly. Remove<br />
the bag when the air temperature inside the<br />
plastic bag has reached the surrounding<br />
temperature (after about one hour).<br />
On the LCDscreen<br />
• Do noI exert excessive pressure on tile L('D<br />
screen. Blurs appear and iI may cause a<br />
nlalfullction of your camcorder.<br />
• If your camcorder is used in a cold place, a<br />
rcsidual image may appear on lhe LCD screen.<br />
This is not a mallilnclion.<br />
• While you arc using your camcordcr, the back of<br />
lhe LCD sclven nlay Ileal up. This is not a<br />
nlalfunction.<br />
• Toclean the LCD screen<br />
If fingerprints or dust make the LCD screen<br />
dirty, use the cleaning cloth/supplied) to<br />
clean the LCD screen.<br />
When you use the LCD Cleaning Kit<br />
(optional), do not apply the cleaning liquid<br />
directly to the LCD screen. Use cleaning<br />
paper moistened with the liquid.<br />
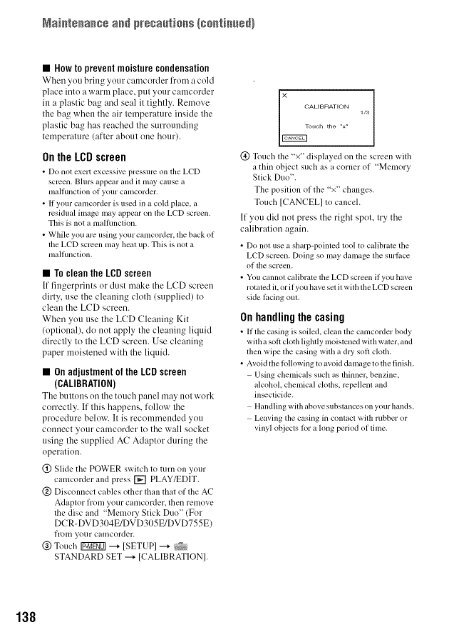
• OnadjustmentoftheLCDscreen<br />
(CALIBRATION)<br />
The buttons on the touch panel ma} not 'vv(lrk<br />
correctly. If this happens, follow the<br />
procedure below, at is recommended you<br />
connect your camcorder to the wall socket<br />
using the supplied AC Adaptor during the<br />
operation.<br />
(!) Slide the POWER switch to turn on your<br />
camcorder and press [_ PLAY_DIT.<br />
@ Disconnect cables other Ihan that of the AC<br />
Adaptor from your camcorder, then remove<br />
the disc and "Memory Stick Duo" (For<br />
DCR-DVD304E/DVD305E/DVD755E)<br />
from your camcorder.<br />
@ Touch IgJgg_l ---* [SETUPI ---* _}_<br />
STANDARD SET ---* [CALIBRATION].<br />
uch the "x"<br />
l/CALIBRATION<br />
(_) Touch the "x _displayed on the screen with<br />
a thin object such as a corner of "Memory<br />
Stick Duo".<br />
1/3<br />
The position of the "x" changes.<br />
Touch [CANCEL] to canceh<br />
If you did not press the right spot, try the<br />
calibralion again.<br />
• Do not use a sllarp-pointed tool to calibrate tile<br />
LCD screen. Doing so may damage lhe surlace<br />
of lhe screen.<br />
• You cannol calibrate lhe LCD screen if you have<br />
rotated it. or if you have sct it with tile LCD SCl_3Cll<br />
side lacing oul.<br />
Onhandlingthecasing<br />
• It tile casing is soiled, clean tile camcorder body<br />
with a soft cloth lighdy moistcned with w-aler, und<br />
dlcn wipe the casing wilh a dry soft cloth.<br />
• Avoid lhe lolh)wing 1