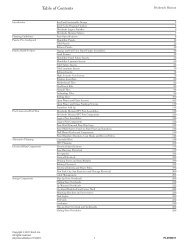
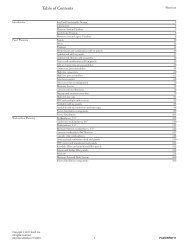
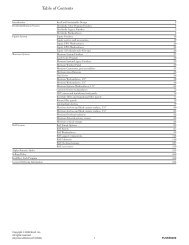
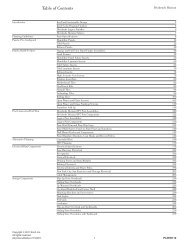
Price List July 2012 - Knoll
Price List July 2012 - Knoll
Price List July 2012 - Knoll

You also want an ePaper? Increase the reach of your titles
YUMPU automatically turns print PDFs into web optimized ePapers that Google loves.
Specifying the applied wall system<br />
AutoStrada<br />
How to specify Applied Wall<br />
1. Plan frames to support the height<br />
and width of the intended overall<br />
wall system. Frames can be<br />
installed side-by- side or as much<br />
as 12 apart to provide adequate<br />
structure for horizontal channels<br />
up to 6 wider than the frame on<br />
each side. For example, a 10<br />
length of channels and wall covers<br />
can be supported by three 36<br />
wide frames or by two 48 wide<br />
frames.<br />
2. Specify horizontal channels at<br />
each level required for covers and<br />
overhead storage or shelves. A top<br />
channel is always required and<br />
intermediate channels may be<br />
attached to the frame at any 7 1 /2<br />
increment above 24,31 1 /2,39,<br />
46 1 /2,54,61 1 /2,or69 above<br />
the floor.<br />
3. Typically intermediate channels<br />
are planned at 24,39 and 54 to<br />
support 15h covers. An additional<br />
channel at 31 1 /2 will enable 7<br />
1<br />
/2h covers above and below<br />
worksurface height for slat wall<br />
and power/wire management.<br />
Horizontal channels can be<br />
planned the full width of the wall<br />
or may be segmented to allow<br />
taller covers such as a<br />
markerboard in specific locations.<br />
Alternatively intermediate<br />
channels may be planned at 24<br />
and 46 1 /2 ona69H frame to<br />
support all 22 1 /2 H covers.<br />
4. Specify bottom channel to support<br />
22 1 /2H covers between floor and<br />
24. Specify intermediate bottom<br />
trim and vertical frame covers if<br />
leaving the frame open below 24.<br />
5. Specify end trim if end of wall is<br />
visible and specify corner<br />
connectors, if any.<br />
6. Specify functional covers such as<br />
recess cover, the mounting<br />
location for surface mounted<br />
power distribution and voice/data<br />
outlets, and slat wall covers. Also<br />
specify tackable or marker surface<br />
covers. Then fill in the wall with<br />
decorative covers such as wood<br />
veneer, plastic laminate,<br />
non-tackable fabric, or<br />
backpainted glass. If planning a<br />
bookshelf the cover below the<br />
shelf cannot be glass. Covers are<br />
not required behind overhead<br />
storage cabinets.<br />
7. Specify overhead storage: display<br />
shelves at 31 1 /2 or 39, lower<br />
bookshelves at 54 and upper<br />
bookshelves at 69 to align with<br />
adjacent overhead storage<br />
cabinets. Specify open, partially<br />
open or fully enclosed overhead<br />
storage in veneer or laminate<br />
surface, Overhead storage<br />
cabinets usually hang from a<br />
channel at 69 and bear against a<br />
channel at 54 above the floor.<br />
8. Specify power and cable trays.<br />
Power is distributed by a surface<br />
mounted plugmold raceway with<br />
ten simplex outlets, available in<br />
three configurations: one- circuit<br />
three-wire, two-circuit four wire,<br />
or two-circuit six wire. A 24 wide<br />
plugmold with eight simplex<br />
outlets is also available. Raceways<br />
are always hardwired to the<br />
building power supply by an<br />
electrical contractor. Contractor<br />
will punch a hole through the<br />
recess cover behind the plugmold<br />
to connect from the wall to the<br />
plugmold. Recess cover also<br />
accommodates voice/data outlets<br />
and cable grommets are available<br />
to line a punched hole.<br />
9. Specify worksurface supports.<br />
Worksurface support brackets can<br />
be attached to the channel at 24<br />
above the floor or may be attached<br />
within a cable tray at the same<br />
level.<br />
10. Add accessories.<br />
Customer’s Responsibility:<br />
Attachment of AutoStrada Applied<br />
Wall System to built walls<br />
It is the responsibility of the<br />
customer and their structural<br />
engineer/architect to verify that the<br />
permanent built wall (studs, blocks,<br />
solid masonry, or other) to which the<br />
Applied Wall System is intended to<br />
be attached is designed to support<br />
the load bearing standards set forth<br />
below. It is also the responsibility of<br />
the customer and their structural<br />
engineer/architect to specify the<br />
fasteners and method for attaching<br />
the frames to the built wall and<br />
confirm that the installers have<br />
followed these specifications. For<br />
local standards and additional<br />
requirements such as seismic the<br />
customer should consult local<br />
building and safety codes.<br />
Design loads:<br />
69H Applied wall: 240#/foot of<br />
width. Assume four 60 lb. vertical<br />
loads spaced evenly between 24 and<br />
69 above the floor, with the load<br />
centered 11 from the built wall.<br />
84H Applied wall: 300#/foot of<br />
width. Assume five 60 lb. vertical<br />
loads spaced evenly between 24 and<br />
84 above the floor, with the load<br />
centered 11 from the built wall.<br />
Warning/Disclaimer<br />
<strong>Knoll</strong> is not responsible for the<br />
attachment method of the Applied<br />
Wall System product, which is the<br />
responsibility of the customer and its<br />
structural engineer/architect. <strong>Knoll</strong><br />
is not responsible for the cost of<br />
preparing an existing wall nor the<br />
additional cost for a new wall to<br />
make them appropriate for the<br />
installation of the Applied Wall<br />
System product. Failure to properly<br />
attach the Applied Wall System to a<br />
wall capable of supporting the loads<br />
listed above can lead to property<br />
damage and/or personal injury.<br />
12