HP Officejet 6500 (E709) All-in-One Series User Guide - Radio Shack
HP Officejet 6500 (E709) All-in-One Series User Guide - Radio Shack
HP Officejet 6500 (E709) All-in-One Series User Guide - Radio Shack
Create successful ePaper yourself
Turn your PDF publications into a flip-book with our unique Google optimized e-Paper software.
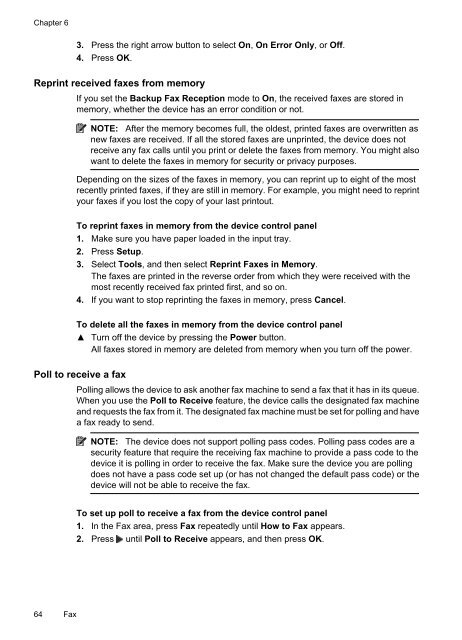
Chapter 6<br />
3. Press the right arrow button to select On, On Error Only, or Off.<br />
4. Press OK.<br />
Repr<strong>in</strong>t received faxes from memory<br />
If you set the Backup Fax Reception mode to On, the received faxes are stored <strong>in</strong><br />
memory, whether the device has an error condition or not.<br />
NOTE: After the memory becomes full, the oldest, pr<strong>in</strong>ted faxes are overwritten as<br />
new faxes are received. If all the stored faxes are unpr<strong>in</strong>ted, the device does not<br />
receive any fax calls until you pr<strong>in</strong>t or delete the faxes from memory. You might also<br />
want to delete the faxes <strong>in</strong> memory for security or privacy purposes.<br />
Depend<strong>in</strong>g on the sizes of the faxes <strong>in</strong> memory, you can repr<strong>in</strong>t up to eight of the most<br />
recently pr<strong>in</strong>ted faxes, if they are still <strong>in</strong> memory. For example, you might need to repr<strong>in</strong>t<br />
your faxes if you lost the copy of your last pr<strong>in</strong>tout.<br />
To repr<strong>in</strong>t faxes <strong>in</strong> memory from the device control panel<br />
1. Make sure you have paper loaded <strong>in</strong> the <strong>in</strong>put tray.<br />
2. Press Setup.<br />
3. Select Tools, and then select Repr<strong>in</strong>t Faxes <strong>in</strong> Memory.<br />
The faxes are pr<strong>in</strong>ted <strong>in</strong> the reverse order from which they were received with the<br />
most recently received fax pr<strong>in</strong>ted first, and so on.<br />
4. If you want to stop repr<strong>in</strong>t<strong>in</strong>g the faxes <strong>in</strong> memory, press Cancel.<br />
To delete all the faxes <strong>in</strong> memory from the device control panel<br />
Turn off the device by press<strong>in</strong>g the Power button.<br />
<strong>All</strong> faxes stored <strong>in</strong> memory are deleted from memory when you turn off the power.<br />
Poll to receive a fax<br />
Poll<strong>in</strong>g allows the device to ask another fax mach<strong>in</strong>e to send a fax that it has <strong>in</strong> its queue.<br />
When you use the Poll to Receive feature, the device calls the designated fax mach<strong>in</strong>e<br />
and requests the fax from it. The designated fax mach<strong>in</strong>e must be set for poll<strong>in</strong>g and have<br />
a fax ready to send.<br />
NOTE: The device does not support poll<strong>in</strong>g pass codes. Poll<strong>in</strong>g pass codes are a<br />
security feature that require the receiv<strong>in</strong>g fax mach<strong>in</strong>e to provide a pass code to the<br />
device it is poll<strong>in</strong>g <strong>in</strong> order to receive the fax. Make sure the device you are poll<strong>in</strong>g<br />
does not have a pass code set up (or has not changed the default pass code) or the<br />
device will not be able to receive the fax.<br />
To set up poll to receive a fax from the device control panel<br />
1. In the Fax area, press Fax repeatedly until How to Fax appears.<br />
2. Press until Poll to Receive appears, and then press OK.<br />
64 Fax


