HP Officejet 6500 (E709) All-in-One Series User Guide - Radio Shack
HP Officejet 6500 (E709) All-in-One Series User Guide - Radio Shack
HP Officejet 6500 (E709) All-in-One Series User Guide - Radio Shack

You also want an ePaper? Increase the reach of your titles
YUMPU automatically turns print PDFs into web optimized ePapers that Google loves.
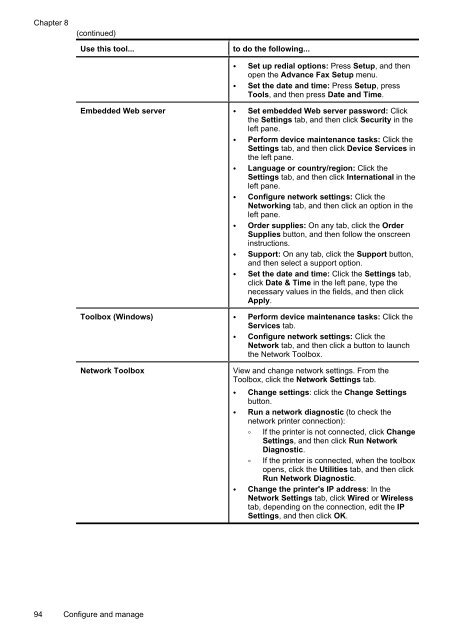
Chapter 8<br />
(cont<strong>in</strong>ued)<br />
Use this tool...<br />
to do the follow<strong>in</strong>g...<br />
• Set up redial options: Press Setup, and then<br />
open the Advance Fax Setup menu.<br />
• Set the date and time: Press Setup, press<br />
Tools, and then press Date and Time.<br />
Embedded Web server • Set embedded Web server password: Click<br />
the Sett<strong>in</strong>gs tab, and then click Security <strong>in</strong> the<br />
left pane.<br />
• Perform device ma<strong>in</strong>tenance tasks: Click the<br />
Sett<strong>in</strong>gs tab, and then click Device Services <strong>in</strong><br />
the left pane.<br />
• Language or country/region: Click the<br />
Sett<strong>in</strong>gs tab, and then click International <strong>in</strong> the<br />
left pane.<br />
• Configure network sett<strong>in</strong>gs: Click the<br />
Network<strong>in</strong>g tab, and then click an option <strong>in</strong> the<br />
left pane.<br />
• Order supplies: On any tab, click the Order<br />
Supplies button, and then follow the onscreen<br />
<strong>in</strong>structions.<br />
• Support: On any tab, click the Support button,<br />
and then select a support option.<br />
• Set the date and time: Click the Sett<strong>in</strong>gs tab,<br />
click Date & Time <strong>in</strong> the left pane, type the<br />
necessary values <strong>in</strong> the fields, and then click<br />
Apply.<br />
Toolbox (W<strong>in</strong>dows) • Perform device ma<strong>in</strong>tenance tasks: Click the<br />
Services tab.<br />
• Configure network sett<strong>in</strong>gs: Click the<br />
Network tab, and then click a button to launch<br />
the Network Toolbox.<br />
Network Toolbox<br />
View and change network sett<strong>in</strong>gs. From the<br />
Toolbox, click the Network Sett<strong>in</strong>gs tab.<br />
• Change sett<strong>in</strong>gs: click the Change Sett<strong>in</strong>gs<br />
button.<br />
• Run a network diagnostic (to check the<br />
network pr<strong>in</strong>ter connection):<br />
If the pr<strong>in</strong>ter is not connected, click Change<br />
Sett<strong>in</strong>gs, and then click Run Network<br />
Diagnostic.<br />
If the pr<strong>in</strong>ter is connected, when the toolbox<br />
opens, click the Utilities tab, and then click<br />
Run Network Diagnostic.<br />
• Change the pr<strong>in</strong>ter's IP address: In the<br />
Network Sett<strong>in</strong>gs tab, click Wired or Wireless<br />
tab, depend<strong>in</strong>g on the connection, edit the IP<br />
Sett<strong>in</strong>gs, and then click OK.<br />
94 Configure and manage