X9DR3_i-LN4F+ 1.1.indb - Supermicro
X9DR3_i-LN4F+ 1.1.indb - Supermicro
X9DR3_i-LN4F+ 1.1.indb - Supermicro

Create successful ePaper yourself
Turn your PDF publications into a flip-book with our unique Google optimized e-Paper software.
OPEN 1st<br />
OPEN 1st<br />
Chapter 2: Installation<br />
2-3 Processor and Heatsink Installation<br />
Warning: When handling the processor package, avoid placing direct pressure on<br />
the label area.<br />
Notes:<br />
• Always connect the power cord last, and always remove it before adding,<br />
removing or changing any hardware components. Make sure that you install<br />
the processor into the CPU socket before you install the CPU heatsink.<br />
• If you buy a CPU separately, make sure that you use an Intel-certified multidirectional<br />
heatsink only.<br />
• Make sure to install the system board into the chassis before you install<br />
the CPU heatsink.<br />
• When receiving a server board without a processor pre-installed, make sure<br />
that the plastic CPU socket cap is in place and none of the socket pins are<br />
bent; otherwise, contact your retailer immediately.<br />
• Refer to the <strong>Supermicro</strong> website for updates on CPU support.<br />
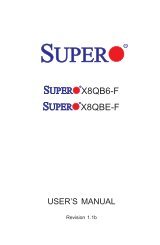
Installing the LGA2011 Processor<br />
1. There are two load levers on the LGA2011 socket. To open the socket cover,<br />
first press and release the load lever labeled 'Open 1st'.<br />
1 2<br />
WARNING!<br />
WARNING!<br />
Press down<br />
on Load Lever<br />
labeled 'Open 1st'.<br />
2-5