X9DR3_i-LN4F+ 1.1.indb - Supermicro
X9DR3_i-LN4F+ 1.1.indb - Supermicro
X9DR3_i-LN4F+ 1.1.indb - Supermicro

You also want an ePaper? Increase the reach of your titles
YUMPU automatically turns print PDFs into web optimized ePapers that Google loves.
<strong>X9DR3</strong>-<strong>LN4F+</strong>/X9DRi-<strong>LN4F+</strong> Motherboard User’s Manual<br />
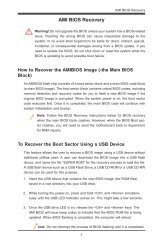
Note: For AMI UEFI BIOS Recovery, please refer to the UEFI BIOS Recovery<br />
User Guide posted @http://www.supermicro.com/support/manuals/.<br />
Starting the Setup Utility<br />
Normally, the only visible Power-On Self-Test (POST) routine is the memory test.<br />
As the memory is being tested, press the key to enter the main menu of<br />
the AMI BIOS setup utility. From the main menu, you can access the other setup<br />
screens. An AMI BIOS identification string is displayed at the left bottom corner of<br />
the screen below the copyright message.<br />
Warning: Do not upgrade the BIOS unless your system has a BIOS-related issue.<br />
Flashing the wrong BIOS can cause irreparable damage to the system. In no event<br />
shall the manufacturer be liable for direct, indirect, special, incidental, or consequential<br />
damage arising from a BIOS update. If you have to update the BIOS, do not shut down<br />
or reset the system while the BIOS is being updated to avoid possible boot failure.<br />
4-2 Main Setup<br />
When you first enter the AMI BIOS setup utility, you will enter the Main setup screen.<br />
You can always return to the Main setup screen by selecting the Main tab on the<br />
top of the screen. The Main BIOS Setup screen is shown below.<br />
The AMI BIOS main menu displays the following information:<br />
System Date<br />
This item displays the system date in Day MM/DD/YY format (e.g. Wed 10/12/2011).<br />
4-2