X9DR3_i-LN4F+ 1.1.indb - Supermicro
X9DR3_i-LN4F+ 1.1.indb - Supermicro
X9DR3_i-LN4F+ 1.1.indb - Supermicro

You also want an ePaper? Increase the reach of your titles
YUMPU automatically turns print PDFs into web optimized ePapers that Google loves.
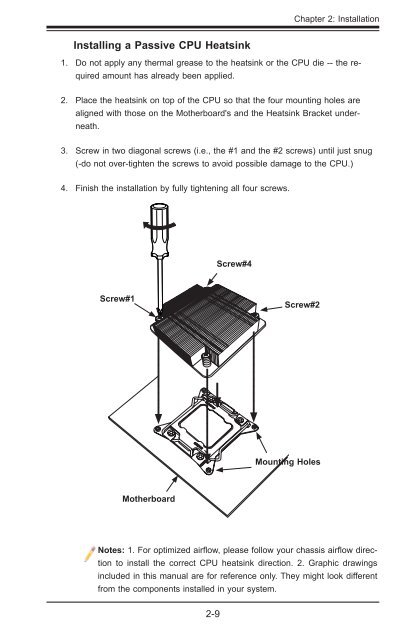
Chapter 2: Installation<br />
Installing a Passive CPU Heatsink<br />
1. Do not apply any thermal grease to the heatsink or the CPU die -- the required<br />
amount has already been applied.<br />
2. Place the heatsink on top of the CPU so that the four mounting holes are<br />
aligned with those on the Motherboard's and the Heatsink Bracket underneath.<br />
3. Screw in two diagonal screws (i.e., the #1 and the #2 screws) until just snug<br />
(-do not over-tighten the screws to avoid possible damage to the CPU.)<br />
4. Finish the installation by fully tightening all four screws.<br />
Screw#4<br />
Screw#1<br />
Screw#2<br />
OPEN 1st<br />
Mounting Holes<br />
Motherboard<br />
Notes: 1. For optimized airflow, please follow your chassis airflow direction<br />
to install the correct CPU heatsink direction. 2. Graphic drawings<br />
included in this manual are for reference only. They might look different<br />
from the components installed in your system.<br />
2-9