
You also want an ePaper? Increase the reach of your titles
YUMPU automatically turns print PDFs into web optimized ePapers that Google loves.
Village boundary<br />
6. delineation<br />
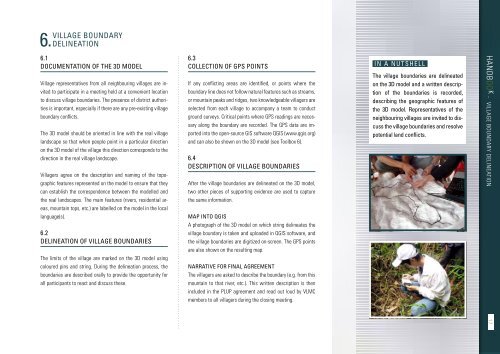
6.1<br />
Documentation of the 3D model<br />
Village representatives from all neighbouring villages are invited<br />
to participate in a meeting held at a convenient location<br />
to discuss village boundaries. The presence of district authorities<br />
is important, especially if there are any pre-existing village<br />
boundary conflicts.<br />
The 3D model should be oriented in line with the real village<br />
landscape so that when people point in a particular direction<br />
on the 3D model of the village this direction corresponds to the<br />
direction in the real village landscape.<br />
Villagers agree on the description and naming of the topographic<br />
features represented on the model to ensure that they<br />
can establish the correspondence between the modelled and<br />
the real landscapes. The main features (rivers, residential areas,<br />
mountain tops, etc.) are labelled on the model in the local<br />
language(s).<br />
6.2<br />
Delineation of village boundaries<br />
The limits of the village are marked on the 3D model using<br />
coloured pins and string. During the delineation process, the<br />
boundaries are described orally to provide the opportunity for<br />
6.3<br />
Collection of GPS points<br />
If any conflicting areas are identified, or points where the<br />
boundary line does not follow natural features such as streams,<br />
or mountain peaks and ridges, two knowledgeable villagers are<br />
selected from each village to accompany a team to conduct<br />
ground surveys. Critical points where GPS readings are necessary<br />
along the boundary are recorded. The GPS data are imported<br />
into the open-source GIS software QGIS (www.qgis.org)<br />
and can also be shown on the 3D model (see Toolbox 6).<br />
6.4<br />
Description of village boundaries<br />
After the village boundaries are delineated on the 3D model,<br />
two other pieces of supporting evidence are used to capture<br />
the same information.<br />
Map into QGIS<br />
A photograph of the 3D model on which string delineates the<br />
village boundary is taken and uploaded in QGIS software, and<br />
the village boundaries are digitized on-screen. The GPS points<br />
are also shown on the resulting map.<br />
Narrative for final agreement<br />
The villagers are asked to describe the boundary (e.g. from this<br />
IN A NUTSHELL<br />
The village boundaries are delineated<br />
on the 3D model and a written description<br />
of the boundaries is recorded,<br />
describing the geographic features of<br />
the 3D model. Representatives of the<br />
neighbouring villages are invited to discuss<br />
the village boundaries and resolve<br />
potential land conflicts.<br />
HANDBOO K - VILLAGE BOUNDARY DELINEATION<br />
Participatory Land Use Planning (PLUP) HANDBOOK<br />
all participants to react and discuss these.<br />
mountain to that river, etc.). This written description is then<br />
included in the PLUP agreement and read out loud by VLMC<br />
members to all villagers during the closing meeting.<br />
17