
You also want an ePaper? Increase the reach of your titles
YUMPU automatically turns print PDFs into web optimized ePapers that Google loves.
Creating zones<br />
5. for land use plans<br />
Zoning the current land use<br />
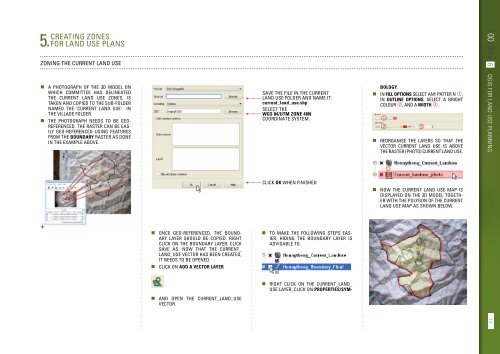
• A photograph of the 3D model on<br />
which committee has delineated<br />
the current land use zones, is<br />
taken and copied to the sub-folder<br />
named the ‘current land use’ in<br />
the village folder.<br />
• The photograph needs to be georeferenced.<br />
The raster can be easily<br />
geo-referenced using features<br />
from the boundary raster as done<br />
in the example above.<br />
SAVE THE FILE IN THE CURRENT<br />
LAND USE FOLDER AND NAME IT.<br />
current_land_use.shp<br />
SELECT THE<br />
WGS 84/UTM ZONE 48N<br />
COORDINATE SYSTEM.<br />
bology.<br />
• In Fill options select any patter n ,<br />
in Outline options, select a bright<br />
colour , and a Width .<br />
• Reorganise the layers so that the<br />
vector current land use is above<br />
the raster (photo) current land use.<br />
TOOLBOX 6 QGIS for land use planning<br />
CLICK OK WHEN FINISHED<br />
• Now the current land use map is<br />
displayed on the 3D model together<br />
with the polygon of the current<br />
land use map as shown below.<br />
• Once geo-referenced, the boundary<br />
layer should be copied. Right<br />
click on the boundary layer, click<br />
Save as. Now that the current_<br />
land_use vector has been created,<br />
it needs to be opened.<br />
• click on Add a vector layer<br />
• To make the following steps easier,<br />
hiding the boundary layer is<br />
advisable to.<br />
• And open the current_land_use<br />
vector.<br />
• Right click on the current_land_<br />
use layer, click on Properties/Sym-<br />
75