
You also want an ePaper? Increase the reach of your titles
YUMPU automatically turns print PDFs into web optimized ePapers that Google loves.
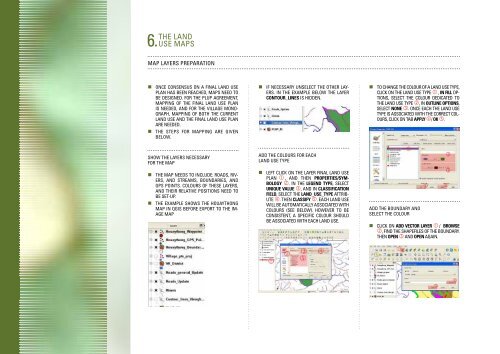
THE LAND<br />
6. USE MAPS<br />
Map layers preparation<br />
• Once consensus on a final land use<br />
plan has been reached, maps need to<br />
be designed. For the PLUP agreement,<br />
mapping of the final Land Use plan<br />
is needed, and for the village monograph,<br />
mapping of both the current<br />
land use and the final land use plan<br />
are needed.<br />
• The steps for mapping are given<br />
below.<br />
• If necessary unselect the other layers.<br />
In the example below the layer<br />
Contour_Lines is hidden.<br />
• To change the colour of a land use type,<br />
click on the Land use type , in Fill Options,<br />
select the colour dedicated to<br />
the land use type , In Outline options,<br />
select None . Once each the land use<br />
type is associated with the correct colours,<br />
click on tab Apply / OK .<br />
Show the layers necessary<br />
for the map<br />
• The map needs to include: roads, rivers,<br />
and streams, boundaries, and<br />
GPS points. Colours of these layers,<br />
and their relative positions need to<br />
be set-up.<br />
• The example shows the Houaythong<br />
map in QGIS before export to the image<br />
map<br />
Add the colours for each<br />
land use type<br />
• Left click on the layer final land use<br />
plan , and then Properties/Symbology<br />
. In the Legend type, select<br />
Unique value , and in Classification<br />
field, select the Land_use_type attribute<br />
. Then Classify . Each land use<br />
will be automatically associated with<br />
colours (see below). However to be<br />
consistent, a specific colour should<br />
be associated with each land use.<br />
Add the boundary and<br />
select the colour<br />
• Click on Add vector Layer / Browse<br />
, find the shapefiles of the boundary.<br />
Then Open and Open again.