iDEAl EsPRit - Ideal Heating
iDEAl EsPRit - Ideal Heating
iDEAl EsPRit - Ideal Heating

You also want an ePaper? Increase the reach of your titles
YUMPU automatically turns print PDFs into web optimized ePapers that Google loves.
SERVICING<br />
40<br />
SERVICING<br />
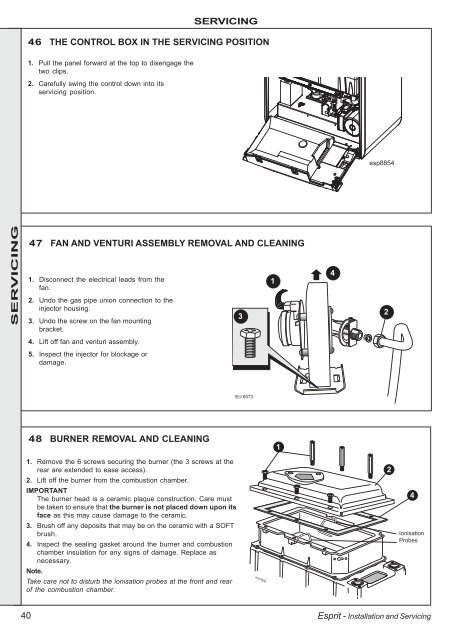
46 THE CONTROL BOX IN THE SERVICING POSITION<br />
1. Pull the panel forward at the top to disengage the<br />
two clips.<br />
2. Carefully swing the control down into its<br />
servicing position.<br />
47 FAN AND VENTURI ASSEMBLY REMOVAL AND CLEANING<br />
1. Disconnect the electrical leads from the<br />
fan.<br />
2. Undo the gas pipe union connection to the<br />
injector housing.<br />
3. Undo the screw on the fan mounting<br />
bracket.<br />
4. Lift off fan and venturi assembly.<br />
5. Inspect the injector for blockage or<br />
damage.<br />
48 BURNER REMOVAL AND CLEANING<br />
1. Remove the 6 screws securing the burner (the 3 screws at the<br />
rear are extended to ease access).<br />
2. Lift off the burner from the combustion chamber.<br />
IMPORTANT<br />
The burner head is a ceramic plaque construction. Care must<br />
be taken to ensure that the burner is not placed down upon its<br />
face as this may cause damage to the ceramic.<br />
3. Brush off any deposits that may be on the ceramic with a SOFT<br />
brush.<br />
4. Inspect the sealing gasket around the burner and combustion<br />
chamber insulation for any signs of damage. Replace as<br />
necessary.<br />
Note.<br />
Take care not to disturb the ionisation probes at the front and rear<br />
of the combustion chamber.<br />
3<br />
Ecl 6073<br />
nm7400<br />
1<br />
1<br />
4<br />
esp8854<br />
Esprit - Installation and Servicing<br />
2<br />
2<br />
4<br />
Ionisation<br />
Probes