iDEAl EsPRit - Ideal Heating
iDEAl EsPRit - Ideal Heating
iDEAl EsPRit - Ideal Heating

You also want an ePaper? Increase the reach of your titles
YUMPU automatically turns print PDFs into web optimized ePapers that Google loves.
SERVICING<br />
58<br />
SERVICING<br />
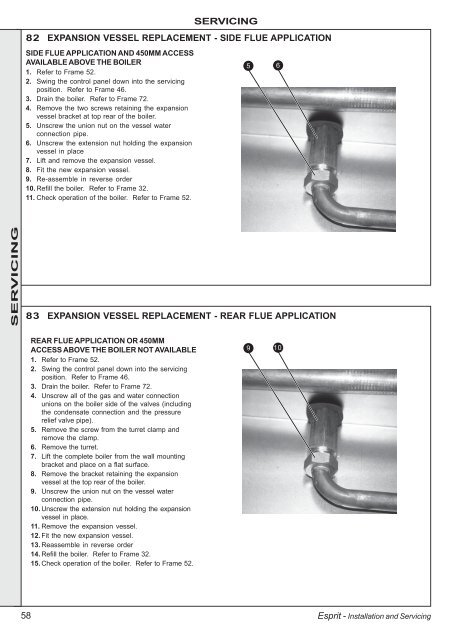
82 EXPANSION VESSEL REPLACEMENT - SIDE FLUE APPLICATION<br />
SIDE FLUE APPLICATION AND 450MM ACCESS<br />
AVAILABLE ABOVE THE BOILER<br />
1. Refer to Frame 52.<br />
2. Swing the control panel down into the servicing<br />
position. Refer to Frame 46.<br />
3. Drain the boiler. Refer to Frame 72.<br />
4. Remove the two screws retaining the expansion<br />
vessel bracket at top rear of the boiler.<br />
5. Unscrew the union nut on the vessel water<br />
connection pipe.<br />
6. Unscrew the extension nut holding the expansion<br />
vessel in place<br />
7. Lift and remove the expansion vessel.<br />
8. Fit the new expansion vessel.<br />
9. Re-assemble in reverse order<br />
10. Refill the boiler. Refer to Frame 32.<br />
11. Check operation of the boiler. Refer to Frame 52.<br />
83 EXPANSION VESSEL REPLACEMENT - REAR FLUE APPLICATION<br />
REAR FLUE APPLICATION OR 450MM<br />
ACCESS ABOVE THE BOILER NOT AVAILABLE<br />
1. Refer to Frame 52.<br />
2. Swing the control panel down into the servicing<br />
position. Refer to Frame 46.<br />
3. Drain the boiler. Refer to Frame 72.<br />
4. Unscrew all of the gas and water connection<br />
unions on the boiler side of the valves (including<br />
the condensate connection and the pressure<br />
relief valve pipe).<br />
5. Remove the screw from the turret clamp and<br />
remove the clamp.<br />
6. Remove the turret.<br />
7. Lift the complete boiler from the wall mounting<br />
bracket and place on a flat surface.<br />
8. Remove the bracket retaining the expansion<br />
vessel at the top rear of the boiler.<br />
9. Unscrew the union nut on the vessel water<br />
connection pipe.<br />
10. Unscrew the extension nut holding the expansion<br />
vessel in place.<br />
11. Remove the expansion vessel.<br />
12. Fit the new expansion vessel.<br />
13. Reassemble in reverse order<br />
14. Refill the boiler. Refer to Frame 32.<br />
15. Check operation of the boiler. Refer to Frame 52.<br />
5<br />
9<br />
6<br />
10<br />
Esprit - Installation and Servicing