iDEAl EsPRit - Ideal Heating
iDEAl EsPRit - Ideal Heating
iDEAl EsPRit - Ideal Heating

Create successful ePaper yourself
Turn your PDF publications into a flip-book with our unique Google optimized e-Paper software.
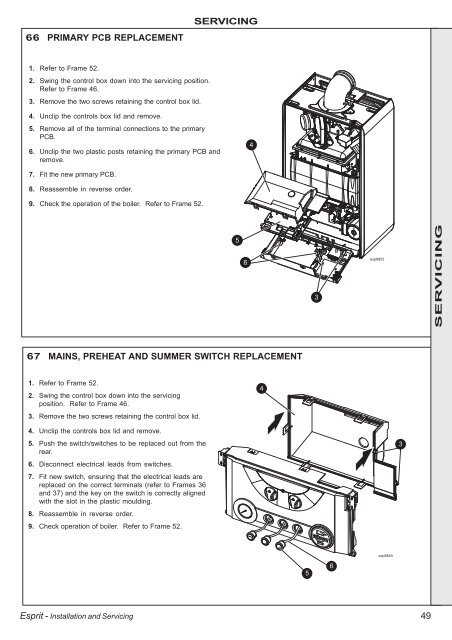
66 PRIMARY PCB REPLACEMENT<br />
1. Refer to Frame 52.<br />
2. Swing the control box down into the servicing position.<br />
Refer to Frame 46.<br />
3. Remove the two screws retaining the control box lid.<br />
4. Unclip the controls box lid and remove.<br />
5. Remove all of the terminal connections to the primary<br />
PCB.<br />
6. Unclip the two plastic posts retaining the primary PCB and<br />
remove.<br />
7. Fit the new primary PCB.<br />
8. Reassemble in reverse order.<br />
9. Check the operation of the boiler. Refer to Frame 52.<br />
Esprit - Installation and Servicing<br />
SERVICING<br />
67 MAINS, PREHEAT AND SUMMER SWITCH REPLACEMENT<br />
1. Refer to Frame 52.<br />
2. Swing the control box down into the servicing<br />
position. Refer to Frame 46.<br />
3. Remove the two screws retaining the control box lid.<br />
4. Unclip the controls box lid and remove.<br />
5. Push the switch/switches to be replaced out from the<br />
rear.<br />
6. Disconnect electrical leads from switches.<br />
7. Fit new switch, ensuring that the electrical leads are<br />
replaced on the correct terminals (refer to Frames 36<br />
and 37) and the key on the switch is correctly aligned<br />
with the slot in the plastic moulding.<br />
8. Reassemble in reverse order.<br />
9. Check operation of boiler. Refer to Frame 52.<br />
5<br />
6<br />
4<br />
4<br />
5<br />
3<br />
6<br />
esp8853<br />
esp8849<br />
3<br />
49<br />
SERVICING