iDEAl EsPRit - Ideal Heating
iDEAl EsPRit - Ideal Heating
iDEAl EsPRit - Ideal Heating

You also want an ePaper? Increase the reach of your titles
YUMPU automatically turns print PDFs into web optimized ePapers that Google loves.
SERVICING<br />
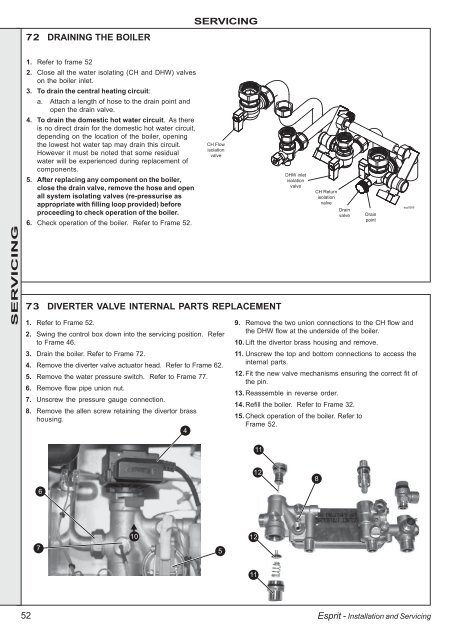
72 DRAINING THE BOILER<br />
1. Refer to frame 52<br />
2. Close all the water isolating (CH and DHW) valves<br />
on the boiler inlet.<br />
3. To drain the central heating circuit:<br />
a. Attach a length of hose to the drain point and<br />
open the drain valve.<br />
4. To drain the domestic hot water circuit. As there<br />
is no direct drain for the domestic hot water circuit,<br />
depending on the location of the boiler, opening<br />
the lowest hot water tap may drain this circuit.<br />
However it must be noted that some residual<br />
water will be experienced during replacement of<br />
components.<br />
5. After replacing any component on the boiler,<br />
close the drain valve, remove the hose and open<br />
all system isolating valves (re-pressurise as<br />
appropriate with filling loop provided) before<br />
proceeding to check operation of the boiler.<br />
6. Check operation of the boiler. Refer to Frame 52.<br />
52<br />
SERVICING<br />
73 DIVERTER VALVE INTERNAL PARTS REPLACEMENT<br />
1. Refer to Frame 52.<br />
2. Swing the control box down into the servicing position. Refer<br />
to Frame 46.<br />
3. Drain the boiler. Refer to Frame 72.<br />
4. Remove the diverter valve actuator head. Refer to Frame 62.<br />
5. Remove the water pressure switch. Refer to Frame 77.<br />
6. Remove flow pipe union nut.<br />
7. Unscrew the pressure gauge connection.<br />
8. Remove the allen screw retaining the divertor brass<br />
housing.<br />
4<br />
6<br />
7<br />
10<br />
CH Flow<br />
isolation<br />
valve<br />
5<br />
9. Remove the two union connections to the CH flow and<br />
the DHW flow at the underside of the boiler.<br />
10. Lift the divertor brass housing and remove.<br />
11. Unscrew the top and bottom connections to access the<br />
internal parts.<br />
12. Fit the new valve mechanisms ensuring the correct fit of<br />
the pin.<br />
13. Reassemble in reverse order.<br />
14. Refill the boiler. Refer to Frame 32.<br />
15. Check operation of the boiler. Refer to<br />
Frame 52.<br />
12<br />
11<br />
11<br />
12<br />
DHW inlet<br />
isolation<br />
valve<br />
CH Return<br />
isolation<br />
valve<br />
8<br />
Drain<br />
valve<br />
Drain<br />
point<br />
esp9266<br />
Esprit - Installation and Servicing