iDEAl EsPRit - Ideal Heating
iDEAl EsPRit - Ideal Heating
iDEAl EsPRit - Ideal Heating

You also want an ePaper? Increase the reach of your titles
YUMPU automatically turns print PDFs into web optimized ePapers that Google loves.
SERVICING<br />
44<br />
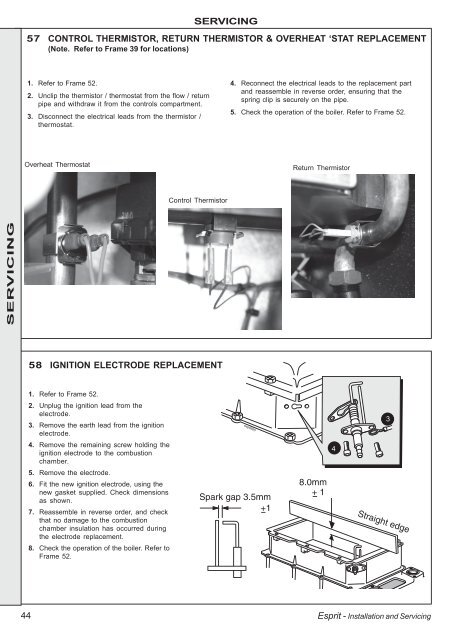
58 IGNITION ELECTRODE REPLACEMENT<br />
1. Refer to Frame 52.<br />
2. Unplug the ignition lead from the<br />
electrode.<br />
3. Remove the earth lead from the ignition<br />
electrode.<br />
4. Remove the remaining screw holding the<br />
ignition electrode to the combustion<br />
chamber.<br />
5. Remove the electrode.<br />
6. Fit the new ignition electrode, using the<br />
new gasket supplied. Check dimensions<br />
as shown.<br />
7. Reassemble in reverse order, and check<br />
that no damage to the combustion<br />
chamber insulation has occurred during<br />
the electrode replacement.<br />
8. Check the operation of the boiler. Refer to<br />
Frame 52.<br />
SERVICING<br />
57 CONTROL THERMISTOR, RETURN THERMISTOR & OVERHEAT ‘STAT REPLACEMENT<br />
(Note. Refer to Frame 39 for locations)<br />
1. Refer to Frame 52.<br />
2. Unclip the thermistor / thermostat from the flow / return<br />
pipe and withdraw it from the controls compartment.<br />
3. Disconnect the electrical leads from the thermistor /<br />
thermostat.<br />
Overheat Thermostat<br />
Control Thermistor<br />
4. Reconnect the electrical leads to the replacement part<br />
and reassemble in reverse order, ensuring that the<br />
spring clip is securely on the pipe.<br />
5. Check the operation of the boiler. Refer to Frame 52.<br />
esp8865<br />
Return Thermistor<br />
4<br />
Esprit - Installation and Servicing<br />
3