
Create successful ePaper yourself
Turn your PDF publications into a flip-book with our unique Google optimized e-Paper software.
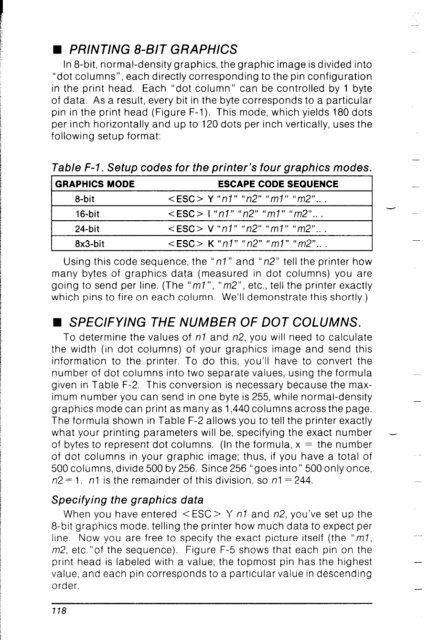
• PRINTING 8-61-r GRAPHICS<br />
In 8-bit, normal-density graphics, the graphic image is divided into<br />
“dot columns”, each directly corresponding to the pin configuration<br />
in the print head. Each “dot column” can be controlled by 1 byte<br />
of data. As a result, every bit in the byte corresponds to a particular<br />
pin in the print head (Figure F-l). This mode, which yields 180 dots<br />
per inch horizontally and up to 120 dots per inch vertically, uses the<br />
following setup format:<br />
Table F-l. Setup codes for the printer’s four graphics modes.<br />
GRAPHICS MODE<br />
ESCAPE CODE SEQUENCE<br />
8-bit<br />
Y “nl” “n2” “ml” “m2”.. .<br />
16-bit<br />
I “nl” “172” “ml” “m.‘.. .<br />
24-bit<br />
< ESC> V “nl *I “n2” “ml” “m2”.. .<br />
8x3-bit<br />
K “n” “n2” “ml” “n-L..<br />
Using this code sequence, the “r-t” and “n2” tell the printer how<br />
many bytes of graphics data (measured in dot columns) you are<br />
going to send per line. (The “ml”, “m2”, etc., tell the printer exactly<br />
which pins to fire on each column. We’ll demonstrate this shortly.)<br />
-<br />
H SPECIFYING THE NUMBER OF DOT COLUMNS.<br />
To determine the values of nl and n2, you will need to calculate<br />
the width (in dot columns) of your graphics image and send this<br />
information to the printer. To do this, you’ll have to convert the<br />
number of dot columns into two separate values, using the formula<br />
given in Table F-2. This conversion is necessary because the maximum<br />
number you can send in one byte is 255, while normal-density<br />
graphics mode can print as many as 1,440 columns across the page.<br />
The formula shown in Table F-2 allows you to tell the printer exactly<br />
what your printing parameters will be, specifying the exact number -<br />
of bytes to represent dot columns. (In the formula, x = the number<br />
of dot columns in your graphic image; thus, if you have a total of<br />
500 columns, divide 500 by 256. Since 256 “goes into” 500 only once,<br />
n2 = 1. nl is the remainder of this division, so nl = 244.<br />
Specifying the graphics data<br />
When you have entered < ESC > Y nl and n2, you’ve set up the<br />
8-bit graphics mode, telling the printer how much data to expect per<br />
line. Now you are free to specify the exact picture itself (the “ml,<br />
m2, etc.“of the sequence). Figure F-5 shows that each pin on the<br />
print head is labeled with a value; the topmost pin has the highest<br />
value, and each pin corresponds to a particular value in descending<br />
order.<br />
778